- Before You Start
- Materials & Tools Needed
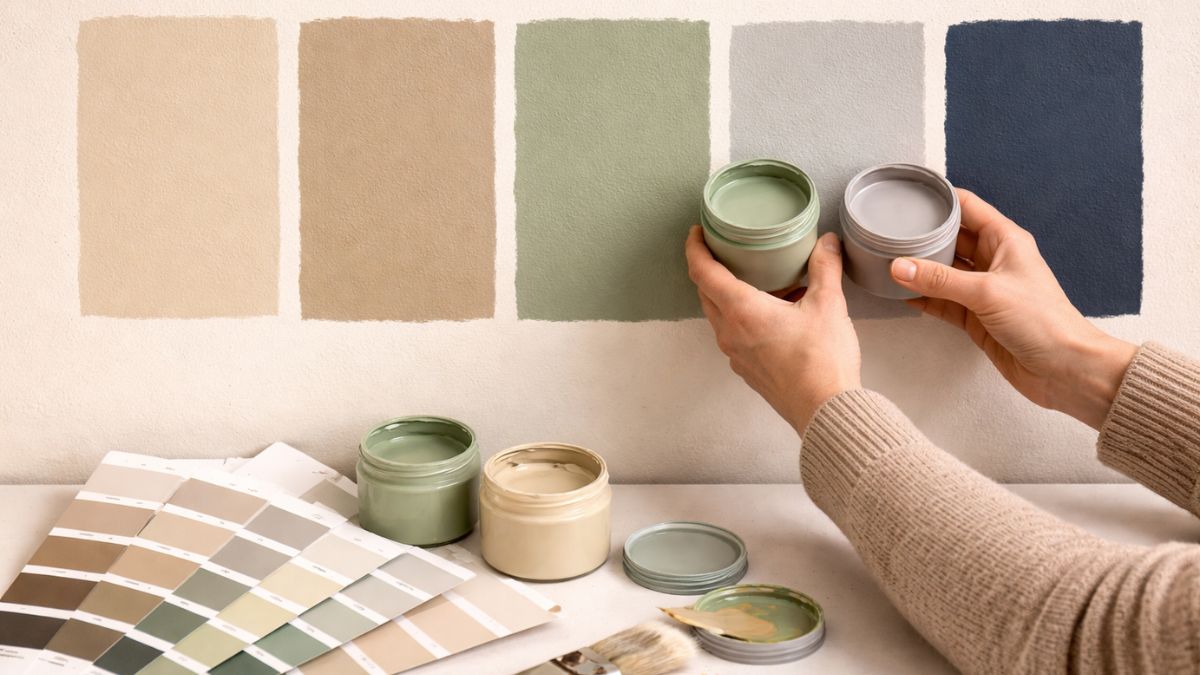
- Step 1 — Choose Your Paint & Finish
- Step 2 — Prep the Room
- Step 3 — Clean & Repair the Walls
- Step 4 — Tape & Protect Surfaces
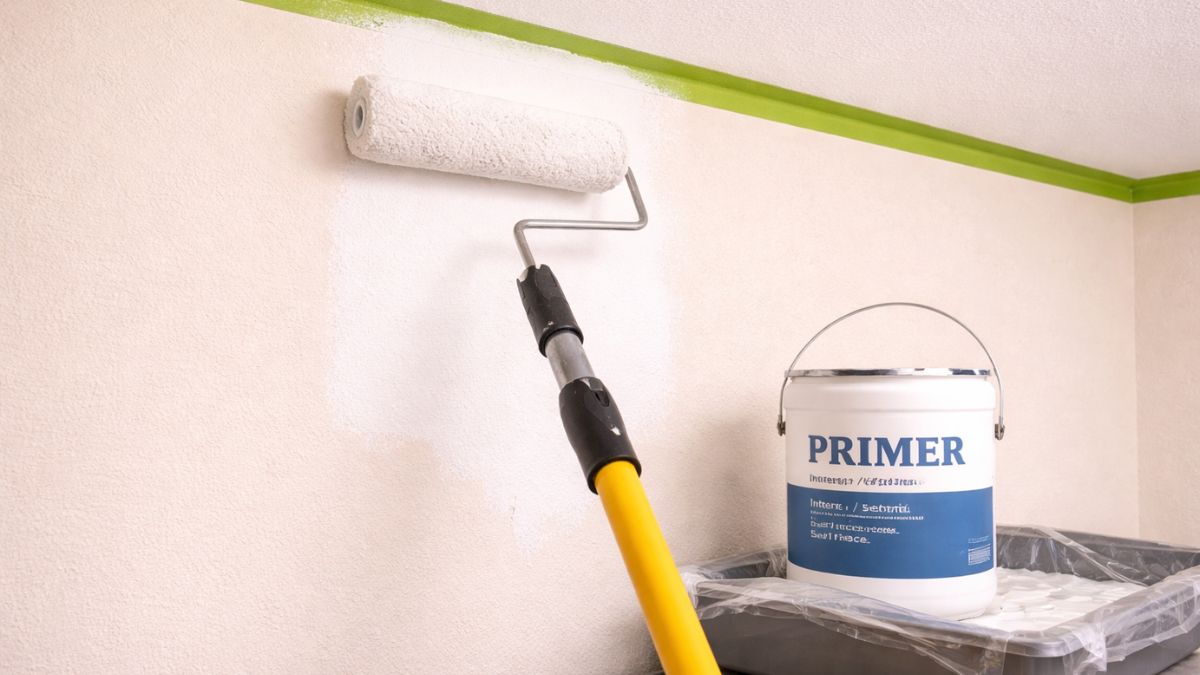
- Step 5 — Apply Primer
- Step 6 — Cut In the Edges
- Step 7 — Roll the Walls
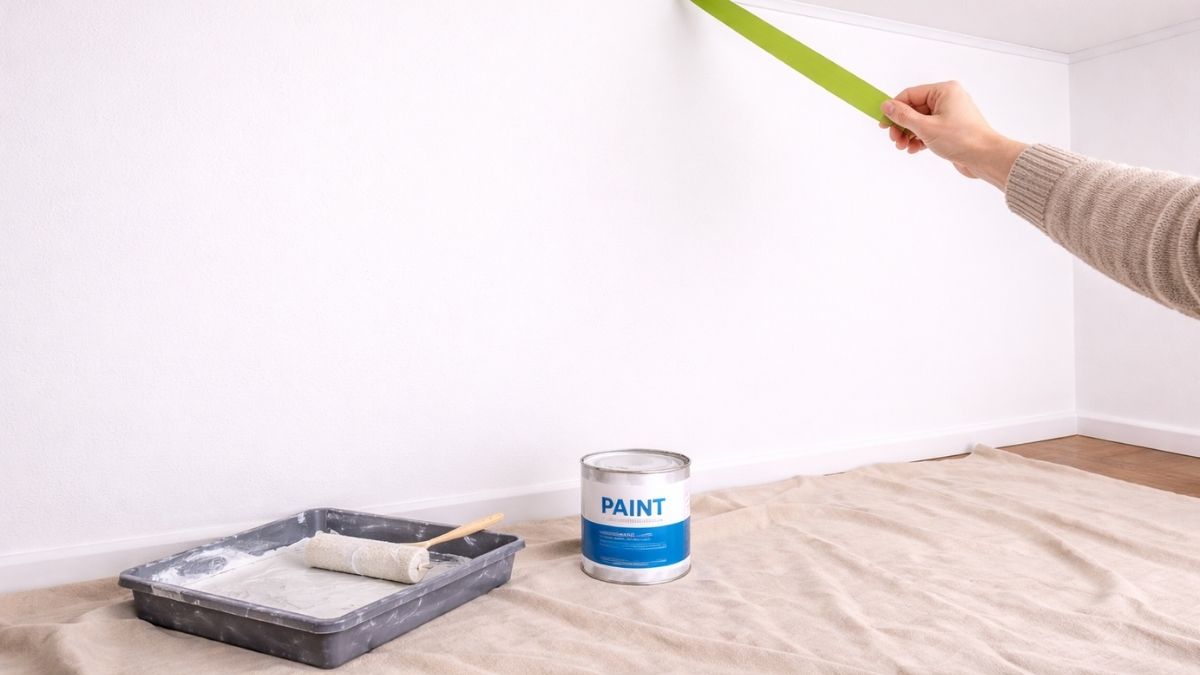
- Step 8 — Second Coat & Finish Up
- Pro Tips & Common Mistakes
- FAQs
Before You Start
Painting a room is the highest-ROI home improvement project you can do — transforming a space completely for a few hundred dollars and a day of work. Professional interior painting costs $2–$6 per square foot of wall area, or $600–$2,000+ for a standard 12×14 ft bedroom. DIY materials for the same room run $80–$200. The difference is pure labor savings.
But a paint job only looks as good as the prep work behind it. A professional painter spends 60–70% of their time on prep — cleaning, patching, taping, and priming — and only 30–40% actually painting. Skipping prep is how DIY paint jobs end up looking DIY.
How Much Paint Do You Need?
One gallon of interior paint covers approximately 350–400 sq ft per coat. To calculate your wall area, measure each wall's width and height, add them up, then subtract door and window areas (roughly 20 sq ft per door, 15 sq ft per window). Use our paint calculator to get an exact gallon count for your room with a built-in waste factor — this prevents you from running short mid-wall or over-buying.
Is This a Good Beginner Project?
Absolutely — painting a room is the most beginner-friendly interior renovation project. No special skills required, no permits needed, and mistakes are easy to fix by painting over them. The learning curve is entirely in the prep and technique, both of which this guide covers in full.
Use our Paint Calculator to find exactly how many gallons you need for walls, ceiling, and trim — all in one tool. Buying the right amount on your first trip saves the hassle of a second store run or wasted paint.
Materials & Tools Needed
You don't need expensive tools to paint a room well — but you do need the right ones. Using cheap brushes and rollers is the single most common cause of poor DIY paint results. Quality applicators make an enormous difference in finish quality and speed. Use our paint calculator to nail your gallon count before buying.
Materials
| Material | Purpose | Quantity Guide |
|---|---|---|
| Interior latex paint | Wall color | Use paint calculator — typically 1–2 gallons per room |
| Primer | Seal surface, improve adhesion | 1 gallon covers ~350 sq ft |
| Painter's tape (1½" or 2") | Protect trim, ceiling, outlets | 2–4 rolls per room |
| Drop cloths (canvas or plastic) | Protect floors and furniture | 2–3 per room |
| Spackling compound | Fill nail holes and small cracks | 1 small tub per room |
| Sandpaper (120 & 220 grit) | Smooth repairs and surfaces | 1 pack each |
| TSP cleaner or sugar soap | Degrease walls before painting | 1 bottle per room |
| Caulk (paintable latex) | Seal gaps at trim and corners | 1–2 tubes |
Tools
- 2½" angled sash brush — for cutting in edges, corners, and trim. Buy quality — cheap brushes leave bristle marks.
- 9" roller frame + ½" nap roller covers — for rolling walls. ½" nap for smooth to slightly textured walls; ¾" nap for heavily textured walls.
- Paint tray + liner — for loading the roller
- Extension pole (4–6 ft) — for rolling ceilings and upper walls without a ladder
- Putty knife (3" and 6") — for applying and feathering spackling
- Sanding sponge — for feathering patched areas
- Screwdriver — for removing outlet covers and switch plates
- Bucket + roller screen — for larger jobs, faster loading than a tray
- Step ladder — for reaching ceiling corners
- Old clothes or paint suit — interior latex paint doesn't wash out easily once dry
The paint you choose determines both how the room looks and how long it lasts. Two decisions matter most: color and sheen level. Most people spend all their time on color and underestimate sheen — but sheen is what determines durability, cleanability, and how the color looks in different lighting conditions.
Paint Sheen Guide
| Sheen | Best For | Durability | Washable |
|---|---|---|---|
| Flat / Matte | Ceilings, low-traffic bedrooms, hiding imperfections | Low | No |
| Eggshell | Living rooms, bedrooms, dining rooms | Moderate | Light cleaning |
| Satin | Kitchens, bathrooms, kids' rooms, hallways | Good | Yes |
| Semi-Gloss | Trim, doors, cabinets, bathrooms | Very Good | Yes |
| Gloss | Trim, furniture, accent features | Excellent | Yes |
- Buy a sample first — always test paint colors on the actual wall before buying full gallons. Paint a 12×12 inch swatch and observe it at different times of day and under artificial light. Colors look dramatically different on a wall vs a chip card at the store.
- Choose quality paint — mid-range and premium paints (Sherwin-Williams Emerald, Benjamin Moore Aura, Behr Ultra) provide better coverage, richer color, and longer life than budget paints. The extra $15–$25 per gallon is almost always worth it — better coverage means fewer coats and less total paint used.
- Calculate gallons needed — use our paint calculator before going to the store. For a typical 12×14 ft bedroom with 9 ft ceilings, you'll need approximately 2 gallons for walls (2 coats) and 1 quart for trim.
- Buy all paint from the same batch — if you need multiple cans of the same color, ask the store to box (combine and stir) them together. Slight color variation between cans is possible even in the same color, and boxing eliminates any inconsistency.
A classic interior design formula: use your dominant color on 60% of the room (walls), a secondary color on 30% (trim, furniture), and an accent color on 10% (pillows, art, accessories). This creates visual balance without being overwhelming. It works for any color palette from neutral to bold.
Good prep is what separates a paint job that lasts 8–10 years from one that starts peeling in 2. This step isn't glamorous but it's where professionals spend most of their time — and where most DIYers cut corners that they later regret.
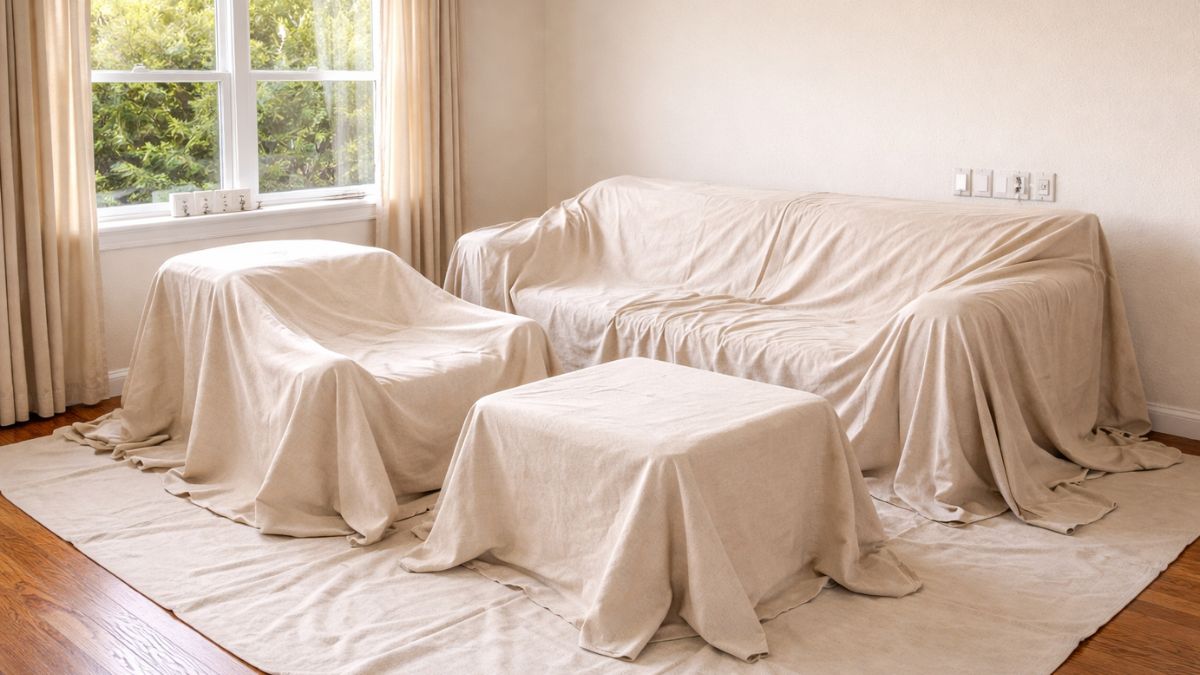
- Clear the room — move all furniture to the center of the room and cover with drop cloths, or move it out entirely if space allows. The more access you have to walls and baseboards, the faster and cleaner the job goes.
- Remove outlet covers and switch plates — unscrew every outlet cover and switch plate and set them aside in a zip-lock bag with their screws. Painting around them (or taping them) always looks sloppy — removing them takes 2 minutes and gives a much cleaner result.
- Remove curtain rods and wall hardware — take down anything that's mounted on the wall. Fill the holes if they won't be re-used, or leave them for now and fill after painting if the hardware goes back in the same spot.
- Lay drop cloths — cover the entire floor with canvas or plastic drop cloths. Canvas is better — it absorbs drips and doesn't slip underfoot like plastic. Tape the edges of drop cloths to the baseboard to keep them from shifting.
- Ventilate the room — open windows and run a fan exhausting air out of the room. Even low-VOC latex paint benefits from good ventilation during application and drying.
If you're painting as part of a larger home renovation — for example, after installing new LVP flooring or completing a bathroom remodel — always paint before installing new flooring or fixtures. Paint drips on new floors are a much bigger headache than painting around existing flooring.
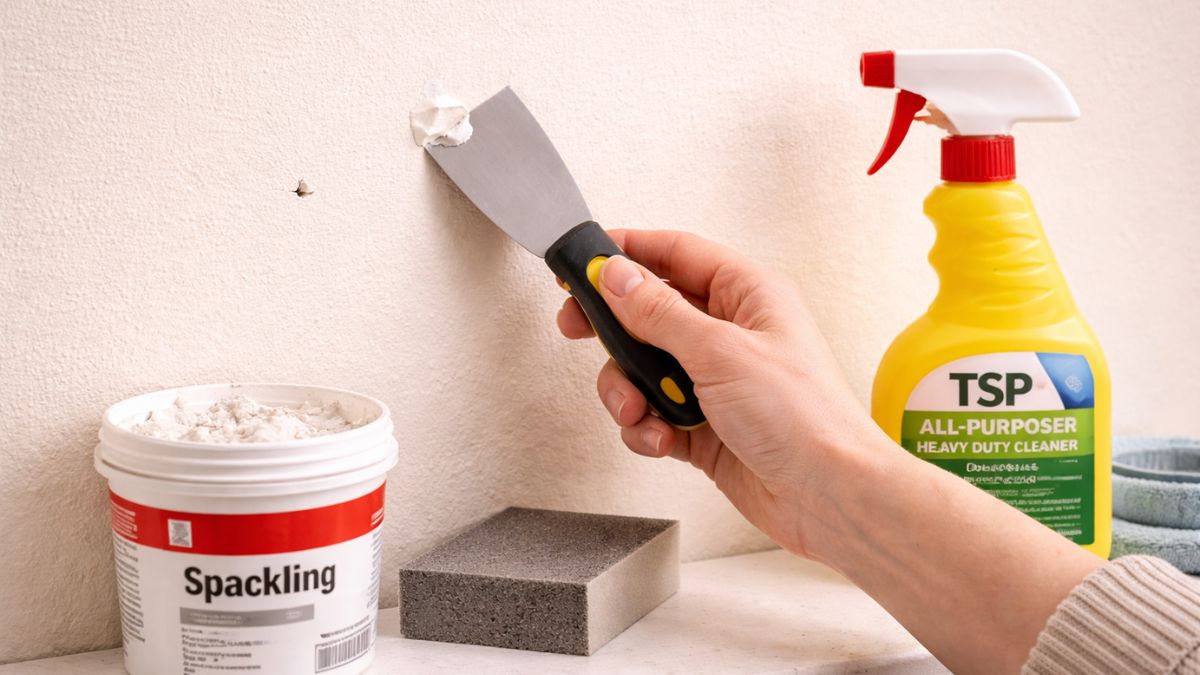
Paint does not bond well to dirty, greasy, or damaged surfaces — no matter how good the paint is. Walls in kitchens, bathrooms, and hallways accumulate grease, dust, and grime that is invisible until light catches a freshly painted surface and reveals every imperfection underneath.
- Wash the walls — mix TSP (trisodium phosphate) cleaner or sugar soap in warm water and wipe down every wall surface with a sponge. Pay special attention to areas near light switches (finger grease), above stoves, and near doorways. Rinse with clean water and let dry completely — at least 2 hours — before painting.
- Fill nail holes and small cracks — apply lightweight spackling compound with a putty knife, slightly overfilling each hole. Let dry completely (follow product directions — typically 1–4 hours). Sand smooth with 120-grit sandpaper, then finish with 220-grit for a seamless surface.
- Address larger cracks — hairline cracks in plaster can be filled with spackling. Larger cracks (wider than 1/16") may indicate structural movement and should be filled with flexible paintable caulk rather than rigid spackling, which will crack again.
- Sand glossy surfaces — if existing walls have a semi-gloss or gloss finish, lightly sand them with 150-grit sandpaper before priming. New paint doesn't bond well to slick surfaces — sanding creates tooth for the primer to grip.
- Caulk gaps at trim — run a thin bead of paintable latex caulk along any gaps between walls and baseboards, window trim, and door casings. Smooth with a wet finger. This is what makes a paint job look professionally finished — caulked trim lines look sharp and crisp; uncaulked ones look sloppy regardless of how well the walls are painted.
- Final dust wipe — after all repairs are dry and sanded, wipe walls down with a tack cloth or lightly damp microfiber cloth to remove all sanding dust before priming.
If you see dark spots or discoloration on walls — especially in bathrooms or behind furniture — test for mold before painting. Painting over mold doesn't kill it; it grows back through the paint within months. Clean mold with a diluted bleach solution (1 cup bleach to 1 gallon water), let dry completely, then apply a mold-resistant primer before painting. If mold covers a large area, consult a professional remediation service.
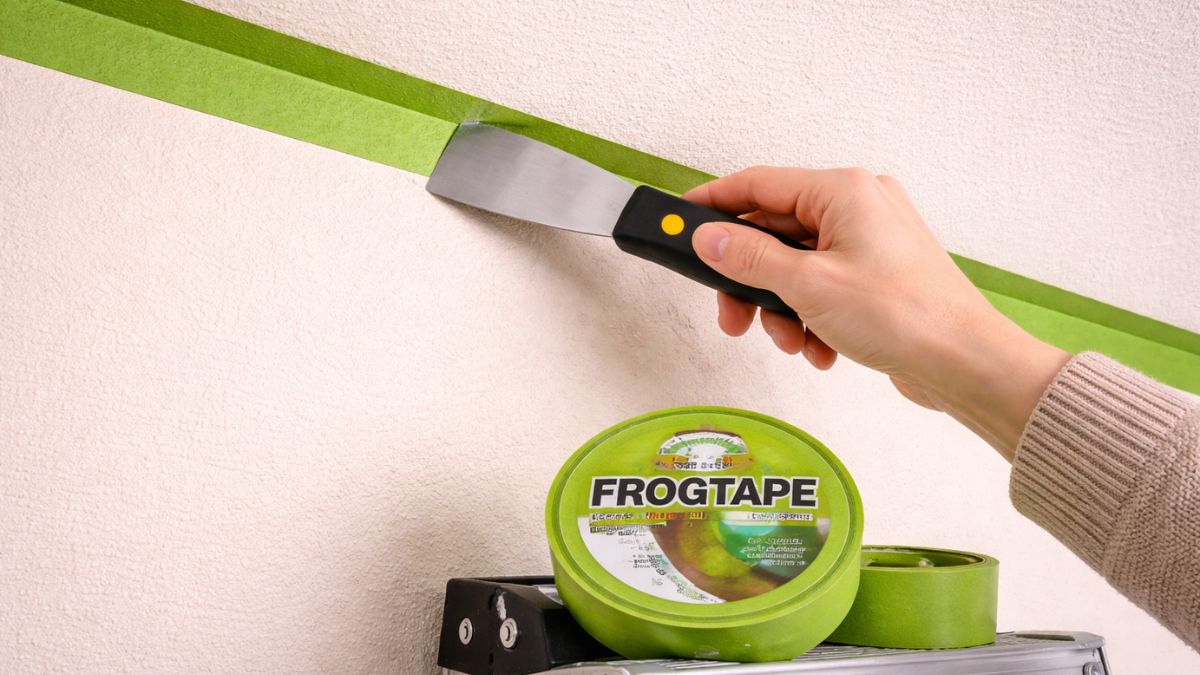
Good taping is what gives painted rooms their clean, sharp lines at ceilings, trim, and corners. Rushing through taping — or skipping it — is how walls end up with ragged edges and paint on the ceiling. Take your time here. It's faster to tape well now than to touch up later.
- Use quality painter's tape — FrogTape or 3M ScotchBlue are worth the extra cost over generic brands. They seal tighter, peel cleaner, and are less likely to allow paint bleed-through. Never use masking tape for painting — the adhesive isn't designed for it and it will tear the surface when removed.
- Tape the ceiling line — run painter's tape along the ceiling where it meets the wall. Press the tape edge firmly with a putty knife to seal it — this prevents paint from bleeding underneath. If you're also painting the ceiling, tape after the ceiling is done.
- Tape trim and baseboards — run tape along the top edge of all baseboards and along window and door trim. Again, press firmly to seal the edge.
- Cover light fixtures — if you can't remove a ceiling fixture, cover it with a plastic bag secured with tape.
- Remove tape while paint is still slightly wet — this is critical. Pulling tape off fully dry paint tears the edge and creates a jagged line. Pull tape off at a 45° angle back over itself, slowly and steadily, within 1–2 hours of finishing each coat.
After applying painter's tape, run a thin bead of the same wall paint (or a clear acrylic medium) along the tape edge with a small brush and let it dry before applying your main color. This seals any micro-gaps in the tape with the base color, ensuring any bleed-through matches the existing surface rather than the new color. Perfect lines every time.
Primer is the step most DIYers skip — and the one professionals never skip. Primer seals porous surfaces, blocks stains, improves paint adhesion, and creates a uniform base that allows topcoat color to go on true. Skipping primer almost always means an extra topcoat, which costs more in paint than the primer would have.
When You Must Prime
- New drywall or plaster (highly porous — absorbs paint unevenly without primer)
- Going from dark color to light color (primer blocks the dark from bleeding through)
- Painting over stains, smoke damage, or water marks (use stain-blocking primer)
- Painting over glossy surfaces (after sanding)
- After patching — spackled areas are more porous than surrounding wall and absorb topcoat differently, leaving visible "flashing" (dull patches)
- Apply primer the same way as paint — cut in corners and edges with a brush first, then roll the main wall areas. You only need one coat of primer in most cases.
- Spot prime patched areas at minimum — even if you don't prime the whole wall, always spot prime every spackled patch. Unprimed patches flash (appear dull or slightly different) through the topcoat.
- Let primer dry completely — most latex primers dry to touch in 1 hour and are ready to topcoat in 2–4 hours. Don't rush this — painting over tacky primer causes adhesion problems.
- Sand lightly after primer — once primer is dry, lightly sand the entire wall with 220-grit sandpaper or a fine sanding sponge. This knocks down any raised grain or primer texture and creates an ultra-smooth base for topcoat. Wipe dust with a tack cloth before painting.
Ask the paint store to tint your primer to a grey version of your topcoat color. A tinted primer gets you closer to final color in one coat and dramatically reduces the number of topcoats needed — especially when going to a bold or dark color. This is standard practice at professional paint stores and usually costs nothing extra.
Cutting in means painting a 2–3 inch band of paint along all edges — at the ceiling, at the baseboards, in corners, and around trim — using a brush before rolling the main wall area. This is the technique that defines whether your finished room looks professional or amateurish. The cut-in line is the most visible element of the finished paint job.
- Load the brush correctly — dip only the bottom third of the bristles into paint. Tap (don't wipe) the brush on the side of the bucket to remove excess. An overloaded brush drips and leaves heavy, uneven edges.
- Paint the ceiling line first — start at a corner and paint a steady, smooth stroke along the ceiling line. Keep the bristle tips just touching the ceiling — the angled brush tip naturally creates a clean straight line with practice. Work in 12–18 inch sections.
- Cut in all four edges of each wall — ceiling line, both corners, and above the baseboard. Also cut in around any outlets, switches, and fixtures.
- Keep a wet edge — work quickly enough that the cut-in paint stays wet when you roll over it. If the cut-in dries before you roll, you'll see a visible line where the brush and roller textures meet. Cutting in and rolling one wall at a time (rather than cutting in the whole room before rolling) keeps edges wet and blended.
- Use a paint shield for baseboards — instead of taping the baseboard, hold a wide putty knife or commercial paint shield against the baseboard as you paint above it. Much faster than taping and gives equally clean results.
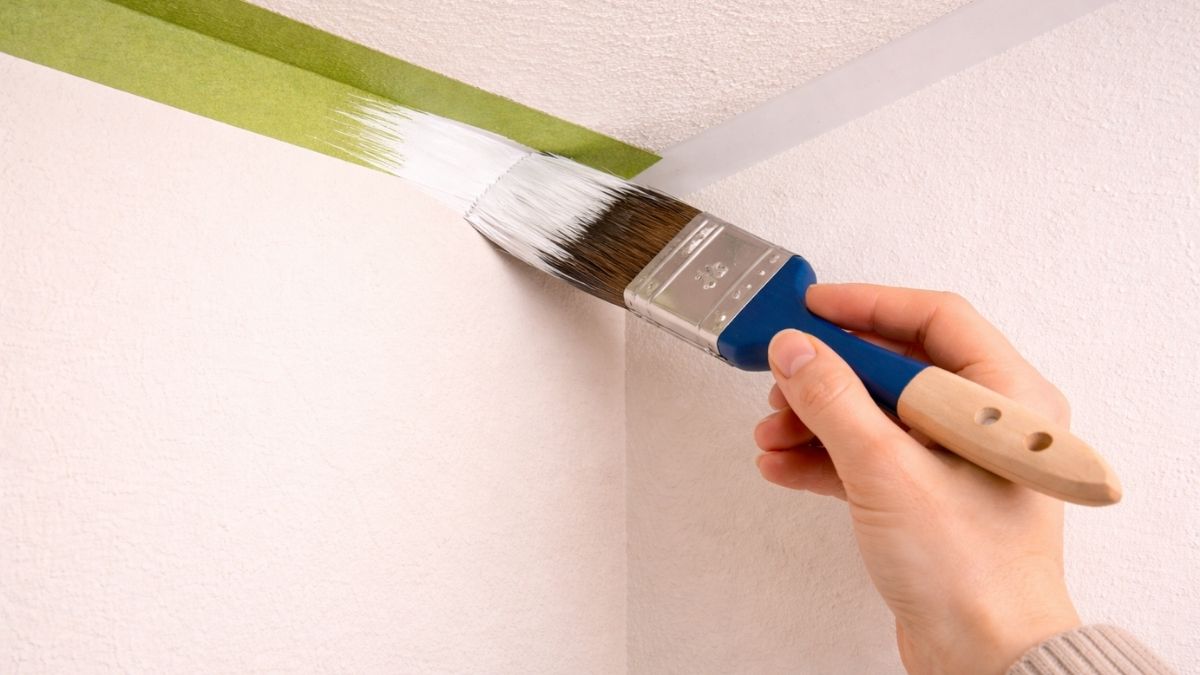
After cutting in a section, feather the outer edge of your brush strokes by lightly dragging the brush perpendicular to the wall, pulling paint away from the edge into the open wall area. This creates a gradual transition that blends seamlessly with the roller, eliminating the visible brush/roller boundary that makes cut-in lines obvious.
Rolling is the fastest and most satisfying part of painting. A 9-inch roller covers a 12×9 ft wall in under 10 minutes with good technique. The key is proper loading, the right pattern, and maintaining consistent pressure throughout.
- Load the roller properly — pour paint into a tray to the fill line. Dip the roller, then roll it back and forth on the ridged tray ramp to load evenly and remove excess. A properly loaded roller is fully covered but not dripping. Alternatively, use a 5-gallon bucket with a roller screen for larger jobs.
- Start in a corner, work in sections — begin about 12 inches from a corner (to avoid flicking paint onto the adjacent wall) and work in 3–4 ft wide vertical sections.
- Use a W or M pattern — apply paint in a large W or M shape on the wall (about 3 ft wide), then fill in the pattern with vertical strokes without reloading. This distributes paint evenly before spreading it out.
- Maintain a wet edge — always roll back into the wet paint you just applied, overlapping by 4–6 inches. Rolling into dry paint creates lap marks — visible ridges where sections meet.
- Finish with light upward strokes — at the end of each section, lightly run the roller from bottom to top in long, even strokes to smooth out texture and remove roller marks. Very light pressure on these finishing strokes.
- Work wall by wall — cut in one wall, then immediately roll it before moving to the next. Never let your cut-in dry before rolling.
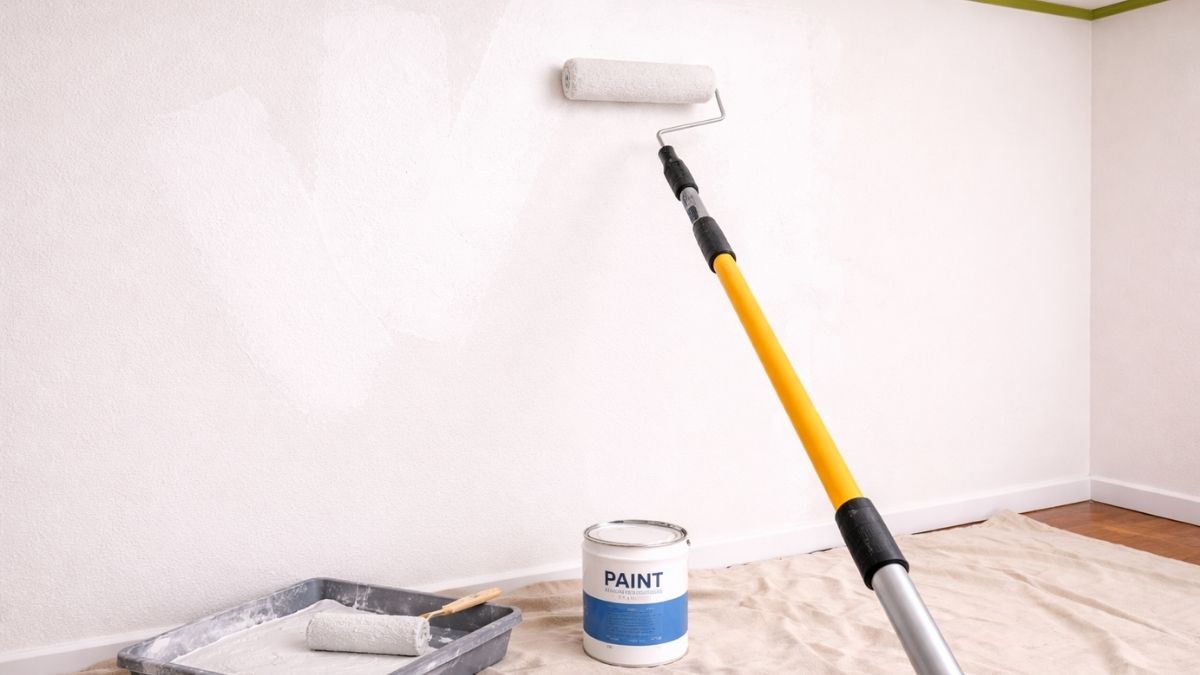
A 4–6 ft extension pole on your roller eliminates the need for a ladder for most wall heights and lets you roll from the floor in long, smooth strokes that are far more consistent than short strokes from a ladder. It also dramatically reduces fatigue on large rooms. A good extension pole costs $10–$20 and is one of the best painting tool investments you can make.
Almost every paint job requires two coats for full, even coverage and true color. The first coat seals the primer and provides a base — the second coat is where the color comes alive and coverage becomes complete. Never try to apply one very thick coat instead of two thin ones — thick coats sag, take forever to dry, and don't look as good as two proper coats.
- Wait for the first coat to dry fully — most interior latex paints are dry to touch in 1 hour but need 2–4 hours before recoating. Check the product label. Recoating too soon causes the brush or roller to pull at the first coat, leaving streaks and texture marks.
- Inspect the first coat — in good lighting (ideally with a work light held at a low angle to the wall), look for uneven coverage, missed spots, and areas where the previous color shows through. Note these areas to pay extra attention to in the second coat.
- Apply the second coat — repeat the cut-in and roll process exactly as in Steps 6 and 7. The second coat goes on faster than the first because coverage is more predictable and you already know the room.
- Remove painter's tape — while the second coat is still slightly wet (not fully dry), pull tape off slowly at a 45° angle. If the paint has dried too much and starts tearing, score along the tape edge with a utility knife before pulling.
- Touch up — once everything is dry, inspect under good lighting and touch up any thin spots, missed areas, or tape bleed-through with a small brush. Keep leftover paint in an airtight container labeled with the color name, sheen, and date for future touch-ups.
- Reassemble the room — reinstall outlet covers and switch plates, rehang curtain rods and wall hardware, move furniture back. Take your drop cloths outside to dry before folding and storing — folding wet canvas drop cloths causes mildew.
Allow 24–48 hours before hanging artwork or placing furniture directly against freshly painted walls — the paint is dry to the touch but hasn't fully hardened yet and can dent or scuff. Full paint cure takes 2–4 weeks, after which the surface can be wiped and cleaned normally. Store leftover paint in the original can, sealed tightly and stored at room temperature (not in a garage that freezes).
Pro Tips & Common Mistakes
Common Mistakes to Avoid
- Skipping prep — the most common cause of poor results. Dirty, unrepaired walls show every imperfection through paint. Prep takes longer than painting — and it's worth every minute.
- Skipping primer — especially on new drywall, after patching, or when making major color changes. Unprimed spackle flashes through topcoat even with premium paint.
- Using cheap brushes and rollers — a $4 brush leaves bristle marks. A $2 roller cover leaves heavy texture and lint in the paint. Buy quality applicators — they're the difference between a professional and an amateur finish.
- Letting cut-in dry before rolling — always cut in and roll one wall at a time. Visible brush/roller boundaries (lap marks) are the most obvious sign of poor painting technique.
- Rolling over dry paint — always maintain a wet edge when rolling. Lap marks from rolling into dried paint are very difficult to fix without repainting the entire wall.
- Pulling tape off dry paint — always remove tape while the final coat is still slightly wet. Pulling tape off fully cured paint tears the edge and requires touch-up.
- One thick coat instead of two thin coats — thick paint sags, takes days to dry, and looks uneven. Two coats of the right consistency always outperform one thick coat.
Pro Tips
- Paint the ceiling first, then walls, then trim — in that order. This way drips from higher surfaces are covered by lower ones, and you don't have to be as careful cutting in.
- Keep a wet rag in your back pocket while painting for immediate drip cleanup — dried latex paint is much harder to remove than wet.
- Never clean latex paint brushes with water immediately — first wipe as much paint out of the bristles as possible with a newspaper or rag, then rinse with water. This preserves brush shape and life significantly.
- For large rooms, use a 5-gallon bucket with a roller screen instead of a tray — it's faster to load, holds more paint, and reduces the number of refills that interrupt your rhythm.
- If painting continues the next day, wrap brushes and rollers tightly in plastic wrap and refrigerate overnight rather than cleaning them — they'll be ready to use immediately the next morning.