- Before You Start
- Materials & Tools Needed
- Step 1 — Design & Plan Your Deck
- Step 2 — Mark & Dig the Footings
- Step 3 — Pour the Concrete Footings
- Step 4 — Install the Posts
- Step 5 — Install the Ledger Board
- Step 6 — Build the Beam & Joist Frame
- Step 7 — Lay the Decking Boards
- Step 8 — Build the Stairs & Railings
- Pro Tips & Common Mistakes
- FAQs
Before You Start
Building a deck is one of the highest-ROI projects a homeowner can do — adding usable outdoor living space and significant resale value. A professionally built 12×16 ft deck costs $8,000–$20,000+ installed. Building it yourself cuts that to $2,500–$6,000 in materials, saving you the entire labor cost. But a deck is also a structural project — one that requires permits, proper footings, and code-compliant framing. Don't skip the prep steps.
Permits Are Not Optional
Almost every municipality requires a building permit for any deck attached to a house, and most require one for freestanding decks over a certain size (typically 200 sq ft or 30 inches above grade). Unpermitted decks create serious problems at resale — buyers' inspectors flag them, insurance won't cover accidents on them, and you may be forced to tear them down. Pull the permit. It typically costs $50–$200 and the inspector's review catches structural mistakes before they become dangerous.
Call 811 Before You Dig
Call 811 at least 3 business days before digging any footing holes. Underground utility lines are buried in most yards. This free service marks their locations — hitting a gas or electrical line while digging is potentially fatal. This applies even to hand-dug holes.
Is This a DIY-Friendly Project?
A simple ground-level or low-profile deck (under 30 inches above grade) is very achievable for a motivated DIYer with basic carpentry skills and access to a circular saw, drill, and level. Elevated decks over 30 inches, decks with complex framing, or decks requiring engineered drawings should involve a licensed contractor for at least the structural elements. Before buying anything, get an accurate cost estimate using our deck cost calculator.
Use our Deck Cost Calculator for a full project estimate, and our Deck Boards Calculator to find exactly how many boards you need before ordering lumber.
Materials & Tools Needed
The list below covers a standard attached ground-level deck using pressure treated lumber — the most common DIY deck build. Use our lumber cost calculator to price out your specific board quantities before heading to the lumber yard.
Materials
| Material | Purpose | Quantity Guide |
|---|---|---|
| Concrete (80 lb bags or ready-mix) | Footings | 2–3 bags per footing hole |
| Post bases / anchor brackets | Attach posts to footings | 1 per footing |
| 4×4 or 6×6 PT posts | Vertical support | 1 per footing |
| 2×8 or 2×10 PT lumber (joists & beams) | Structural frame | Per deck plan |
| 2×10 or 2×12 PT ledger board | Attaches deck to house | Full width of deck |
| 5/4×6 deck boards (PT or composite) | Walking surface | Use deck boards calculator |
| Joist hangers & post caps | Metal connectors for framing | Per framing plan |
| Structural screws / lag bolts | Framing connections | Per plan + 20% extra |
| Composite or PT railing system | Safety barrier | Per linear ft of open edge |
| Stair stringers (3×12 PT) | Stair structure | 3 per stair run |
| Flashing tape & Z-flashing | Waterproof ledger connection | Full ledger length |
Tools
- Post hole digger or rented power auger — for footings (auger rental $80–$150/day, saves hours)
- Circular saw — for cutting lumber to length
- Drill / impact driver — for structural screws and lag bolts
- Level (4 ft and 2 ft) — for posts, beams, and joists
- Speed square & framing square — for layout and squaring
- Chalk line & tape measure — for layout
- String line & line level — for layout and footing alignment
- Hammer & nail gun (optional) — for framing
- Jigsaw — for cuts around obstacles
- Safety glasses, work gloves, ear protection
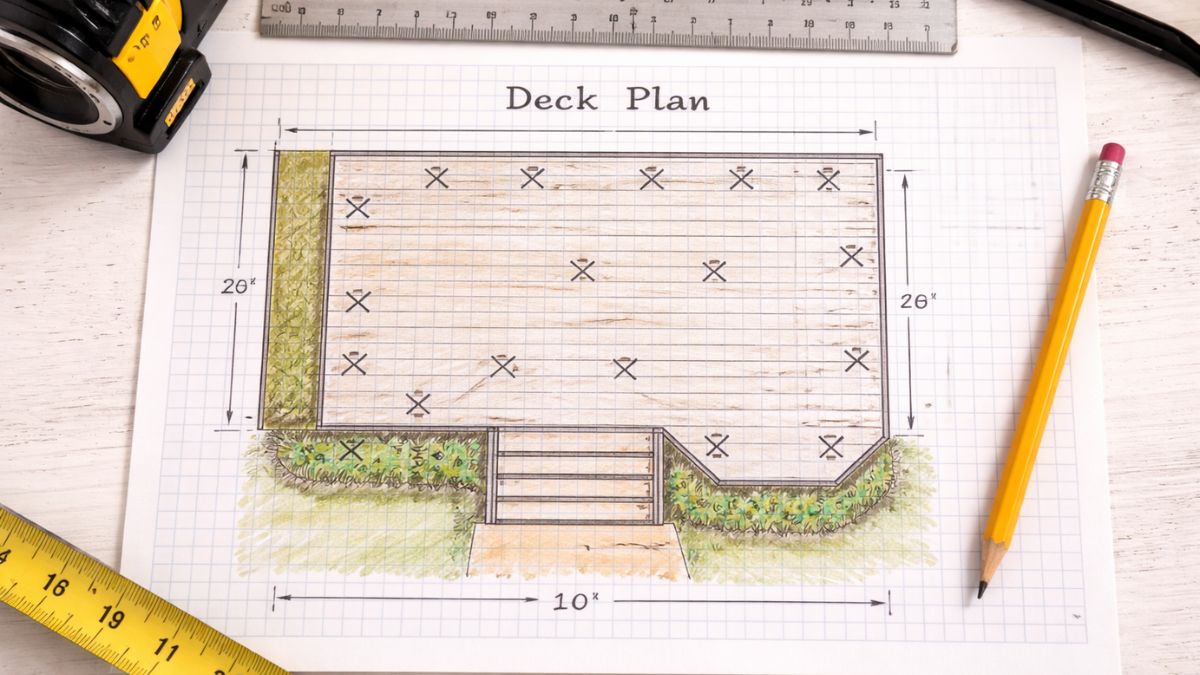
A well-planned deck starts on paper, not with lumber. Getting the design right before you buy a single board saves significant money, prevents structural errors, and makes the permit application straightforward.
- Determine size and shape — sketch the deck to scale on graph paper. A 12×16 ft (192 sq ft) deck is a practical starting size for most backyards. Use our square footage calculator to play with dimensions and confirm your total area.
- Decide on height — a deck attached to a house typically needs to match the interior floor height minus one step (about 7 inches below the door threshold). This determines post height and whether you need railings (required by code if deck surface is 30 inches or more above grade).
- Plan footing locations — footings are typically spaced 6–8 ft apart. Map out every footing on your plan. The number of footings determines your concrete order — use our concrete calculator to estimate bags needed per hole.
- Choose your decking material — pressure treated lumber is the most affordable ($1.50–$3/linear ft). Composite decking costs more upfront ($3–$8/linear ft) but requires no staining or sealing and lasts longer. Use our deck boards calculator to compare board counts for both options.
- Submit for permit — most building departments require a site plan showing the deck location relative to the house and property lines, a framing plan with footing locations and lumber sizes, and a materials list. Your permit office will tell you exactly what's needed.
Build your deck at least 5 feet from any property line and at least 3 feet from any easement. Check your local setback requirements with your municipality — violations require removal at your expense. Your permit application will flag any setback issues before you build.
Footings are the foundation of your deck — they transfer the deck's load into the ground below the frost line. Getting footing locations perfectly square and at the correct depth is critical. A footing poured in the wrong place means a post in the wrong place, which throws off every beam and joist that follows.
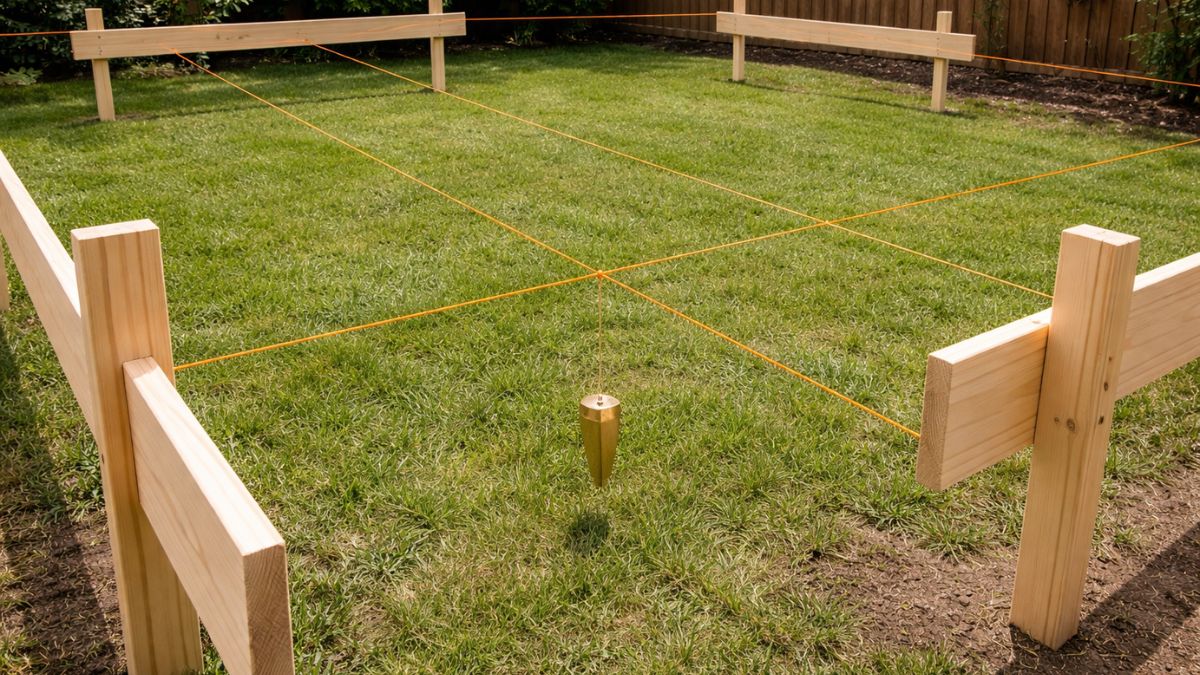
- Establish a batter board layout — set up batter boards (horizontal boards nailed to stakes) outside the deck corners and run string lines to mark the exact perimeter of the deck. This gives you a reference to work from without disturbing layout when you dig.
- Use the 3-4-5 triangle to square corners — from each corner, measure 3 ft along one string and 4 ft along the perpendicular string. The diagonal between those two points should be exactly 5 ft. If not, adjust until it is. A squared layout is essential for a deck that looks and functions correctly.
- Mark footing centers — use a plumb bob hung from the string line intersections to transfer each corner point to the ground. Mark with spray paint or a stake.
- Dig the holes — footing holes must extend below the local frost depth (check your local building code — ranges from 12 inches in mild climates to 48 inches in northern states). Diameter should be at least 12 inches, or as specified by your permit drawings.
- Add 6 inches of gravel — place compacted gravel at the bottom of each hole for drainage, preventing frost heave from pushing the footing up.
Post hole diggers work fine for soft soil and shallow frost depths. But for hard clay, rocky soil, or frost depths over 24 inches, rent a one-man or two-man power auger — it turns a 3-hour hand-digging job into 30 minutes. Most tool rental shops carry them for $80–$150/day. Well worth it for decks with 6+ footings.
Concrete footings anchor your entire deck structure. Done correctly, they'll last the life of the deck. Use our concrete calculator to confirm exactly how many 80 lb bags you need before mixing — running short mid-pour means a weak footing.
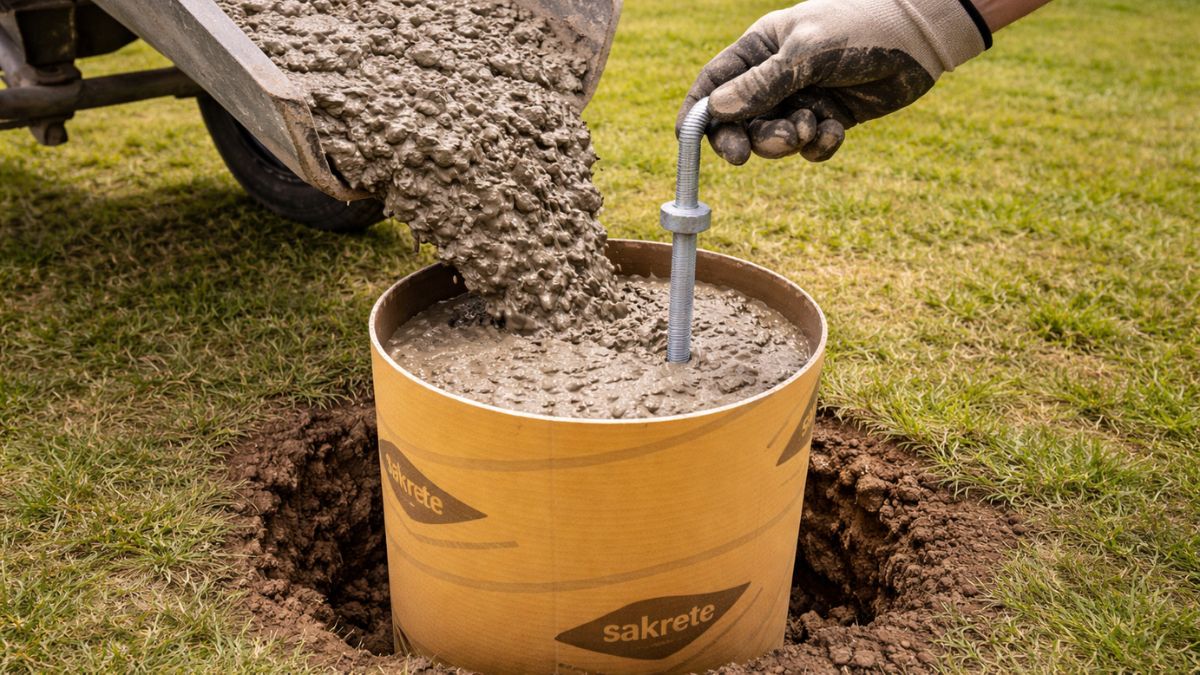
- Set tube forms (Sonotubes) — place cardboard tube forms in each hole, extending 2–4 inches above grade. These give the footing a clean cylindrical shape and keep dirt from crumbling into the wet concrete.
- Mix and pour the concrete — mix each bag per instructions (or order ready-mix for large decks). Pour into the tube form and rod the concrete with a stick to eliminate air pockets.
- Set the post base anchor — while the concrete is still wet, press a J-bolt or standoff post base into the center of each footing. Use a plumb bob and your string lines to confirm exact location before the concrete sets. This is your last chance to adjust position.
- Check alignment — all post base anchors must be perfectly aligned with your string line layout. Check with a level and tape measure from multiple reference points.
- Allow full cure — wait a minimum of 48 hours (72 hours in cold weather) before loading footings with posts and framing. Full concrete strength takes 28 days — avoid heavy loads until then.
Never pour concrete footings when ground temperature is below 40°F — concrete won't cure properly in cold conditions and the footing will be structurally weak. If you must work in cool weather, use a heated enclosure or cold-weather concrete mix and keep the pour covered and insulated for at least 48 hours.
Posts transfer the deck's load from the beams down to the footings. They must be perfectly plumb — even a slight lean multiplies into a significantly out-of-level deck surface by the time you're laying boards.
- Cut posts to rough height — cut posts slightly long (2–3 inches taller than final height). You'll trim them to exact height once they're installed and the beam is set.
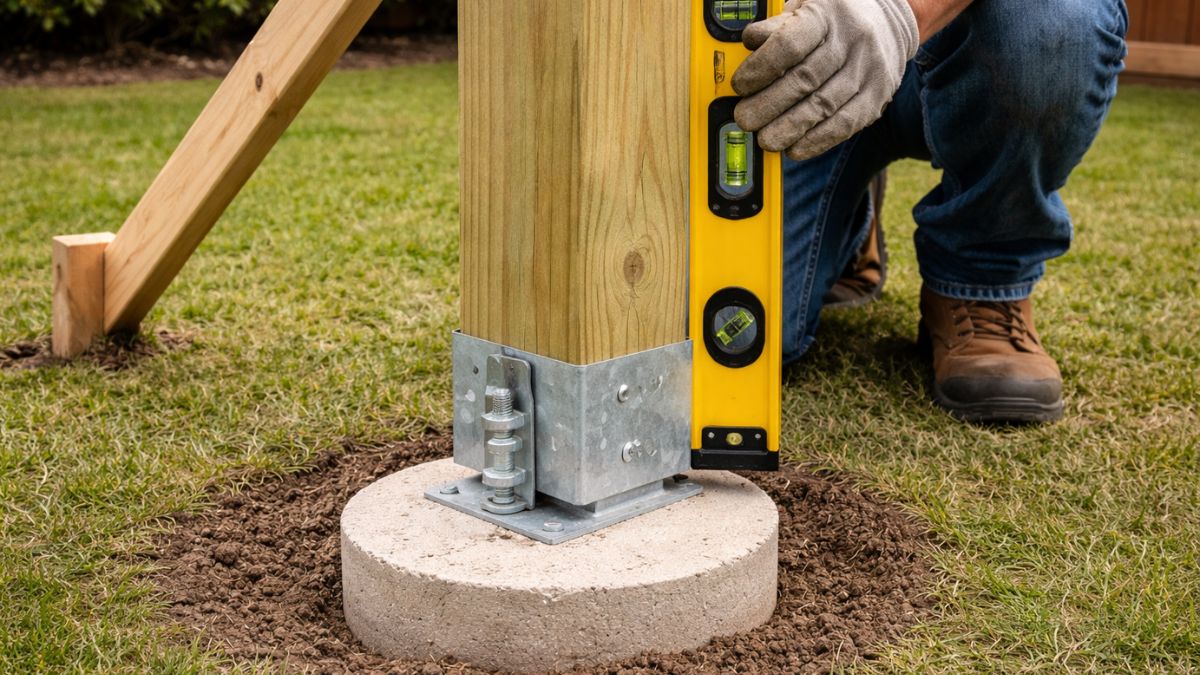
- Set posts in post bases — place each post in its standoff base and fasten with the specified hardware. For through-bolt connections, drill and bolt per the manufacturer's specifications.
- Brace posts plumb — use temporary 2×4 diagonal braces screwed to stakes in the ground to hold each post perfectly plumb in both directions. Check with a level on two adjacent faces.
- Do not permanently fasten yet — leave posts at rough height until beams are set and final heights are confirmed. You'll cut posts to final height after the beam is in place and level.
Always verify the pressure treatment rating on any lumber that will contact or be close to the ground. Posts set in post bases (above grade) require UC4A treatment minimum. Posts embedded directly in concrete or soil require UC4B. Using the wrong rating causes premature rot and structural failure. The treatment code is stamped on every piece of PT lumber.
The ledger board is the horizontal beam that attaches your deck directly to the house. It carries half the deck's load — making it one of the most structurally critical components and one of the most common failure points when installed incorrectly. Water infiltration behind a poorly flashed ledger is the leading cause of deck collapse.
- Locate the rim joist — remove siding at the ledger location to expose the house's band joist (rim joist). The ledger must attach to the structural framing of the house, not just the sheathing or siding.
- Install flashing first — apply self-adhesive flashing tape over the top of the ledger location before attaching the board. This is non-negotiable — water trapped behind the ledger rots the house framing within a few years.
- Position the ledger board — set the ledger at the correct height (door threshold height minus the deck surface thickness plus one step down, typically 7 inches). Level carefully — this sets the height of the entire deck.
- Fasten with structural lag screws — use ½" diameter × 3½" structural lag screws or approved structural bolts in a staggered pattern per the IRC code table (typically every 16 inches). Do not use regular deck screws — they are not rated for shear loads.
- Install Z-flashing — tuck metal Z-flashing under the siding above the ledger and over the top edge of the ledger board. Reinstall siding over the flashing. This creates a drip edge that directs water away from the house framing.
- Seal all penetrations — apply exterior-grade caulk around every lag bolt hole and at all siding cuts to prevent water entry.
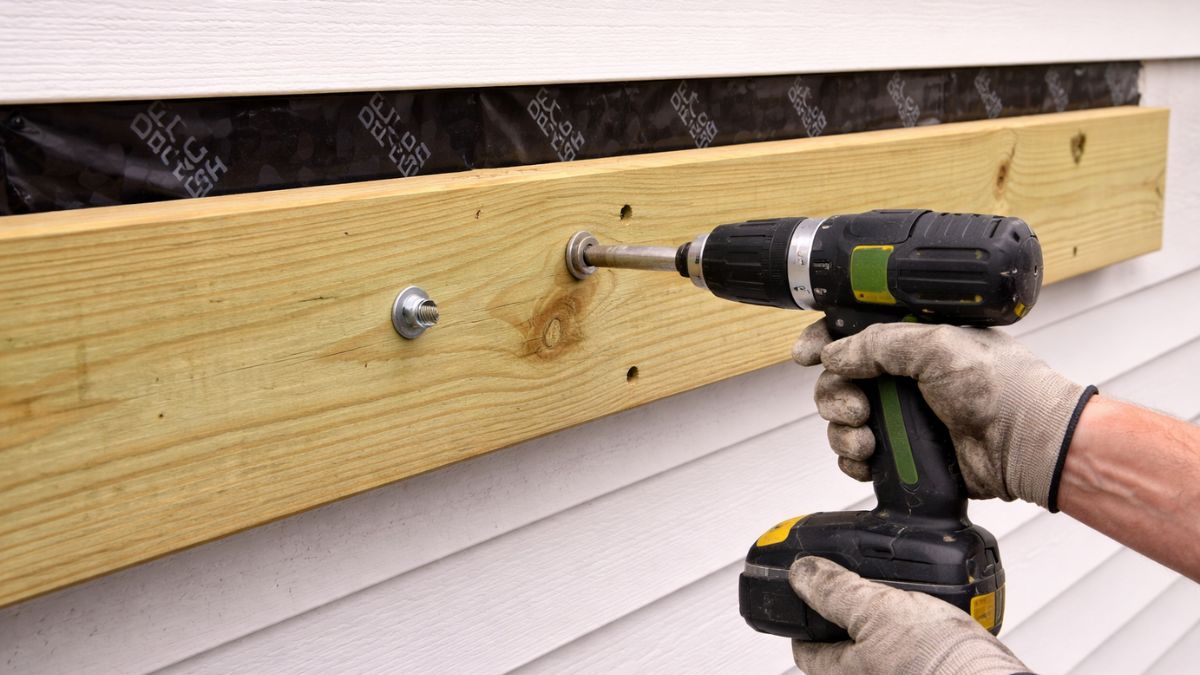
According to the North American Deck and Railing Association (NADRA), ledger board failure is the leading cause of deck collapses in the US. Never attach a ledger with nails only — use lag screws or through-bolts. Always flash the ledger — no exceptions. This step is what your building inspector will scrutinize most carefully.
With footings cured, posts set, and the ledger installed, you're ready to build the structural frame that supports the deck boards. This is the most labor-intensive part of the build — but also the most satisfying, as the deck takes shape rapidly.
- Install the beam — set the built-up beam (typically two 2×10s or 2×12s bolted together) on top of the posts using post caps. Level the beam in both directions, cut posts to final height, and secure with the specified hardware.
- Install rim joists — attach outer rim joists (same size as interior joists) to the ends of the ledger board and beam using joist hangers. These form the perimeter frame and give you a reference for all interior joist locations.
- Install interior joists — hang interior joists between the ledger board and the beam at 16 inches on center (or 12 inches for composite decking, which requires closer spacing). Use joist hangers at both ends — never toenail joists.
- Blocking at mid-span — for joists spanning more than 8 feet, install blocking (short pieces of joist material) at mid-span to prevent rotation and lateral movement. This is a code requirement in most jurisdictions.
- Check for square and level — before proceeding to decking, measure both diagonals of the frame. They should be within ¼ inch of each other. Check all joists for crown (bow upward) — install with crown up so the deck surface flattens under load.
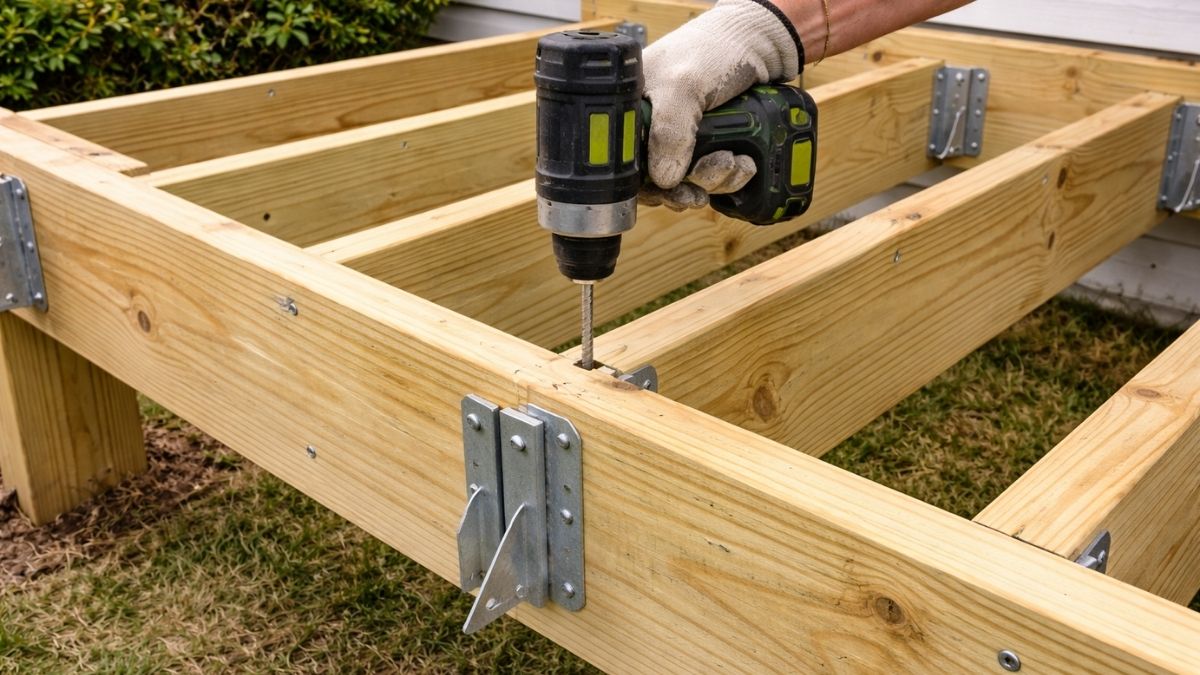
Metal joist hangers are engineered for shear loads — the forces that act perpendicular to a joist. Toenailed connections resist far less lateral force and are not code-compliant for deck framing in most jurisdictions. Use Simpson Strong-Tie or equivalent hangers at every joist-to-ledger and joist-to-rim-joist connection. Fasten with the specified joist hanger nails — regular nails are too long and split the wood.
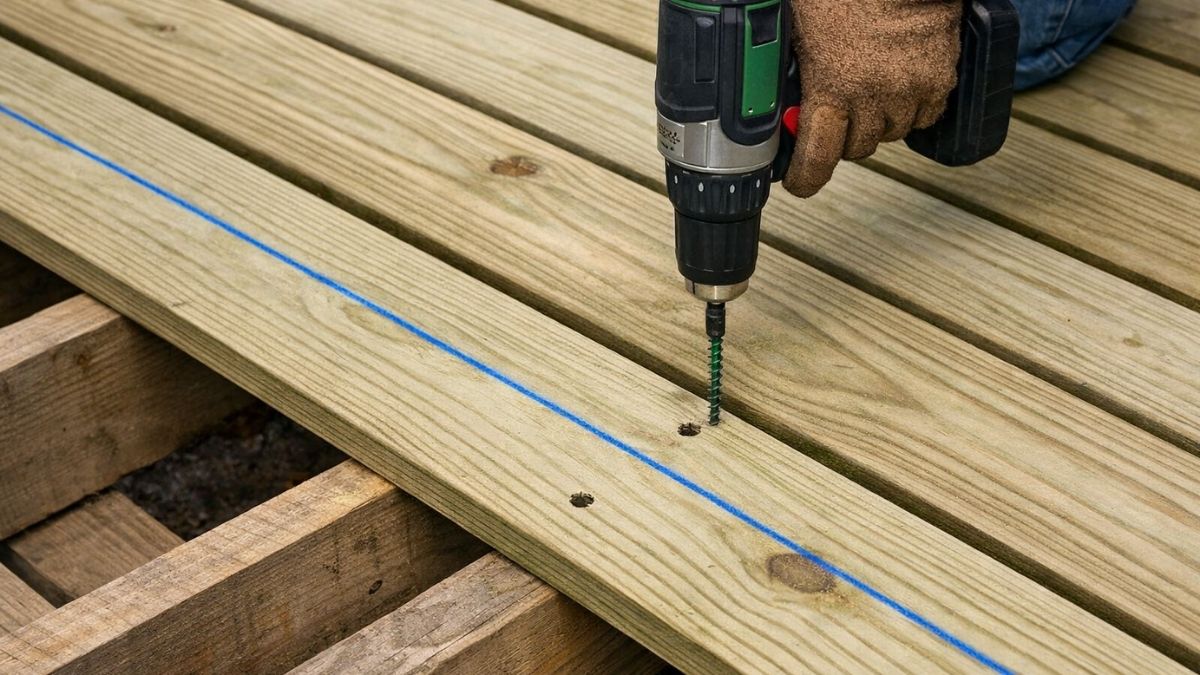
Laying deck boards is the most visible and rewarding part of the build. Take your time with spacing and fastening — gaps that are too wide look sloppy, gaps that are too narrow trap debris and moisture. Use our deck boards calculator to confirm you have the right board count before starting.
- Start at the house — begin decking at the house end (against the ledger) and work outward. The first board sets the gap at the house — leave ¼ inch between the board and any house wall for drainage and airflow.
- Maintain consistent spacing — use a 16d nail or ¼" spacer between boards as a spacing guide. This gap allows water to drain through and accommodates wood expansion in summer. Composite decking has specific spacing requirements — follow the manufacturer's installation guide.
- Fasten correctly — use two structural screws per board per joist crossing. Drive screws at a slight angle toward the joist center to prevent splitting. Pre-drill near board ends to prevent splitting.
- Stagger board ends — if boards don't run the full deck width in one piece, stagger end joints so they don't line up in adjacent rows. End joints must land on a joist center — never in mid-span.
- Let boards run long — don't try to cut boards to exact length before installing. Let them run 2–4 inches past the rim joist on the open end, then snap a chalk line and cut them all at once with a circular saw. This gives a perfectly straight, clean edge.
- Final cut — snap a chalk line parallel to the rim joist at the desired overhang (typically ½–1½ inches past the rim). Cut all boards in one pass for a crisp, professional edge.
For composite decking, consider a hidden fastener system — small clips that fasten into the board grooves so no screw heads are visible on the surface. They cost more per sq ft than face-screwing but give a much cleaner finished look. Ipe and other hardwood decking almost always requires pre-drilling and hidden fasteners to prevent splitting.
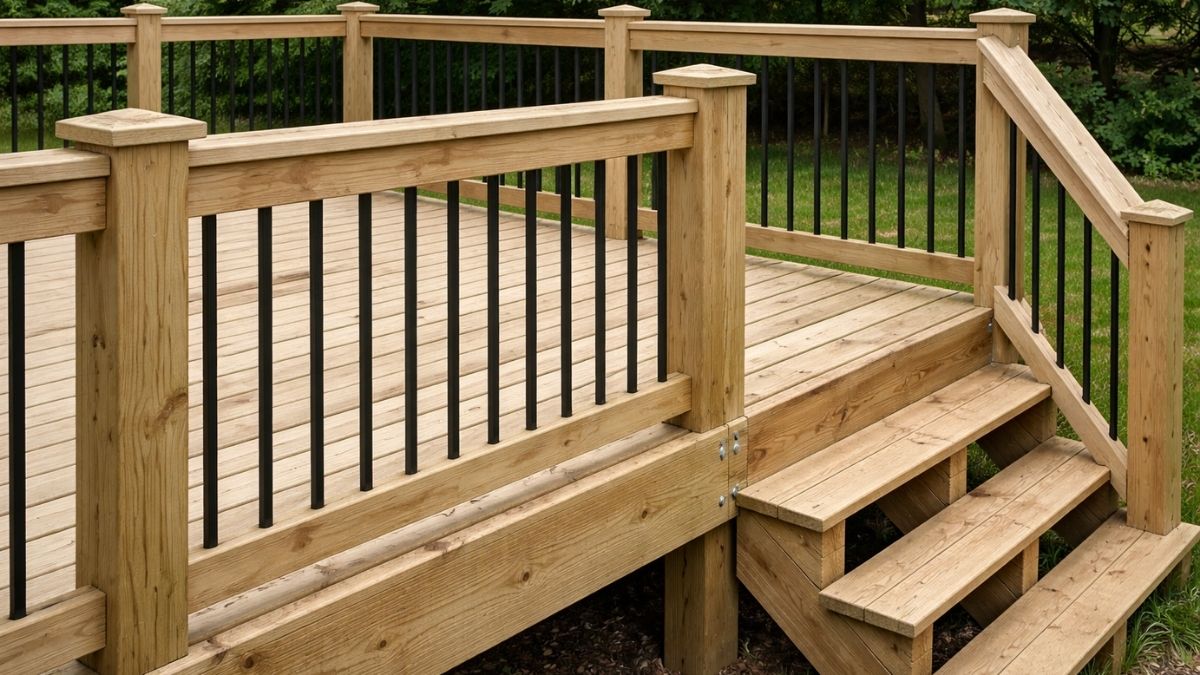
Stairs and railings are the finishing touch — and also among the most code-regulated parts of the build. Railings are required by code on any deck surface 30 inches or more above grade, and stair railings are required for any stair with 4 or more risers. Get these right — they're what inspectors and future buyers look at most carefully.
Building the Stairs
- Calculate rise and run — measure the total rise (vertical height from deck surface to ground). Divide by 7 inches (ideal riser height) to get the number of steps. The run (tread depth) should be at least 10 inches. Per IRC code: max riser height 7¾", min tread depth 10".
- Cut the stringers — use a framing square to lay out the stair pattern on 3×12 PT lumber. Cut carefully — stringer cuts are complex and errors are hard to fix once cut.
- Attach stringers to deck — fasten stringer tops to the deck rim joist with approved stringer hangers or a structural ledger. Bottom ends rest on a concrete pad or gravel base — never on bare soil.
- Install treads — use 5/4×6 or 2×6 PT boards for treads. Two boards per tread with a ¼" gap between them. Fasten with two screws per board per stringer.
Installing the Railings
- Post spacing — railing posts must be spaced no more than 72 inches apart (6 feet) for code compliance. Posts should be bolted through the rim joist with ½" through-bolts — surface-mounted post bases that only fasten to the deck surface are not code-compliant in most jurisdictions.
- Baluster spacing — balusters must be spaced so a 4-inch sphere cannot pass through — this prevents small children from getting their heads trapped. Measure carefully and space consistently.
- Railing height — 36 inches minimum for decks under 30 inches above grade; 42 inches minimum for decks 30 inches or higher above grade.
- Grab rail — stair handrails must be graspable (round or oval profile, 1¼–2 inches diameter) and continuous from top to bottom of stair run.
Once stairs and railings are complete, contact your building department to schedule the final inspection. The inspector will check footing depth (if not already inspected during framing), ledger fastening, railing height and baluster spacing, and stair dimensions. Pass the inspection and you're done — your deck is fully permitted and legal.
Pro Tips & Common Mistakes
Common Mistakes to Avoid
- Skipping the permit — the single most expensive mistake. Unpermitted decks must be torn down or retrofitted to code at your expense when discovered. Always pull the permit.
- Footings above the frost line — footings that don't extend below the local frost depth will heave with freeze-thaw cycles, cracking the deck frame. Check your local frost depth requirement — it's in your building code.
- Nailing ledgers instead of bolting — ledger nails are not code-compliant and will pull out under load. Use ½" lag screws or through-bolts in the IRC-specified pattern.
- No ledger flashing — the most common moisture damage mistake. Water behind an unflashed ledger rots house framing silently for years. Always flash the ledger — no exceptions.
- Wrong lumber treatment rating — using interior-grade or wrong PT rating lumber in ground contact accelerates rot. Check UC ratings on every piece of lumber before purchase.
- Toenailing joists — use joist hangers for every joist-to-beam and joist-to-ledger connection. Toenails are not engineered for shear forces in deck framing.
- Face-screwing composite decking — most composite decking brands require hidden fasteners. Check the manufacturer's installation guide before fastening.
Pro Tips
- Buy 10% more decking boards than calculated — allow for defects, splits, and waste from cuts. Returning leftover boards is easier than making a second lumber run mid-build.
- Apply a wood preservative end-cut treatment (like Copper Green or End Cut) to every saw cut on PT lumber. Factory treatment doesn't penetrate cut ends — untreated cut ends rot faster.
- Install blocking between joists at the ledger end — this stiffens the deck significantly and prevents the rim joist from rolling outward over time.
- Use stainless steel or hot-dipped galvanized hardware throughout. Standard zinc-plated screws react with PT lumber's preservative chemicals and corrode within 2–3 years.
- If you're staining the deck, do it within 60 days of installation while the PT lumber is still clean and open-grained. Waiting allows grey weathering that makes stain penetration uneven.