- Before You Start
- Materials & Tools Needed
- Step 1 — Choose Location & Size
- Step 2 — Choose Your Lumber
- Step 3 — Cut & Assemble the Frame
- Step 4 — Prepare the Ground
- Step 5 — Line the Bed (Optional)
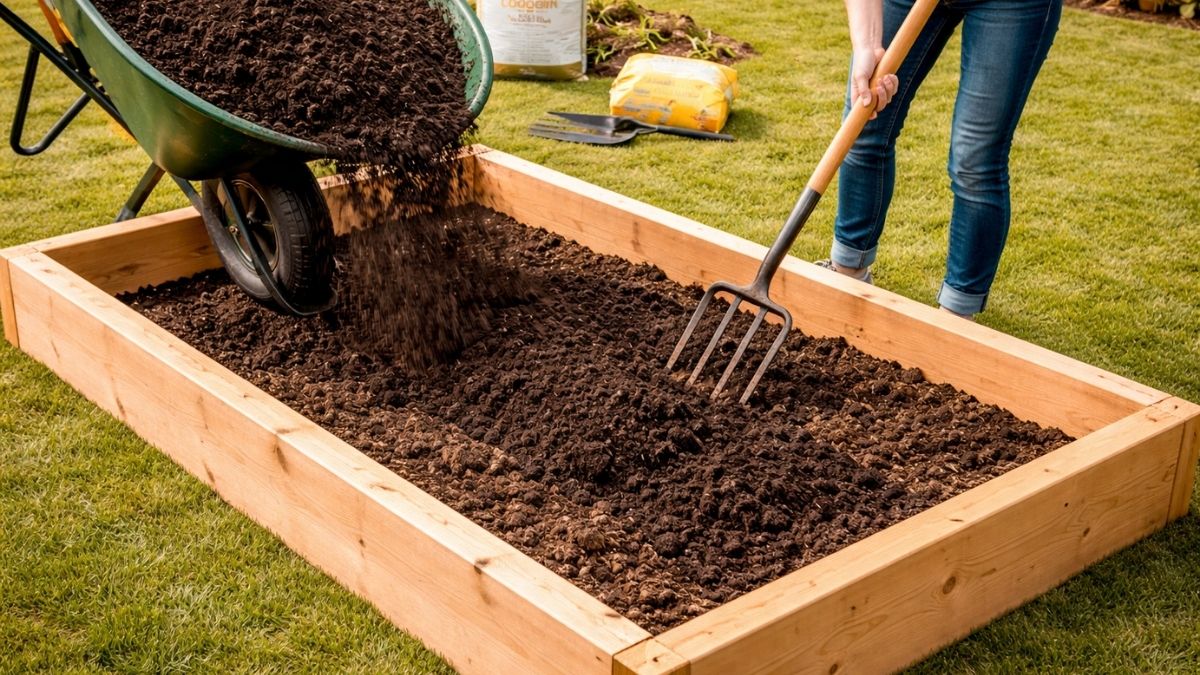
- Step 6 — Mix & Fill the Soil
- Step 7 — Add Mulch & Pathways
- Step 8 — Plant & Maintain
- Pro Tips & Common Mistakes
- FAQs
Before You Start
Raised garden beds are one of the most rewarding weekend projects a homeowner can build. They solve almost every common gardening problem — poor native soil, drainage issues, back strain from ground-level gardening, weed pressure, and slugs and pests — in one simple structure. A professionally built raised bed costs $300–$800 installed. You can build the same bed yourself for $50–$150 in lumber and hardware, plus fill soil.
The most important decision isn't the lumber — it's the soil mix. The most common raised bed mistake is filling beds with cheap topsoil or native dirt. Raised beds thrive on a specifically blended mix of compost, topsoil, and aeration material. Get the soil right and almost everything grows well. Get it wrong and nothing does, regardless of how well the bed is built.
Why Raised Beds Outperform In-Ground Gardens
- Better drainage — water moves freely through raised bed soil mix, preventing root rot that plagues heavy native clay soils
- Warmer soil — raised beds warm up 2–4 weeks earlier in spring, extending the growing season significantly
- No compaction — you never walk on raised bed soil, so it stays loose and aerated all season
- Weed control — starting with fresh soil dramatically reduces weed pressure vs in-ground beds
- Accessible gardening — taller beds (24"+) eliminate bending entirely, making gardening accessible for all ages and abilities
Before building, calculate how much soil you'll need to fill the bed. Use our Topsoil Calculator and Mulch Calculator to get exact cubic yard quantities before ordering — soil delivery minimums often mean you need to calculate carefully to avoid paying for a full yard you don't need.
Materials & Tools Needed
The list below covers a standard 4×8 ft raised bed, 12 inches tall — the most popular size for home vegetable gardens. It's wide enough to reach the center from both sides (no stepping in), long enough for a variety of crops, and 12 inches gives most vegetables adequate root depth. Use our topsoil calculator to confirm your soil volume before ordering.
Materials
| Material | Purpose | Quantity for 4×8×12" Bed |
|---|---|---|
| 2×6 cedar, redwood, or PT lumber | Bed frame sides | 4 boards @ 8 ft (2 cut to 4 ft for ends) |
| 4×4 corner posts (optional) | Corner reinforcement for taller beds | 4 posts @ 14" long |
| 3" exterior screws (galvanized / stainless) | Assemble frame | 1 lb box |
| Landscape fabric (weed barrier) | Line the bottom | 1 roll (4×8 ft minimum) |
| Topsoil / garden soil | Base soil layer | ~0.25 cubic yards per 4×8×12" bed |
| Compost | Nutrients and organic matter | Equal volume to topsoil |
| Perlite or coarse sand | Drainage and aeration | 20% of total soil volume |
| Wood mulch or straw | Surface mulch around plants | 2–3 inches deep, bed area |
Tools
- Circular saw or miter saw — for cutting lumber to length
- Drill / impact driver — for driving screws
- Square & tape measure — for checking corners
- Level — for leveling the bed on uneven ground
- Spade or flat shovel — for ground prep
- Garden fork or tiller — for loosening soil beneath the bed
- Wheelbarrow — for mixing and moving soil
- Utility knife — for cutting landscape fabric
- Staple gun — for securing landscape fabric
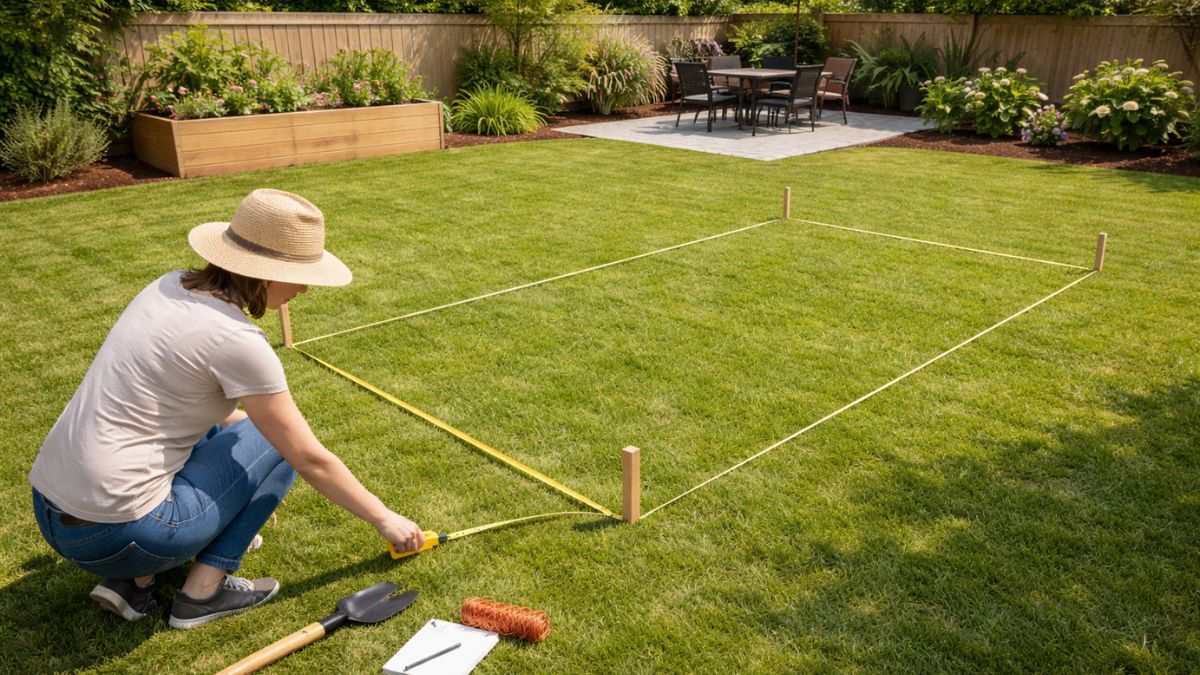
Location is the most important decision in raised bed gardening — and the hardest to fix once the bed is built and filled. Most vegetables need 6–8 hours of direct sunlight per day minimum. Many crops (tomatoes, peppers, squash, cucumbers) need 8+ hours. Leafy greens and herbs tolerate 4–6 hours. Observe your yard through a full day before committing to a location.
- Map the sun — spend one full day observing which parts of your yard receive full sun from morning through afternoon. South-facing and west-facing spots typically get the most sun. Note where trees, the house, and fences create shade at different times of day.
- Choose the right size — 4 ft maximum width is the golden rule. Wider than 4 ft and you can't reach the center without stepping into the bed, which compacts the soil. Length can be whatever fits your space — 4×4, 4×8, and 4×12 are the most common. Use our area calculator to plan multiple beds and total coverage.
- Consider bed height — standard 12 inches works for most vegetables. 18–24 inches is better for deep-rooted crops (carrots, parsnips, potatoes) and for reducing bending. 30–36 inches is wheelchair-accessible and eliminates bending entirely. Taller beds use significantly more soil — calculate volume carefully with our topsoil calculator before ordering.
- Plan access paths — allow at least 24 inches between beds for comfortable walking and wheelbarrow access. 36 inches is better if you use a garden cart. Think about how you'll water — locate beds near a hose bib or plan your irrigation layout before building.
- Check for level — raised beds don't need to be on perfectly flat ground, but a significant slope (more than 4–6 inches across the bed length) will need to be accounted for — either by leveling the ground first or by building the bed frame to accommodate the slope.
First-time raised bed gardeners almost always wish they had started smaller. One or two 4×8 ft beds is plenty for a family of four. You can always add more beds next season once you understand the maintenance rhythm. Overplanting in year one is the fastest way to get overwhelmed and give up on vegetable gardening entirely.
The lumber you choose determines how long the bed lasts, how safe it is for growing food, and how much it costs. This is the decision most first-timers overthink — there are really only three practical options for most homeowners.
| Wood Type | Lifespan | Cost | Food Safe | Notes |
|---|---|---|---|---|
| Cedar | 10–20 years | $$ | ✓ Yes | Naturally rot-resistant, most popular choice |
| Redwood | 15–25 years | $$$ | ✓ Yes | Superior durability, mainly western US availability |
| Douglas Fir (untreated) | 3–7 years | $ | ✓ Yes | Affordable but shorter lifespan, good starter choice |
| PT Lumber (post-2004) | 20–30 years | $ | ✓ Yes* | *Modern ACQ treatment is food-safe per EPA guidelines |
| Composite / Recycled Plastic | 25+ years | $$$$ | ✓ Yes | Zero rot, heavier, more expensive upfront |
Our recommendation: Cedar is the best all-around choice for most homeowners — naturally rot-resistant, beautiful, food-safe, and widely available. Use our lumber cost calculator to compare board costs for your specific bed dimensions before heading to the lumber yard.
Use 2-inch nominal thickness lumber (2×6, 2×8, 2×10, or 2×12) — not 1-inch boards. Thicker lumber is significantly more rigid, holds up better to soil pressure, and lasts much longer. 1×6 boards are tempting because they're cheaper, but they bow outward under soil pressure within 1–2 seasons and need replacement much sooner.
- Avoid railroad ties and old creosote-treated wood — creosote is a known carcinogen that leaches into soil and is not safe for food gardens. Never use old utility poles, railway sleepers, or any lumber with an oily black preservative for vegetable beds.
- Check PT lumber date — pressure treated lumber made before 2004 used arsenic-based preservatives (CCA). Post-2004 PT uses copper-based (ACQ) treatment which is safe for food gardens. Always check the end-tag on PT lumber — it will show the treatment type.
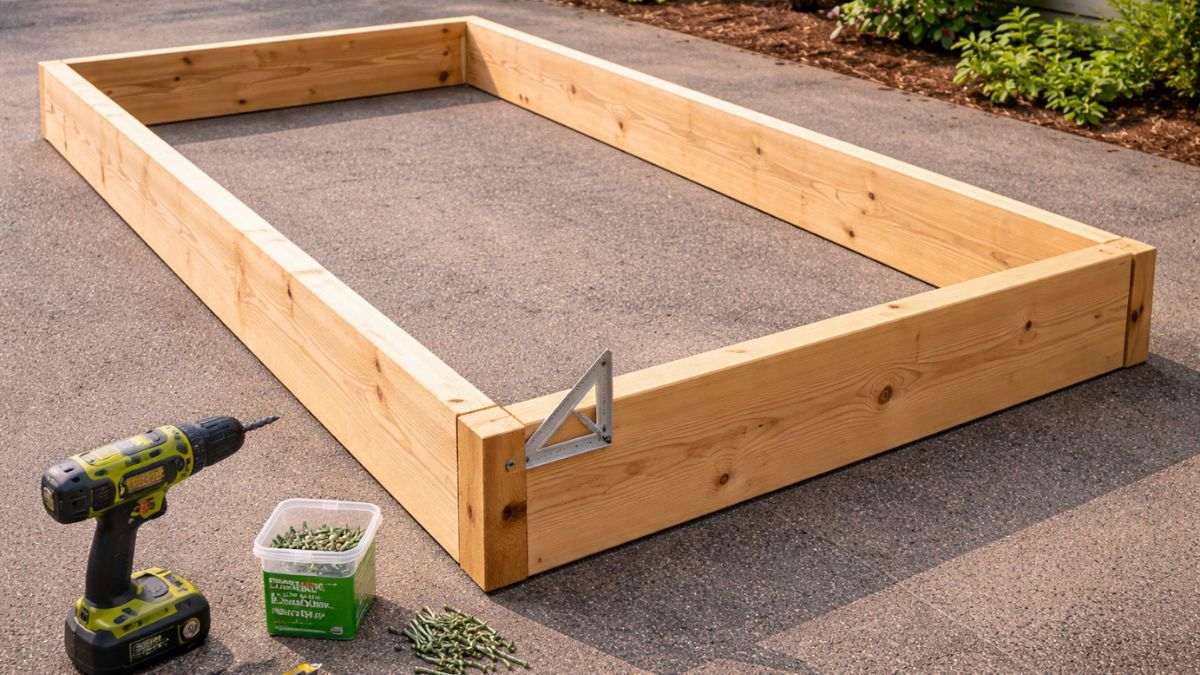
Assembly is the fastest step — a single 4×8 ft raised bed frame goes together in 20–30 minutes with a drill and a bag of screws. The key is getting corners square before fastening so the finished bed is a true rectangle, not a parallelogram.
- Cut boards to length — for a 4×8 ft bed using 2×6 lumber: two 8 ft boards for the long sides (no cuts needed), two boards cut to 45 inches for the short ends (accounts for the 1.5" thickness of the side boards on each end). Cut all pieces before starting assembly.
- Lay out on a flat surface — assemble the frame on your driveway or a flat patio rather than on the lawn where uneven ground makes squaring difficult.
- Assemble corners — butt the end boards against the inside faces of the side boards (this keeps the outer dimensions at exactly 4×8 ft). Pre-drill two holes at each corner to prevent splitting, then drive 3-inch exterior screws. Use three screws per corner for a 2×6 single-course bed.
- Check for square — measure diagonally from corner to corner in both directions. Both measurements must be equal. If they differ, push one corner in or out until the diagonals match, then add a temporary diagonal brace to hold square while the final screws go in.
- Add corner posts for taller beds — for beds taller than 12 inches (two or more courses of lumber), cut 4×4 corner posts and attach them inside each corner. This prevents the boards from bowing outward under soil pressure. For a 24-inch tall bed, use 4×4 posts at every 4-foot interval on the long sides as well.
- Stack courses for taller beds — if building more than one board high, offset the vertical joints between courses (like bricklaying) for a stronger structure. Fasten each course to the one below with 3-inch screws at 12-inch intervals.
If you're building more than one bed, cut all lumber for all beds before assembling. Batch cutting is faster, more accurate, and lets you make the most of full lumber lengths with minimal waste. Assemble all beds on the driveway, then move them into position — it's easier to carry an empty frame than to assemble in a tight garden space.
Proper ground preparation under a raised bed determines whether roots can penetrate the native soil below — significantly expanding the effective root zone and drought resistance of your plants. This step takes 30 minutes but dramatically improves long-term performance.
- Mark the bed outline — set the assembled frame in position and mark the perimeter with spray paint or a spade. Remove the frame temporarily to work the ground.
- Remove existing vegetation — for lawn areas, use a flat spade to cut and remove sod within the bed footprint. Remove it completely — grass left under the bed will grow up through the soil mix within one season. You can compost the sod or use it to patch bare spots elsewhere.
- Loosen the soil below — use a garden fork or broadfork to loosen the native soil 8–12 inches deep within the bed footprint. You don't need to amend it or add anything — just break up compaction so roots can penetrate. This is one of the biggest advantages of raised beds over container gardening.
- Level the ground — rake the loosened soil roughly level within the footprint. The bed frame itself doesn't need to be perfectly level (a slight slope is fine for drainage), but more than 2–3 inches of variation will cause soil to shift to one end over time.
- Place the frame — set the assembled frame back in position. Check that it sits reasonably level using a 4 ft level across the top. If one side is significantly lower, add or remove soil from under that side until the frame is close to level.
- Stake the frame (optional) — on sloped sites or for very large beds, drive 18-inch garden stakes or rebar through pre-drilled holes in the bottom board into the ground to anchor the frame in position.
If you're placing a raised bed over an existing lawn and don't want to remove the sod, use the lasagna method: lay 4–6 sheets of overlapping cardboard (remove tape and staples) directly over the grass inside the bed footprint. The cardboard smothers the grass and breaks down into the soil over 3–6 months, adding organic matter. This works well but does allow some weeds to push through in year one — removing sod first gives cleaner results.
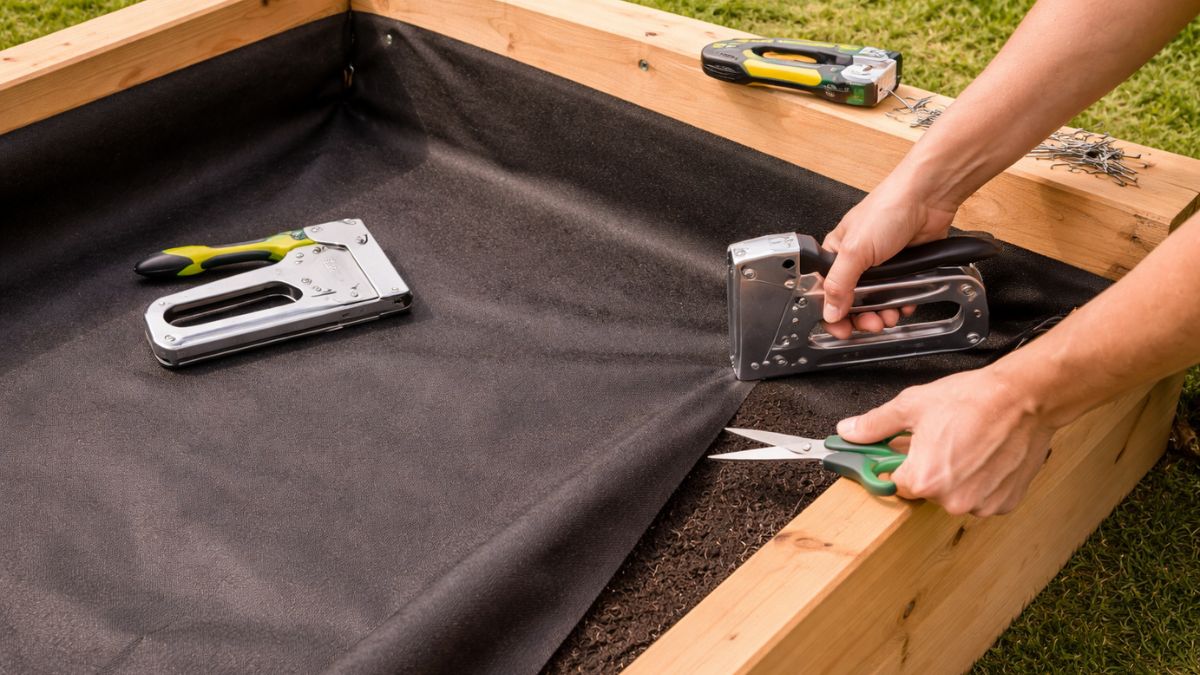
Lining the bottom and sides of a raised bed serves two purposes: blocking weeds from pushing up from below, and protecting wooden sides from direct soil contact to extend the frame's life. Both are optional but both add value — especially for cedar and untreated lumber beds.
- Bottom lining for weed control — cut landscape fabric or hardware cloth (½-inch galvanized mesh) to fit the interior bottom of the bed. Landscape fabric allows water drainage while blocking most weeds. Hardware cloth also blocks gophers, voles, and moles — essential if you have burrowing rodents in your area.
- Staple or pin to the frame — use a staple gun to attach landscape fabric to the inside bottom edge of the frame all the way around. For hardware cloth, use staples or bent galvanized nails to secure edges to the inside frame walls.
- Side lining for lumber longevity — staple a strip of landscape fabric to the inside faces of the wooden boards (the surfaces in direct contact with soil). This significantly reduces moisture contact and can add 3–5 years to the life of cedar or untreated lumber beds.
- Overlap bottom and side liners — if using both, overlap the side liner over the bottom liner by 3–4 inches and staple together. This creates a moisture barrier that protects the wood on all soil-contact surfaces without blocking root drainage into native soil below.
Never line the bottom of a raised bed with solid plastic sheeting or heavy vinyl — it blocks drainage completely and creates a waterlogged root zone that kills plants. Only use permeable materials: landscape fabric, hardware cloth, or weed barrier fabric. The bottom of your raised bed must allow water to drain freely into the native soil below.
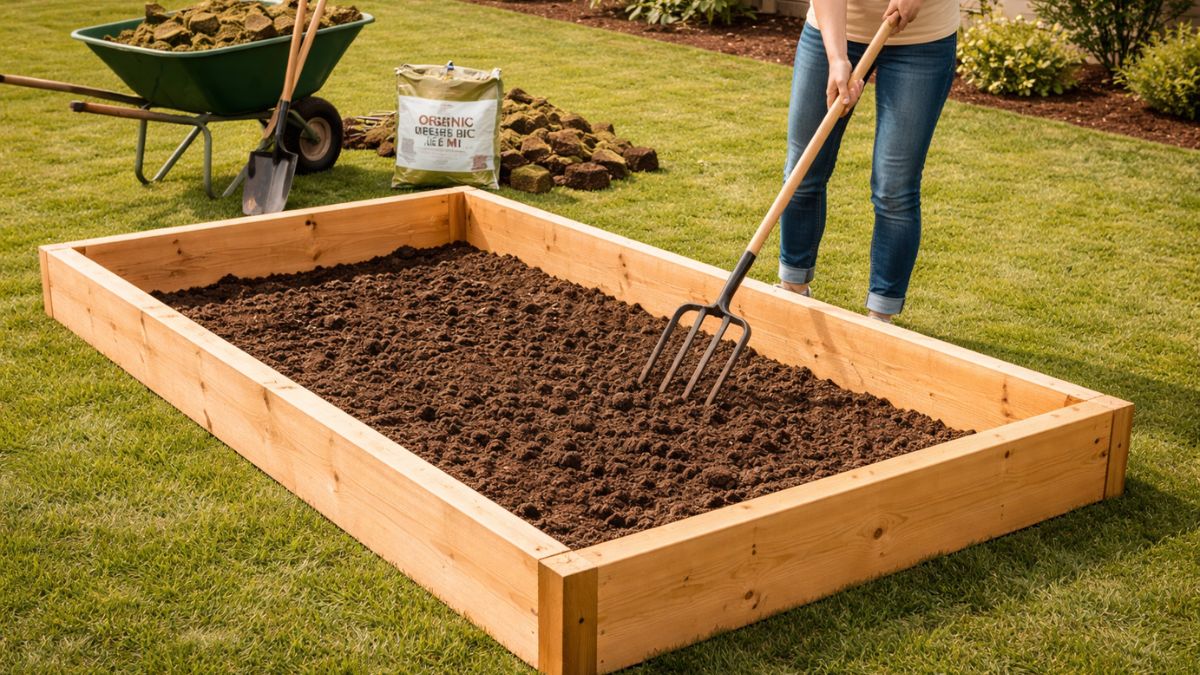
The soil mix is the heart of your raised bed — it determines everything about how well plants grow. This step is where most people make the single biggest raised bed mistake: filling with cheap topsoil or native dirt. Raised beds need a blended mix specifically designed for container-style growing. Calculate your exact volume first with our topsoil calculator and our cubic yard calculator to avoid under-ordering.
The Mel's Mix Formula (Most Proven)
The most widely used raised bed soil formula is ⅓ compost + ⅓ peat moss or coco coir + ⅓ coarse vermiculite or perlite. This blend drains excellently, holds moisture and nutrients well, and never compacts. For a 4×8×12" bed (approximately 0.25 cubic yards), you need about 2 cubic feet of each component.
The Budget-Friendly Alternative
A less expensive but still high-performing mix: 60% quality topsoil + 30% compost + 10% perlite or coarse sand. This works well for most vegetables and costs significantly less than Mel's Mix when filling larger beds. Never use more than 60% topsoil — higher ratios result in compaction and poor drainage.
- Calculate your volume — for a 4×8 ft bed at 12 inches deep: 4 × 8 × 1 = 32 cubic feet = approximately 1.2 cubic yards. Use our cubic yard calculator to convert your specific bed dimensions to cubic yards for ordering.
- Mix components in a wheelbarrow — for small quantities, mix components in a wheelbarrow before filling. For larger beds, alternate layers of each component in the bed and mix in place with a garden fork.
- Fill in layers — add soil in 4–6 inch layers, mixing and settling each layer before adding more. This prevents large air pockets that cause uneven settling after the first watering.
- Fill to 1–2 inches below the top board — don't fill to the very top. Leaving a lip prevents soil from washing over the edge during watering and rain, and gives room for mulch on top.
- Water thoroughly and let settle — water the newly filled bed until water drains from the bottom. Soil will settle 1–3 inches after the first thorough watering. Top up with additional soil mix to bring back to the proper level before planting.
For multiple beds or large beds, buying bulk compost by the cubic yard from a local landscape supply company is dramatically cheaper than bagged compost from big box stores. A cubic yard of compost from a landscape supplier costs $30–$60 delivered — equivalent bagged compost would cost $150–$250. Use our topsoil calculator to figure out how much you need before calling for a quote.
Mulching the bed surface and establishing clear pathways between beds are the finishing touches that make a raised bed garden easy to maintain long-term. These steps are often skipped by first-timers and later identified as the things they wish they'd done from the start.
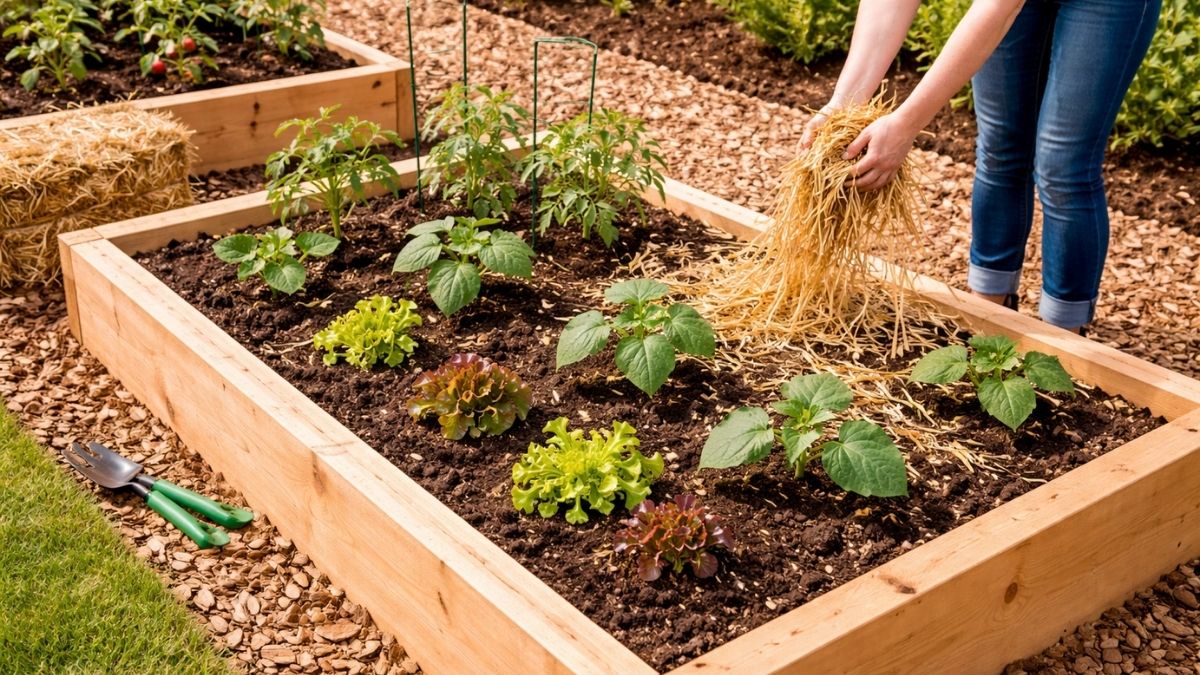
- Apply surface mulch — once plants are in the ground (or seeds are sown), cover the exposed soil surface between plants with 2–3 inches of straw, wood chip mulch, or shredded leaves. Mulch retains moisture (reducing watering frequency by 30–50%), moderates soil temperature, suppresses weeds, and adds organic matter as it breaks down. Use our mulch calculator to find out how much you need.
- Keep mulch away from plant stems — leave a 2-inch gap between mulch and plant stems or seed rows. Mulch piled against stems traps moisture and promotes crown rot and slug damage.
- Build pathways between beds — loose materials like wood chip mulch, pea gravel, or straw work well for paths. Lay 4–6 inches deep over landscape fabric for long-lasting, low-maintenance paths. For a permanent path solution, consider pavers or stepping stones — our paver calculator can help you estimate material quantities for pathway installation.
- Edge your paths — install metal or plastic edging between garden beds and lawn areas to prevent grass from creeping into pathways and beds. This one step saves significant maintenance time each season.
Many tree service companies will deliver a truckload of fresh wood chips for free — they pay to dump chips at a facility otherwise. Search "free wood chips" or use the ChipDrop service to request a free delivery. A truckload covers 200–400 sq ft of pathways 4 inches deep. The chips break down over 2–3 years, adding rich organic matter to the soil below.
With the bed built, filled, and mulched, it's time to plant. Raised beds are forgiving for beginners — the excellent soil drainage and nutrition head start means most vegetables establish quickly and perform far better than they would in native ground soil.
Planting Guidelines
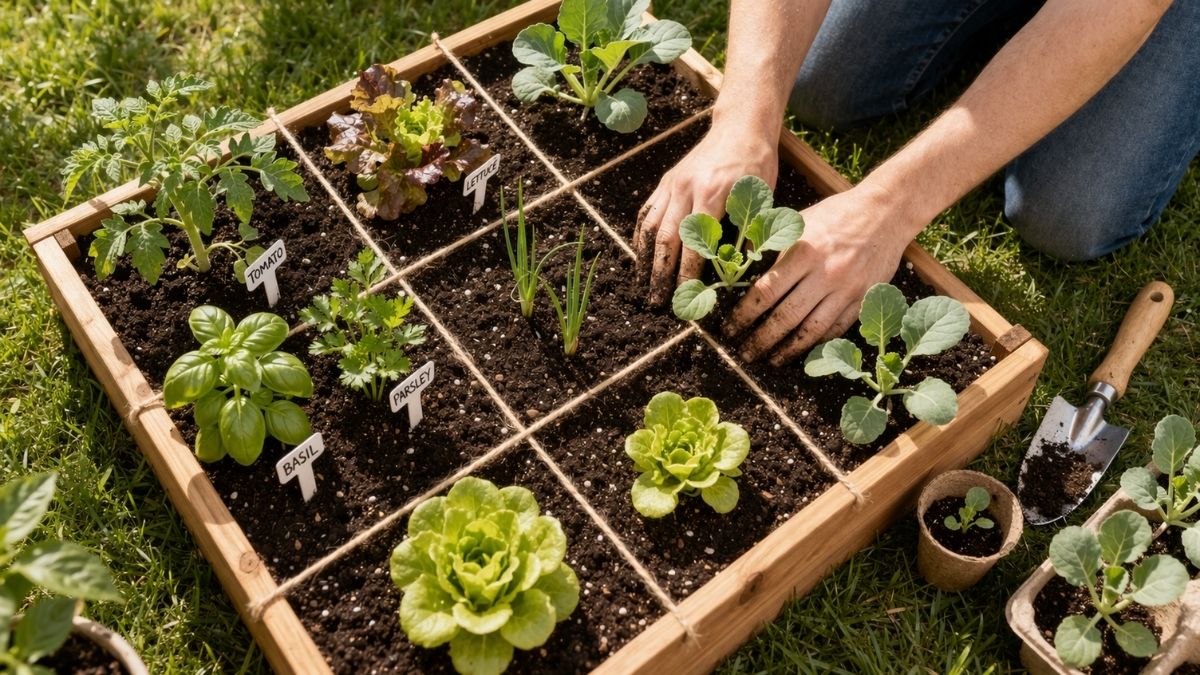
- Use the square foot gardening method — divide the bed into 1-foot squares and plant one type of crop per square, adjusting plant count by size: 1 tomato or pepper per square, 4 lettuce plants per square, 9 spinach plants per square, 16 carrots or radishes per square. This maximizes yield in limited space.
- Plant tall crops on the north end — place tall crops (tomatoes, corn, trellised beans, sunflowers) at the north end of the bed so they don't shade shorter crops to the south.
- Succession plant — don't plant all your lettuce or radishes at once. Plant a few seeds every 2–3 weeks for continuous harvest rather than a glut followed by nothing.
- Water deeply and less frequently — raised beds dry out faster than in-ground gardens, especially in summer. Water deeply (until water drains from the bottom) every 2–3 days rather than lightly every day. Deep watering encourages deep root development; shallow frequent watering creates shallow, drought-vulnerable roots.
Annual Maintenance
- Add 2–3 inches of compost each spring — raised bed soil shrinks each year as organic matter breaks down. Topping up with compost replenishes nutrients and restores volume. Use our topsoil calculator to estimate your annual top-up needs.
- Never compact the soil — never step into the raised bed. If the bed is too wide to reach the center, add a stepping stone path through the middle rather than walking on the soil.
- Rotate crops each year — don't grow the same crop family in the same spot two years in a row. Rotation prevents soil-borne disease buildup and nutrient depletion specific to each crop family.
- Inspect the frame annually — check corner joints and board faces for rot each spring. Catching rot early (one board) is cheap. Catching it late (frame failure) means rebuilding.
Your raised bed is ready to grow. Most vegetables can be planted immediately after filling — the fresh soil mix is already rich in nutrients and doesn't need time to settle before planting. Expect your first-year harvest to be good and your second-year harvest to be excellent as the soil biology establishes and the compost breaks down further.
Pro Tips & Common Mistakes
Common Mistakes to Avoid
- Filling with cheap topsoil only — pure topsoil compacts in raised beds, drains poorly, and produces mediocre results. Always blend with at least 30% compost and 10% drainage material (perlite, coarse sand).
- Building wider than 4 feet — you will end up stepping into the bed to reach plants, compacting soil and defeating the purpose of raised bed gardening. 4 ft is the maximum. 3 ft is better if you only have access from one side.
- Using 1-inch lumber — 1×6 boards bow outward under soil pressure within 1–2 seasons. Always use 2-inch nominal thickness minimum.
- No landscape fabric or cardboard underneath — grass and weeds push up through even a well-filled bed if not properly blocked at the bottom. Block vegetation before filling.
- Placing in shade — the most common mistake. Vegetables need at least 6 hours of direct sun. Observe your site for a full day before building.
- Overplanting in year one — start with one or two beds and learn the watering and maintenance rhythm before expanding. Garden overwhelm is the #1 reason people give up on vegetable gardening.
- Using railroad ties or pre-2004 PT lumber — old pressure treated lumber contains arsenic-based preservatives that leach into food crops. Only use cedar, redwood, untreated lumber, or post-2004 PT lumber for food gardens.
Pro Tips
- Install a drip irrigation system or soaker hose before filling the bed with soil — threading hoses through a planted bed is frustrating. Put irrigation in first, then fill soil around it.
- Build beds on a slight slope (½ inch per 4 feet) toward the south or toward a drainage outlet — this prevents water from pooling at one end after heavy rain.
- Add a trellis on the north end of the bed at build time — retrofitting trellises into a filled, planted bed is awkward. Attach vertical supports to the bed frame before filling.
- For pest-prone areas, install a hardware cloth bottom during Step 5 instead of landscape fabric — ½-inch galvanized hardware cloth completely blocks gophers and moles that can devastate root crops.
- Label what you plant and where. Year 1 you'll remember. Year 2 you won't — especially for crop rotation planning.