- Before You Start
- Materials & Tools Needed
- Step 1 — Plan & Mark the Area
- Step 2 — Excavate to the Correct Depth
- Step 3 — Install the Gravel Base
- Step 4 — Lay the Sand Bedding Layer
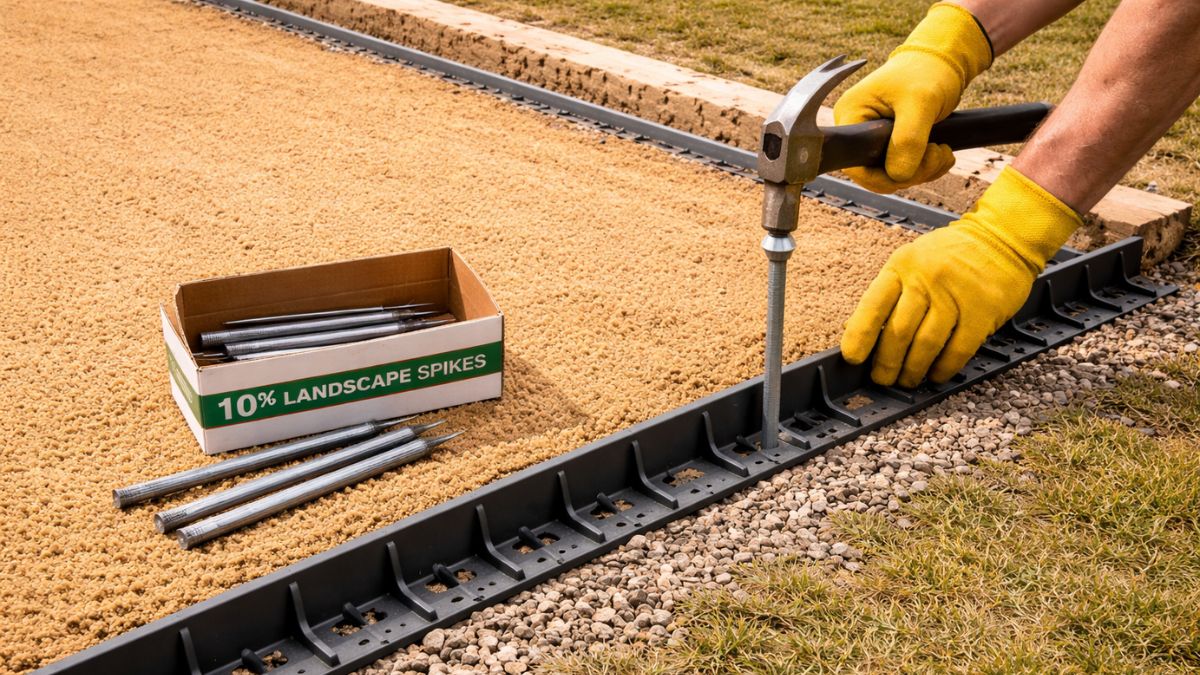
- Step 5 — Set the Edge Restraints
- Step 6 — Lay the Pavers
- Step 7 — Cut Pavers for Edges
- Step 8 — Compact & Sand the Joints
- Pro Tips & Common Mistakes
- FAQs
Before You Start
A paver patio is one of the most satisfying DIY outdoor projects you can complete — the results are beautiful, durable, and add real value to your home. Professional paver installation costs $10–$25 per square foot installed in 2026. A 12×16 ft patio (192 sq ft) runs $1,900–$4,800 in labor and materials professionally. DIY materials for the same patio cost $600–$1,200 — saving the full labor cost of $1,200–$3,600.
Unlike a concrete slab, pavers are forgiving — individual pavers can be lifted and re-leveled years later if settling occurs, and damaged pavers can be replaced one at a time without affecting the rest of the patio. The work is physically demanding (lots of digging and heavy lifting) but the techniques are straightforward and entirely learnable by a first-timer over a weekend.
Why Pavers Beat Concrete for Patios
- Repairability — individual pavers can be lifted and replaced; concrete cracks are permanent
- No cracking from frost heave — the flexible base system absorbs ground movement without cracking
- Immediate use — no curing time; you can walk on pavers the same day they're laid
- Visual variety — dozens of colors, textures, and patterns to choose from
- Permeable options — permeable pavers allow rainwater to infiltrate, reducing runoff
Use our Paver Calculator to get exact paver count and cost for your specific patio dimensions and paver size — with a 10% waste factor included. Our Patio Cost Calculator gives a full cost estimate including base materials, sand, and edge restraints.
Materials & Tools Needed
The list below is for a standard 12×16 ft (192 sq ft) paver patio using 4×8 inch rectangular concrete pavers, standard pattern. Use our paver calculator to adjust quantities for your dimensions and paver size.
Materials
| Material | Purpose | Quantity (12×16 ft patio) |
|---|---|---|
| Concrete pavers | The patio surface | ~212 pavers (192 sq ft + 10% waste) |
| Compactable gravel (¾" base) | Stable, draining sub-base | ~3 tons for 6" compacted base |
| Coarse concrete sand (bedding) | 1" leveling layer under pavers | ~1.5 tons (1" deep over 192 sq ft) |
| Polymeric jointing sand | Fill joints & lock pavers in place | 2–3 bags (50 lb each) |
| Plastic paver edge restraints | Hold perimeter pavers in place | Perimeter length + 10% = ~60 linear ft |
| Landscape fabric (geotextile) | Separate gravel from native soil | Area + 1 ft overlap each side |
| Spiked landscape nails (10") | Secure edge restraints | 1 every 12" = ~60–80 nails |
Tools
- Excavation — spade, flat shovel, wheelbarrow, plate compactor (rent)
- Layout — stakes, mason's line, tape measure, speed square, line level or laser level
- Sand screeding — two 1-inch diameter steel conduit pipes (screed rails), long straight 2×4 screed board
- Paver cutting — angle grinder with diamond blade or wet saw (rent) for straight cuts; chisel and hammer for rough cuts
- Compaction — plate compactor with rubber pad attachment (to protect paver surface)
- Finishing — push broom, rubber mallet, paver hand tamper
- Safety — work gloves, knee pads, eye protection (for cutting)
Concrete pavers are the most affordable and widely available option — $0.50–$2.00 per paver. Natural stone (bluestone, travertine, flagstone) costs $3–$8 per sq ft but looks premium. Brick pavers fall in between at $1–$3 per paver. For a first-time install, concrete pavers are recommended — they're uniform in size (making layout easier), widely available, and forgiving of minor cutting errors. Use our paver calculator to compare material costs side by side.
Good planning prevents the two most common paver patio mistakes: cutting too many pavers at the edges (from poor layout) and uneven slopes (from skipping proper grade planning). Spend an extra hour here — it pays back tenfold during the lay.
- Call 811 before digging — utility lines are buried at varying depths. Call 811 (free, required by law) at least 3 business days before any excavation to have lines marked.
- Determine finished patio height — the finished patio surface should sit ½–1 inch above the surrounding lawn to allow runoff to drain off the patio, not pool on it. It should also slope away from the house at 1–2% (¼ inch per foot minimum) for drainage.
- Lay out the patio dimensions on paper first — sketch your paver size and pattern on graph paper. Calculate how many full pavers fit across each dimension and how wide the cut pieces at the edges will be. Aim for cut pieces no narrower than half a paver width — narrower cuts look poor and break easily. Adjust overall dimensions by a paver increment (4 or 8 inches) if needed to minimize cutting.
- Mark the perimeter with stakes and string — drive stakes at each corner and stretch mason's line around the perimeter at the planned finished patio height. Use the 3-4-5 method to ensure square corners. Verify by measuring both diagonals — they must be equal.
- Mark the slope — set the string lines so they slope away from the house at ¼ inch per foot. Use a line level to set the house-side string line horizontal, then drop the outer string line accordingly. Example: for a 12 ft deep patio at ¼"/ft slope, the outer edge should be 3 inches lower than the house edge.
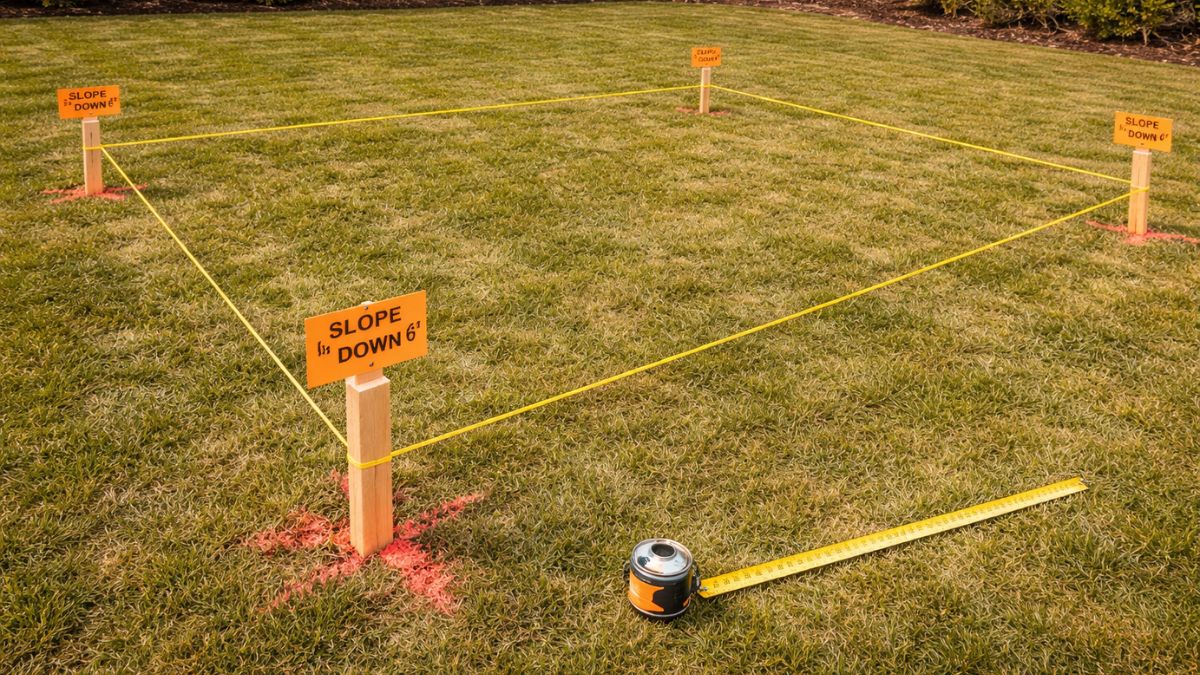
Before any digging, dry-lay a row of pavers along each edge of your planned patio to verify the layout works with your chosen paver size. This takes 10 minutes and immediately reveals whether you'll have awkward cuts at the edges. Adjust your dimensions now — it's free. Adjusting after excavation costs hours of extra work.
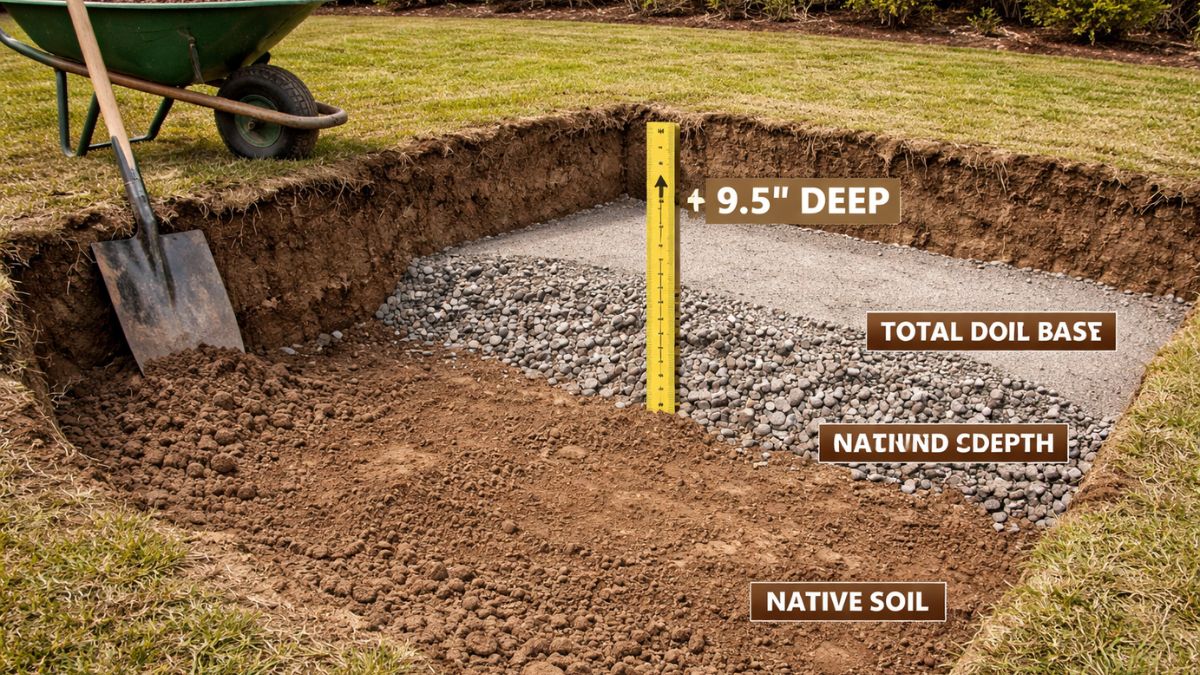
Correct excavation depth is critical — too shallow and your patio will be too high or lack adequate base; too deep and you waste time and materials filling back up. Calculate the exact depth before picking up a shovel.
Total Excavation Depth Formula
Depth = Paver thickness + 1" bedding sand + 6" compacted gravel base
For standard 2⅜" (60mm) concrete pavers: 2.375" + 1" + 6" = 9.375" total excavation — round to 9½ inches below finished grade. For 3⅛" (80mm) pavers: approximately 10¼ inches.
- Set excavation depth marks — mark the required excavation depth on each corner stake. Use a line level across the area to verify consistent depth as you dig.
- Remove all sod and topsoil — use a flat spade to cut sod in strips and remove completely. Topsoil contains organic material that compresses and decomposes — it must be fully removed from the entire patio footprint and 6 inches beyond on all sides (for edge restraint installation).
- Dig to the correct depth — excavate the entire area to the calculated depth. Work systematically from one end to the other. Check depth frequently with a tape measure from the string lines.
- Slope the excavation — the bottom of your excavation should slope at the same angle as your finished patio — ¼ inch per foot away from the house. A sloped base produces a sloped patio; a level base with a sloped sand layer is acceptable but harder to maintain consistently.
- Compact the native subgrade — run the plate compactor over the exposed soil. If you hit soft spots, dig them out and fill with compactable gravel. A consistent, firm subgrade is the foundation of everything above it.
After compacting the subgrade, lay geotextile landscape fabric across the entire excavation floor and up the sides. This fabric separates the gravel base from the native soil below, preventing soil from migrating up into the gravel over time and causing base failure. Without it, clay and fine soil particles gradually infiltrate the gravel base, reducing drainage and causing settling. Overlap seams by 12 inches and pin edges with landscape staples.
The gravel base is the structural heart of a paver patio. It provides load distribution, drainage, and a stable platform that won't shift or settle. Six inches of compacted ¾-inch crushed stone is the minimum for a residential patio in most climates — in freeze-thaw regions, 8 inches is better.
- Use the right gravel — specify ¾" compactable base gravel (also called "road base," "crusher run," or "crushed stone base") — not decorative gravel or pea gravel. Compactable base gravel contains fine particles that bind together under compaction to form a dense, stable mass. Use our gravel calculator to find exact tons needed.
- Spread in 2-3 inch layers — never dump the full 6 inches at once and compact. Add gravel in 2–3 inch lifts, compacting each layer before adding the next. Each lift compacts down approximately 15–20%, so plan accordingly. Spreading in lifts ensures thorough compaction through the full base depth.
- Compact each layer thoroughly — make multiple plate compactor passes over each lift in perpendicular directions. The gravel should feel completely solid underfoot and show no movement under the compactor. Add more material to any low spots and re-compact.
- Check grade and slope — after the final compacted layer, stretch your string lines back across the area and measure down to the gravel surface. The gravel surface should be exactly 1 inch (bedding sand depth) + paver thickness below the string lines — which represent finished patio height. Correct any high or low spots now. It's easy to remove or add a little gravel at this stage; it's much harder after sand is laid.
- Check for drainage slope — verify the gravel surface slopes consistently at ¼ inch per foot away from the house. Use a long level and a tape measure to check in multiple locations across the width.
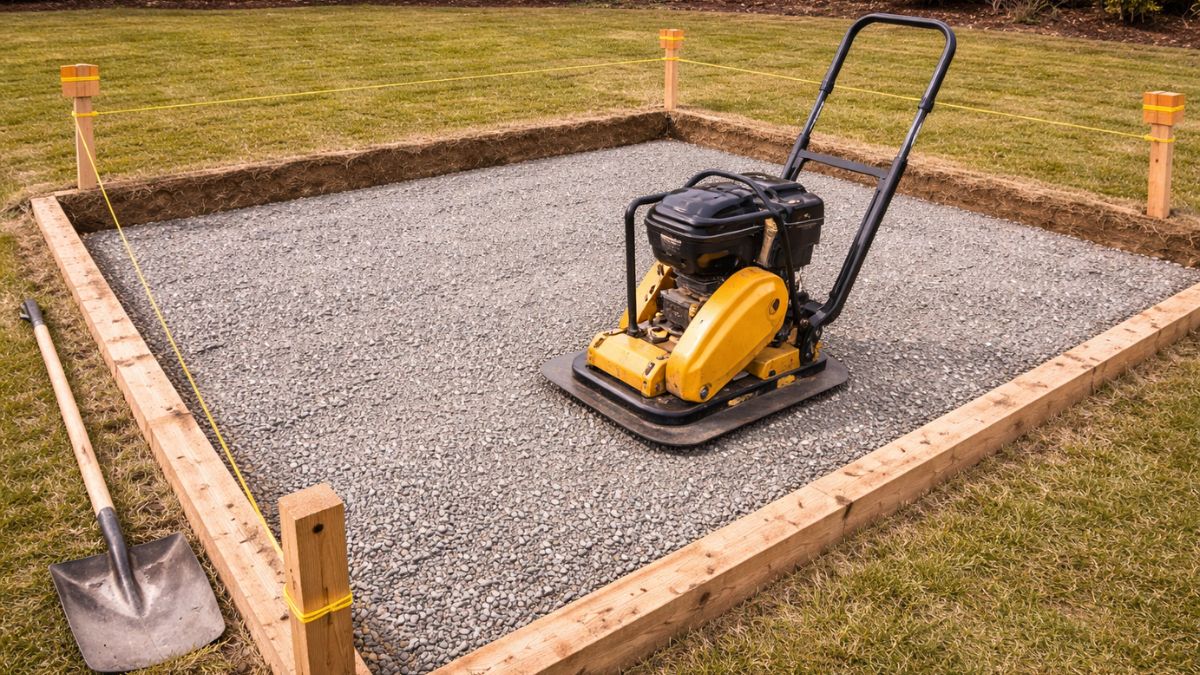
For a 12×16 ft patio at 6" compacted gravel depth: 192 sq ft × 0.5 ft = 96 cu ft ÷ 27 = 3.56 cu yd. At approximately 1.4 tons per cubic yard, that's about 5 tons of gravel. Always order 10% extra. Use our gravel calculator for an exact tonnage for your specific dimensions.
The 1-inch sand bedding layer is what you actually set the pavers into. It provides final leveling and allows minor adjustments as you lay. This step requires patience and precision — a consistent, perfectly screeded sand layer is the difference between a patio that looks professionally installed and one that has wavy, uneven pavers.
- Use coarse concrete sand, not fine masonry sand — coarse concrete sand (also called torpedo sand or sharp sand) doesn't compact under the pavers the same way fine sand does, providing a more stable bedding. Fine masonry sand is too soft and will cause pavers to shift and sink unevenly over time. Never use stone dust — it becomes cement-like when wet and makes repairs nearly impossible.
- Set screed rails — place two 1-inch diameter steel conduit pipes parallel across the gravel base, spacing them 4–6 feet apart. These are your screed guides — the sand screeded level across them will be exactly 1 inch deep. Set them at the correct slope to match your planned drainage direction.
- Spread and screed the sand — dump sand between the rails to slightly above pipe height. Place a long, straight 2×4 screed board across both pipes and draw it toward you in a sawing motion, striking off the excess sand. Fill low spots and re-screed. The finished sand surface should be perfectly smooth, consistent, and exactly at the pipe height.
- Remove the screed rails carefully — once the sand is screeded, carefully pull the pipe rails straight up without disturbing the sand surface. Fill the channels left by the pipes with loose sand and smooth with your hand or a float. Do this one rail at a time immediately before laying pavers in that section.
- Do not walk on screeded sand — any footprint or disturbance in the screeded sand requires re-screeding that section. Work from the unscreeded area and lay pavers on the freshly screeded surface without stepping on it.
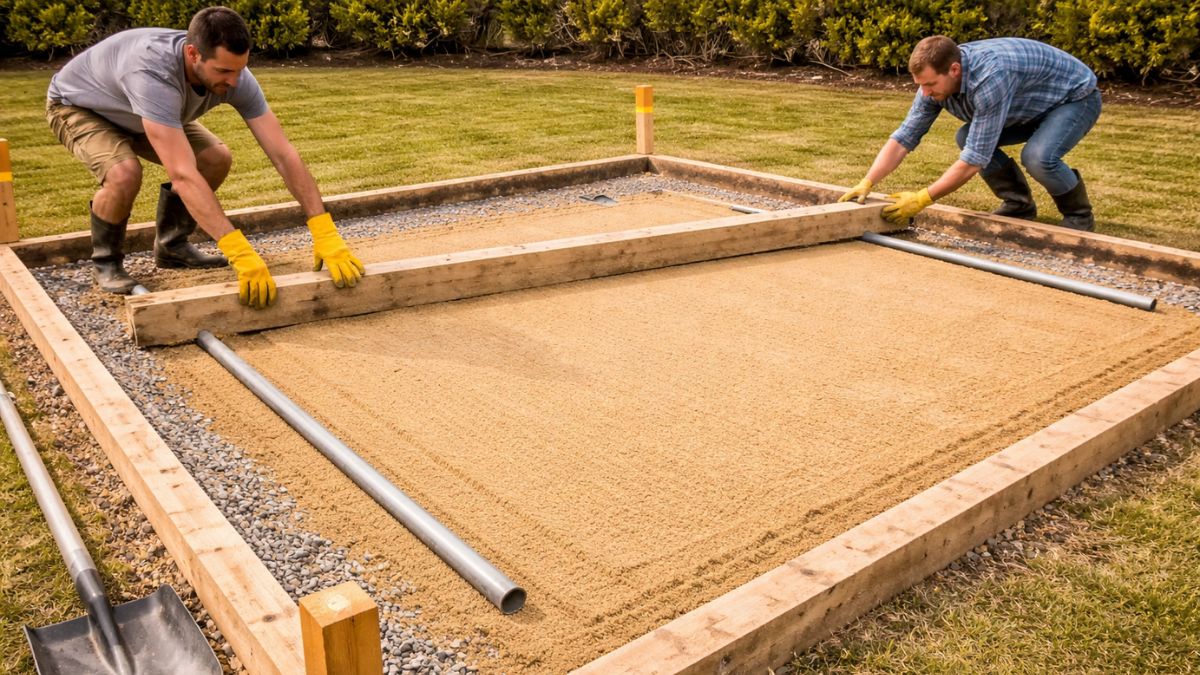
Don't screed the entire patio area at once — screed a 4–6 foot wide strip, lay pavers on it immediately, then screed the next strip. This prevents the screeded sand from being disturbed by foot traffic and keeps the sand from drying out and losing its workability before pavers are placed. Always kneel on the pavers you've already laid, never on the screeded sand.
Edge restraints keep the perimeter pavers from shifting outward over time. Without them, pavers gradually migrate away from the center, joints widen, and the patio loses its shape. This step is installed before laying pavers so restraints are in position to hold the first full course.
- Choose the right edge restraint — plastic snap-together paver edge restraint is the standard residential choice — flexible, easy to install, and invisible once the patio is complete. Metal edge restraint (steel or aluminum) is more rigid and better for curved edges or long straight runs where rigidity matters. Avoid wood edging — it rots and eventually fails.
- Install along the outer perimeter first — snap edge restraint sections together to form the perimeter of the patio. Position the restraint so its inner face aligns with the outer edge of where your outermost pavers will sit. The top of the restraint should be at or just below the finished paver surface height.
- Drive spikes through the restraint flanges — use a maul or hammer to drive 10-inch landscape spikes through the holes in the edge restraint flanges, fully into the compacted gravel base. Space spikes every 12 inches for plastic restraint, 18–24 inches for metal. The spikes must fully penetrate into the compacted gravel to hold — not just into sand.
- Install restraints along the house first — if the patio abuts the house, install that edge restraint (or use the house foundation itself as the restraint) before the parallel edges. This gives you a fixed starting line for laying pavers.
- Verify alignment — stretch a string line along each edge restraint after installation to confirm it's straight. A bowed edge restraint produces a bowed patio edge that's very difficult to correct after pavers are laid.
Laying pavers is the most satisfying part of the project — you finally see the patio take shape. Work methodically, check your lines frequently, and resist the urge to rush. Pavers placed slightly out of position create cascading alignment problems that compound across the patio.
Common Paver Patterns
| Pattern | Difficulty | Cutting Required | Look |
|---|---|---|---|
| Running Bond | Easy | Minimal (edges only) | Classic brick look, elongates space |
| Stack Bond (Grid) | Easy | Minimal (edges only) | Modern, clean — very unforgiving of misalignment |
| Herringbone (45°) | Moderate | Moderate (many angled cuts) | Traditional, interlocking — most stable pattern |
| Herringbone (90°) | Moderate | Low (edge cuts only) | Classic, best for beginners wanting herringbone |
| Basketweave | Moderate | Minimal (edges only) | Traditional, requires 2:1 ratio paver size |
| Circular / Fan | Advanced | Heavy — many radial cuts | Striking focal point, very complex to execute |
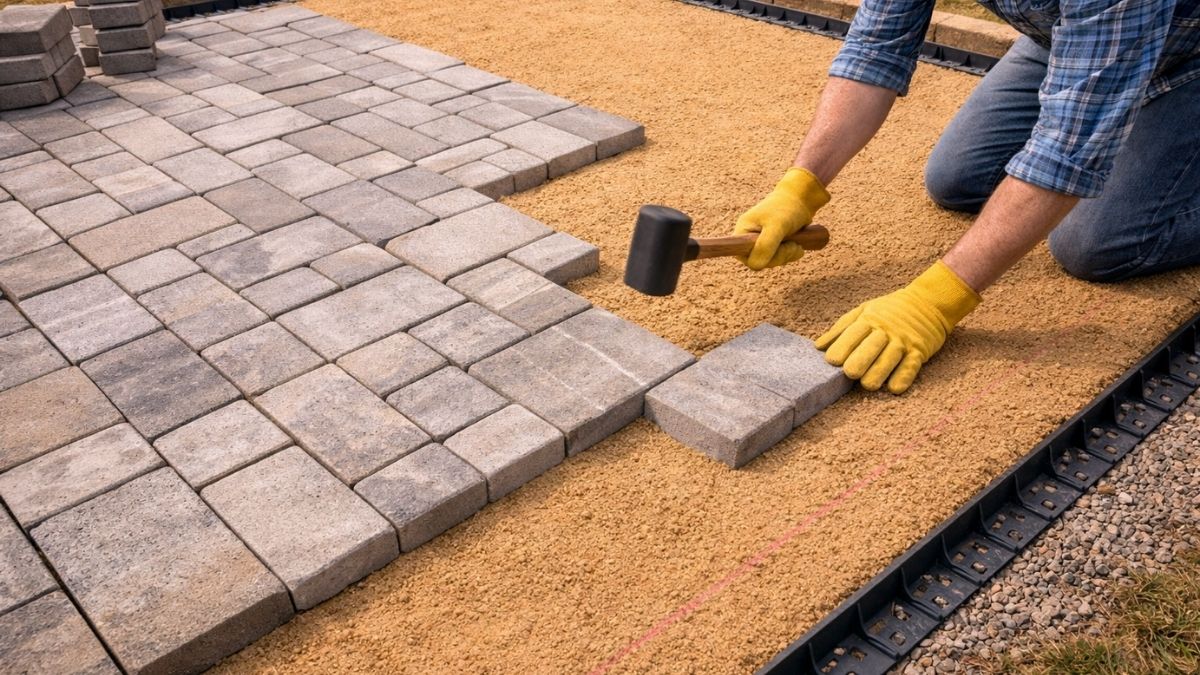
- Start from a fixed straight edge — begin laying from the house wall or a straight edge restraint. Use a chalk line snapped across the sand to keep your first row perfectly straight — all subsequent rows reference back to this line.
- Place pavers, don't slide them — set each paver straight down onto the sand — never drag or slide pavers into position. Sliding displaces sand and creates high spots under the leading edge of the paver. Place the paver as close to final position as possible and adjust with gentle taps.
- Maintain consistent joint spacing — most concrete pavers have molded spacer lugs on their sides that automatically create 1/16" joints. If your pavers don't have lugs, use paver spacers or a thin piece of cardboard to maintain consistent spacing.
- Check level frequently — every 4–6 pavers, lay a long level across the surface to check for high or low spots. A high paver has too much sand under it — lift it and scrape a little sand out. A low paver has too little sand — lift it and add a small amount of loose sand, then replace and check again.
- Use a rubber mallet to seat pavers — gently tap each paver with a rubber mallet to seat it firmly into the sand. One firm tap in the center is usually sufficient. Don't over-tap — you'll create a low spot.
- Work from the laid pavers, not the sand — kneel on a kneeling board placed on laid pavers to avoid disturbing the screeded sand. Never step directly on the unscreeded sand area.
Every 4 rows, stretch a string line across the patio at paver height to verify your rows are staying straight. Even small misalignments compound — a 1/16" error per row adds up to ¾" after 12 rows, creating a noticeably skewed pattern. Catching it at row 4 is a 5-minute fix; catching it at row 20 means pulling up and resetting a significant section.
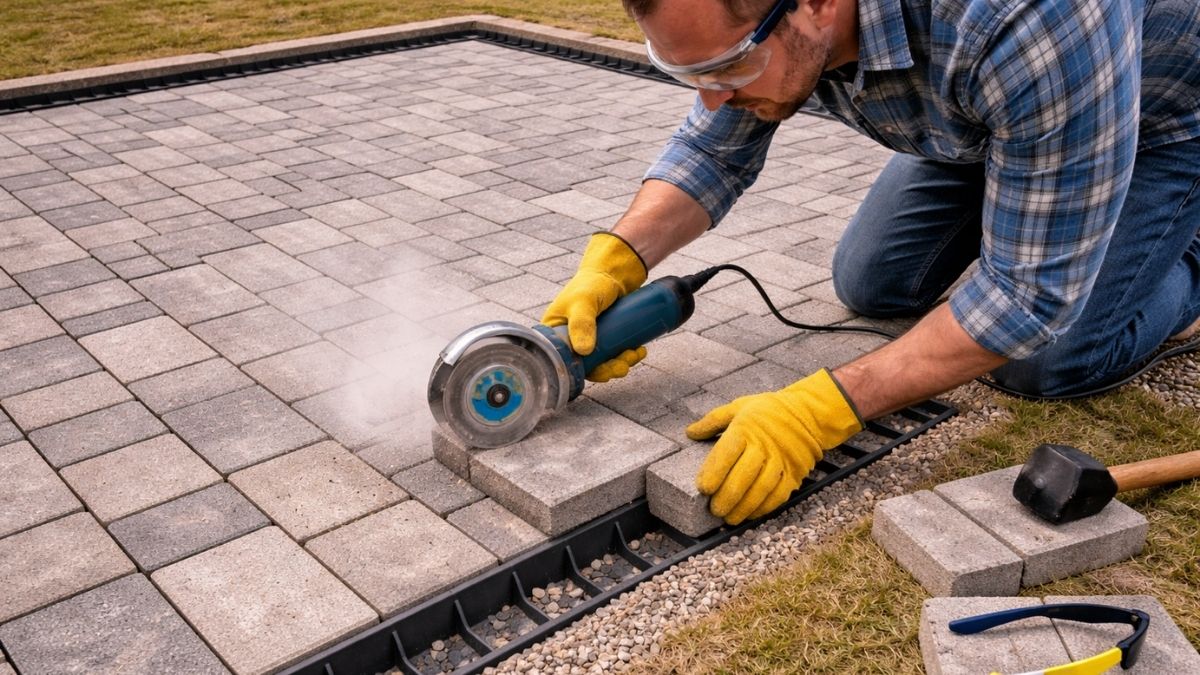
Once all full pavers are laid, you'll have gaps at the edges and possibly around obstacles that need cut pieces. Paver cutting is straightforward with the right tool and a little practice — plan your cuts before starting to minimize waste.
- Measure each cut piece individually — don't assume all edge cuts are the same width. Measure each gap separately and mark the paver for cutting. Mark with a pencil or chalk on the paver face.
- Angle grinder with diamond blade — the most versatile option for DIY paver cutting. A 4½" angle grinder with a continuous rim diamond blade makes clean straight cuts in 2–3 passes. Score the cut line first at low pressure, then make progressively deeper passes. Wear eye protection — fragments fly.
- Wet saw (rental) — a rented paver/tile wet saw makes the cleanest, most precise cuts with minimal dust. Worth renting if you have more than 20 edge cuts. Produces a factory-quality cut edge. Cost: $50–$80/day rental.
- Chisel method for rough cuts — score a line with a brick chisel and hammer all the way around the paver, then strike firmly along the score line. This produces a rougher edge but is fast and free. Useful for cuts that will be hidden by edge restraint or planting beds.
- Never cut smaller than half a paver — pieces narrower than half a paver width are weak, look poor, and are difficult to keep in place. If your layout produces cuts narrower than half a paver, shift the starting position of your layout by half a paver width and re-lay from the opposite edge.
- Place cut pieces with cut edge facing outward — whenever possible, orient cut pavers so the cut edge faces the perimeter edge restraint (which will hold it). Factory edges should face inward toward the patio center where they're visible.
Before firing up the saw, lay all your cut pavers in position without cutting and measure the cuts needed for the entire edge at once. Group similar-sized cuts together and batch-cut them in one session. This is faster than measuring and cutting one at a time, and reduces saw setup/teardown time significantly.
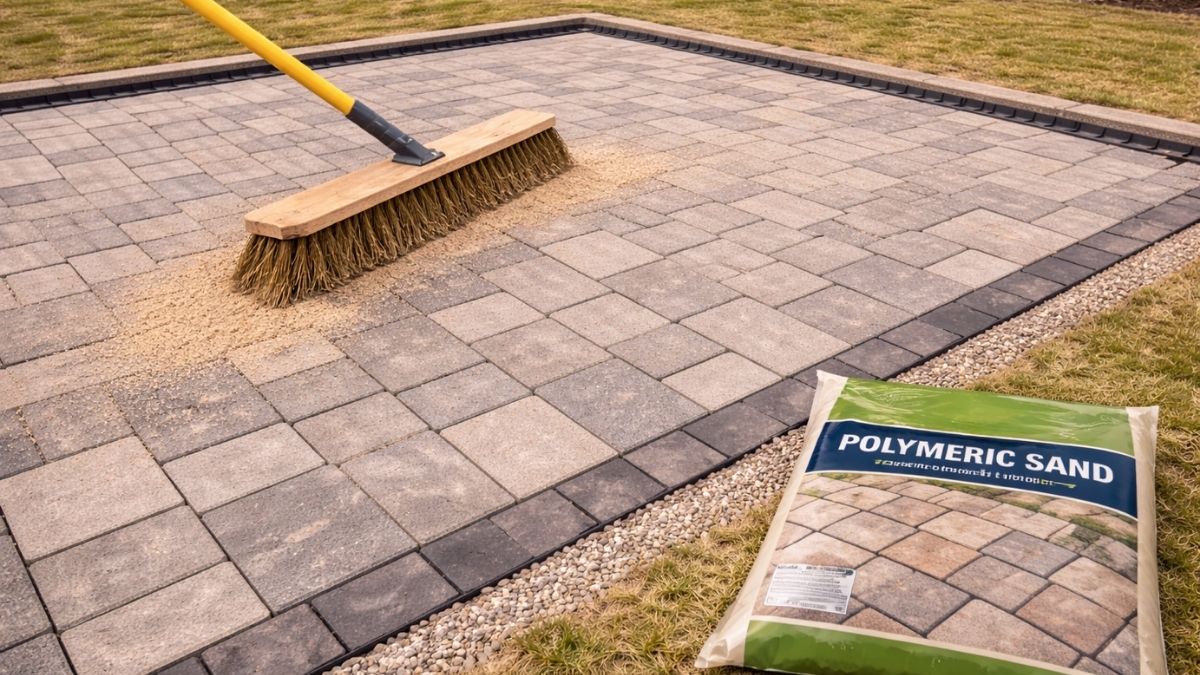
The final compaction and joint sanding are what lock all the pavers into a unified, solid surface. Don't skip or rush these steps — uncompacted pavers will shift and tilt over the first season, and unsealed joints allow weed growth and insect infestation.
- Do a final check before compaction — walk the entire patio and tap each paver. Any that sound hollow or rock underfoot have a void beneath them — lift and add sand before compaction. Also verify the patio slope is consistent and all edges are seated against the edge restraint.
- Compact with the plate compactor — attach a rubber pad to the plate compactor base (essential — bare steel will chip and crack pavers). Run the compactor over the entire patio surface in overlapping passes, first in one direction then perpendicular. This seats all pavers firmly into the sand and brings them to a consistent height. Make 2–3 complete passes.
- Spread polymeric jointing sand — pour polymeric sand (also called polymeric joint sand or poly sand) on the patio surface and sweep it into the joints with a stiff push broom. Work in circular and figure-8 motions to force sand into all joints. Add more sand as joints fill — joints should be filled to within ¼ inch of the paver surface.
- Compact again — run the plate compactor over the patio a second time to vibrate the polymeric sand down into the joints. Add more sand to any joints that have dropped below the ¼-inch fill level.
- Sweep off excess sand — use the push broom to sweep all remaining sand off the paver surfaces. This is important — polymeric sand left on the surface will activate with moisture and bond to the paver face, leaving a hazy residue that's very difficult to remove.
- Activate with water — using a fine mist setting on a garden hose, lightly wet the entire patio surface. The moisture activates the polymeric binders in the sand, which harden over 24 hours to form a firm, jointed surface that resists weeds, ants, and erosion. Do not flood — a light, even mist is all that's needed. Avoid rain for 24 hours after activation.
Your paver patio is ready to use immediately — no curing time required. The polymeric sand needs 24 hours to fully harden, so avoid heavy foot traffic on the first day. Add patio furniture, outdoor lighting, or a fire pit and enjoy your new outdoor space. To keep it looking great, re-seal the patio every 2–3 years with a paver sealer to prevent staining, efflorescence, and UV fade.
Pro Tips & Common Mistakes
Common Mistakes to Avoid
- Insufficient excavation depth — the #1 cause of paver patio failure. Too shallow means inadequate base, which causes settling and unevenness within a season. Always excavate for a full 6-inch compacted gravel base.
- Skipping the geotextile fabric — without fabric separating gravel from native soil, fine soil particles migrate upward into the gravel over years, reducing drainage and causing base failure. Always install it.
- Using fine sand for bedding — fine masonry sand is too soft and unstable. Use coarse concrete sand (torpedo sand). Never use stone dust — it becomes like concrete when wet and makes future repairs nearly impossible.
- Walking on screeded sand — even one footprint in screeded sand means re-screeding that section. Always work from laid pavers or a kneeling board.
- No edge restraints — without edge restraints, the perimeter pavers gradually migrate outward. Joints widen, pavers tip, and the patio slowly comes apart. Always install plastic or metal edge restraint on all unconfined edges.
- Skipping final compaction — uncompacted pavers sit loosely on the sand and will shift with every footstep. Two passes with the plate compactor seats all pavers uniformly and dramatically improves stability.
- Leaving polymeric sand on the surface when activating — any polymeric sand on the paver face when you apply water will bond to the surface, leaving a stubborn haze. Sweep all surface sand off completely before misting.
Pro Tips
- Order pavers from a single production run — batch colors can vary slightly between deliveries. Order everything at once and keep 10% extra for future repairs.
- Mix pavers from multiple pallets as you lay — color variation between pallets (even in the same production run) is normal. Blending from 3 pallets simultaneously eliminates visible color banding.
- Rent the plate compactor with a rubber pad — the pad is non-negotiable for compacting pavers without chipping. Most rental companies include it; verify before renting.
- Lay pavers in cool weather when possible — hot sun dries sand faster and gives you less time to adjust. Early morning starts in summer are ideal.
- Use a story pole (a straight piece of lumber marked with total base depth and layer heights) to check depth at multiple points as you build up each layer. Much faster than measuring from string lines for each check.
- Save 10–15 extra pavers from the original batch and store them for future repairs. Color-matched replacement pavers may not be available years later when you need them.