- Before You Start
- Materials & Tools Needed
- Step 1 — Design & Plan the Layout
- Step 2 — Set the Post Footings
- Step 3 — Set & Brace the Posts
- Step 4 — Install the Beam
- Step 5 — Install the Rafters
- Step 6 — Add Purlins & Decorative Cuts
- Step 7 — Sand, Stain & Seal
- Step 8 — Add Climbing Plants or Shade
- Pro Tips & Common Mistakes
- FAQs
Before You Start
A pergola is the single best addition you can make to an outdoor living space — it defines a room-like area outdoors, provides partial shade, supports climbing plants and string lights, and adds significant curb appeal and home value. Professional pergola installation costs $3,000–$10,000+ depending on size and material. A comparable DIY cedar or pressure-treated pergola runs $500–$1,500 in materials — putting $1,500–$5,000+ back in your pocket.
This guide covers a freestanding 10×12 ft pergola with 4 posts, double beams, and open rafters — the most popular residential size and the most beginner-friendly structure. The techniques apply to any similar size from 8×8 ft to 14×16 ft with minor adjustments to lumber sizing. Use our pergola cost calculator to estimate your full material budget before shopping.
Do You Need a Permit?
Most municipalities require a permit for a pergola attached to the house or exceeding a certain size (typically 200 sq ft or 10 ft tall). Freestanding pergolas under 200 sq ft are often exempt but rules vary widely — always check with your local building department before starting. Permit fees typically run $50–$150. Building without a required permit can complicate home sales and insurance claims.
Freestanding vs Attached
This guide builds a freestanding pergola — all four posts in the ground, independent of the house. An attached pergola uses the house wall as one support (replacing two posts with a ledger board bolted to the house wall). Attached pergolas are simpler to build and use fewer materials, but require drilling into the house structure and proper flashing to prevent water intrusion. Freestanding pergolas are more flexible in placement and fully independent.
Use our Pergola Cost Calculator to get a detailed material and labor estimate across 7 materials (cedar, PT lumber, redwood, aluminum, vinyl, steel, and composite) — so you can compare before committing to a material. Our Lumber Cost Calculator gives exact board costs for your cut list once you're ready to order.
Materials & Tools Needed
The lumber list below is for a standard 10×12 ft freestanding pergola, 8 ft finished height, built from pressure-treated (PT) or cedar lumber. Cedar is the premium choice — naturally rot-resistant and beautiful. Post-2004 PT lumber is the budget choice — highly durable and more economical. Use our lumber cost calculator to price your exact cut list.
Lumber Cut List (10×12 ft Pergola)
| Member | Size | Length | Qty | Purpose |
|---|---|---|---|---|
| Posts | 6×6 | 10 ft | 4 | Vertical supports (2 ft in ground + 8 ft above) |
| Beams (double) | 2×8 | 12 ft | 4 | 2 boards per side spanning post to post (long axis) |
| Rafters | 2×6 | 12 ft | 7 | Span 10 ft across the width, 16" OC spacing |
| Purlins | 2×4 | 12 ft | 5 | Lay perpendicular on top of rafters, 2 ft spacing |
| Blocking | 2×8 | Short pieces | As needed | Between double beam boards at post locations |
Hardware & Materials
- Post base hardware — 4× adjustable post bases (if mounting on concrete) or 80-lb concrete bags (if setting posts in ground)
- Structural screws or bolts — 3" and 3½" exterior structural screws (GRK or similar) for beam-to-post and rafter-to-beam connections; ½" carriage bolts for post-to-beam through-bolting
- Joist hanger hardware — rafter ties or hurricane ties at each rafter-to-beam connection for wind resistance
- Post caps — decorative post caps that sit on top of each post (optional but highly recommended — they shed water and prevent end-grain rot)
- Concrete — 3–4 bags 80-lb fast-setting concrete per post hole (for ground-set posts)
- Exterior wood stain or paint + sealer — for finishing
- Gravel — 6" of gravel at base of each post hole for drainage
Tools
- Layout — stakes, mason's line, tape measure, speed square, plumb bob or level
- Digging — post hole digger (clamshell) or power auger rental ($80–$120/day)
- Cutting — circular saw or miter saw; jigsaw for decorative rafter tail cuts
- Fastening — drill/driver, impact driver, socket wrench for carriage bolts
- Lifting — 2–3 helpers for beam lifting (a critical safety step)
- Safety — work gloves, safety glasses, hard hat during beam installation
The design phase is where you make all the key decisions that determine how the pergola looks, how long it lasts, and whether it requires a permit. Finalizing the design before buying lumber eliminates expensive changes mid-build.
Key Design Decisions
| Decision | Standard Choice | Notes |
|---|---|---|
| Size | 10×12 ft or 12×14 ft | Minimum 8×8 ft for a usable dining space |
| Height | 8–9 ft finished post height | 8 ft is comfortable; 9 ft feels more open and grand |
| Post material | 6×6 cedar or PT | 6×6 is code minimum for 8 ft+ height; never use 4×4 for posts over 6 ft |
| Post setting method | Set in concrete in ground | Most common; post base hardware used on concrete patios |
| Beam style | Double 2×8 sandwiching post | Stronger and easier to install than single large beam |
| Rafter spacing | 16–24 inches on center | 16" gives denser shade; 24" is more open and uses fewer boards |
| Rafter tail style | Decorative curved or notched cut | Visual detail that elevates the finished look — use a jigsaw |
- Choose the location carefully — consider sun angle (south or west orientation provides afternoon shade where you need it most), proximity to the house (attached vs freestanding), ground condition (avoid areas with drainage problems), and underground utilities (call 811).
- Mark post locations precisely — use batter boards and string lines to establish exact post center locations. For a 10×12 ft pergola, posts are typically set at 10×12 ft on center. Use the 3-4-5 method or diagonal measurement to confirm square. Mark each post center with a stake.
- Verify setback requirements — most municipalities require structures to be set back 3–5 ft from property lines. Check before finalizing your location.
- Create a cut list — finalize all lumber dimensions based on your confirmed design and make a complete cut list before going to the lumber yard. Use our lumber calculator to convert your cut list to total board feet for purchasing.
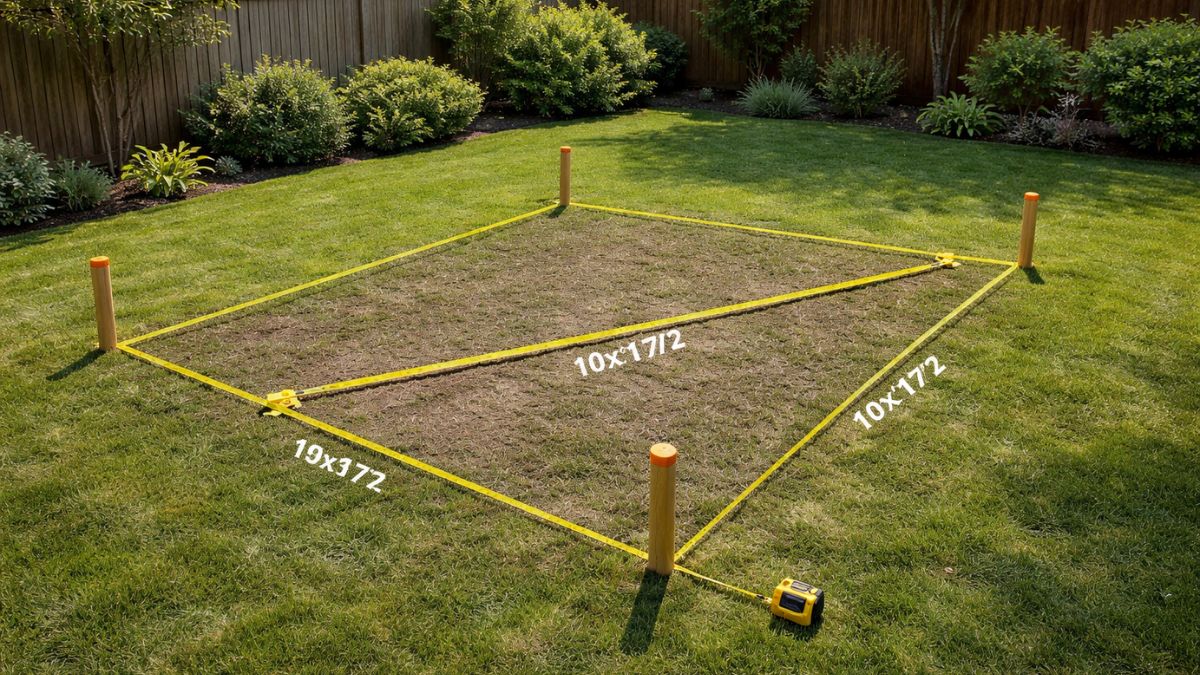
Sketch your pergola to scale on graph paper (1 square = 1 foot) before buying any lumber. Include post locations, beam spans, rafter spacing, and finished heights. This reveals potential problems — like a beam that's too short or rafters that don't overhang symmetrically — before they become expensive mistakes. A 20-minute sketch saves hours of rework.
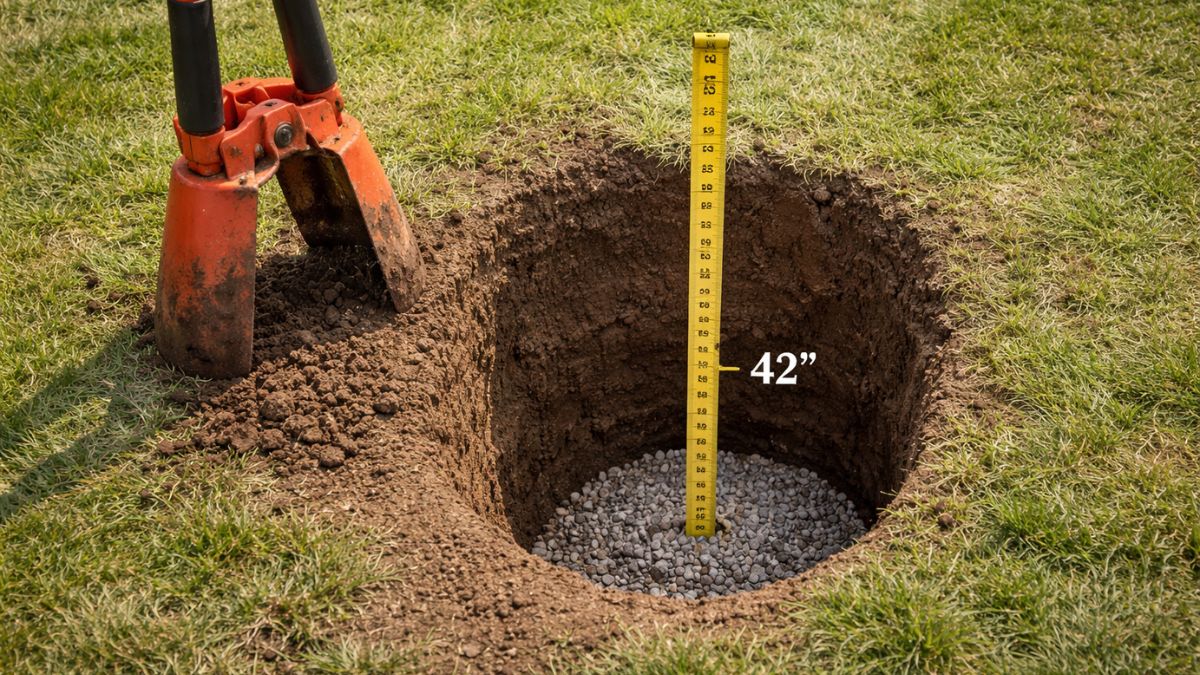
The footings are the foundation of the entire structure. Every problem with a leaning, shifting, or unstable pergola traces back to inadequate footings. This step cannot be rushed — concrete needs to fully cure before post loads are applied.
Footing Depth Requirements
Post holes must extend below the frost line — the depth to which the ground freezes in winter. Frost heave (ground expanding as it freezes) can push posts up and out of alignment if holes are too shallow. Frost line depths: Southern states 0–12 inches, Mid-Atlantic 12–24 inches, Midwest/Northeast 36–48 inches, Northern states 48–60 inches. Contact your local building department for the exact frost line depth in your area.
- Dig the post holes — use a clamshell post hole digger or rented power auger. Hole diameter should be 3× the post diameter: for 6×6 posts (5.5" actual), dig a 16–18" diameter hole. Hole depth = frost line depth + 6 inches for gravel drainage base.
- Add gravel drainage layer — pour 6 inches of ¾-inch gravel into the bottom of each hole and tamp firmly. This prevents water from pooling around the post base and dramatically extends post life by keeping the critical ground-level zone drier.
- Set post depth correctly — for an 8 ft finished pergola height, your posts need to be tall enough to account for the depth in the ground: 8 ft above grade + frost line depth + 6" gravel = total post length. Example for 36" frost line: 8 ft + 3 ft + 0.5 ft = 11.5 ft posts. Buy posts at 12 ft and trim to exact height after setting.
- Place posts and pour concrete — stand the post in the hole on the gravel base. Have a helper hold it plumb (or brace it temporarily with 2×4 diagonal braces staked into the ground). Pour fast-setting concrete around the post. For 80-lb bags of fast-setting mix: use 3–4 bags per hole for a 6×6 post in an 18-inch diameter hole. Follow bag instructions — most fast-set mixes just need water poured in after the dry concrete is placed.
- Plumb the posts perfectly — check plumb with a level on two adjacent faces of each post before the concrete sets. This is critical: a post that's 1° out of plumb at 8 ft height is 1.7 inches off at the top — very visible in the finished structure. Adjust while the concrete is still workable (within the first 5–10 minutes for fast-set).
- Allow full cure before loading — fast-setting concrete reaches working strength in 4 hours. Full cure is 24–48 hours. Do not attach beams or apply any load until the concrete has fully cured — loading too early can shift posts out of plumb.
Posts set in packed earth without concrete will eventually heave, shift, and lean — especially in freeze-thaw climates or areas with expansive clay soil. Always use concrete. For extra protection in wet climates, wrap the below-grade section of cedar posts in self-adhesive flashing tape before setting — this further slows moisture infiltration at the most vulnerable zone.
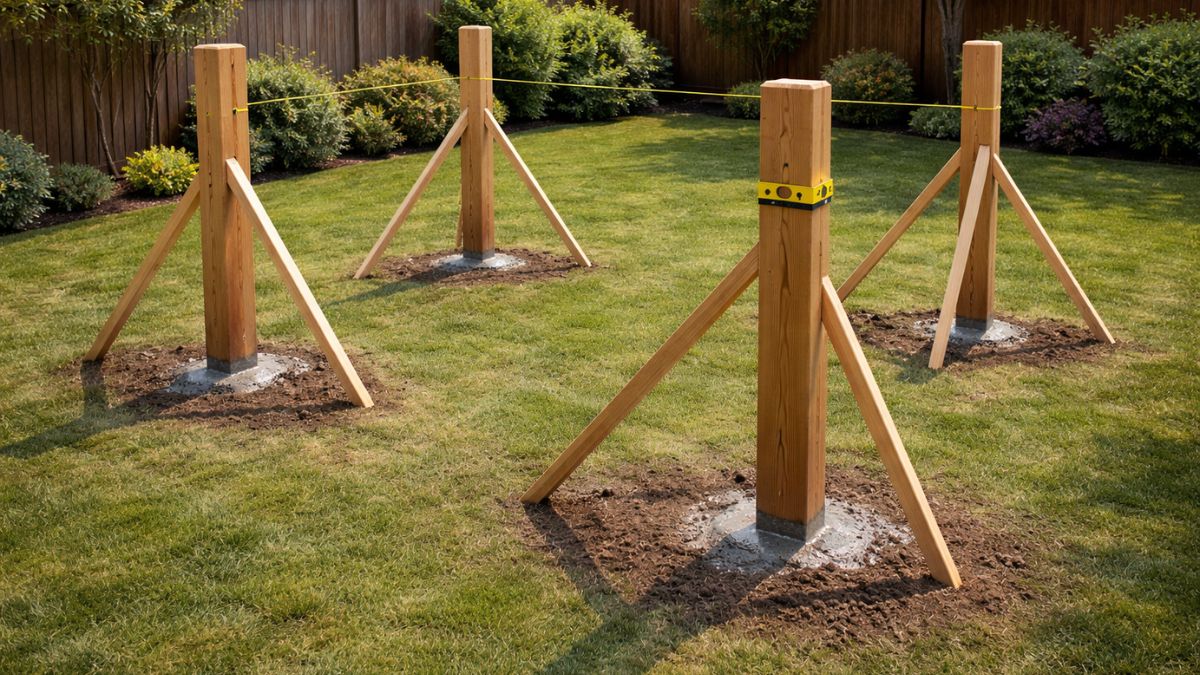
Once the concrete has fully cured, you can trim the posts to final height and install the temporary bracing that will keep them plumb during beam and rafter installation. This step transforms 4 individual posts into a stable, aligned structure ready for framing.
- Establish a level reference line — stretch a taut string line between opposite posts at the planned top-of-beam height. Use a line level or laser level to make the string perfectly level. This line is your reference for marking the post cut height on each post.
- Mark cut height on all 4 posts — transfer the level reference height to each post with a pencil mark all the way around the post using a speed square. All 4 marks must be at the same height from the ground — verify by measuring from the ground to the mark at each post. Any variation creates a tilted beam and uneven structure.
- Cut posts to final height — use a circular saw to cut each post at the marked line. For clean cuts on thick 6×6 posts: score the cut line with a circular saw on two or three faces, then finish with a handsaw on the final face. Or use a miter saw if the post can be brought to a saw station. Cut ends should be perfectly flat and square.
- Install temporary diagonal braces — nail 2×4 diagonal braces from each post to stakes in the ground at 45° angles. Two braces per post (in perpendicular directions) keeps each post rigidly plumb during the beam installation process. These are removed after the beams are bolted in place and the structure becomes self-bracing.
- Apply end-grain sealer to cut tops — immediately after cutting, apply two coats of end-grain sealer or exterior wood preservative to the top of each post. End grain absorbs moisture far faster than face grain — sealing it now dramatically reduces checking (cracking) and rot at the top of the post over the pergola's life.
After concrete cures, re-stretch your layout string lines at the planned beam height. Use a water level (a clear tube filled with water — both ends read the same height regardless of distance) to transfer the exact height from one post to all others. A water level is more accurate than a tape measure for this task and costs under $15. It's the same tool used by foundation contractors to establish level across long distances.
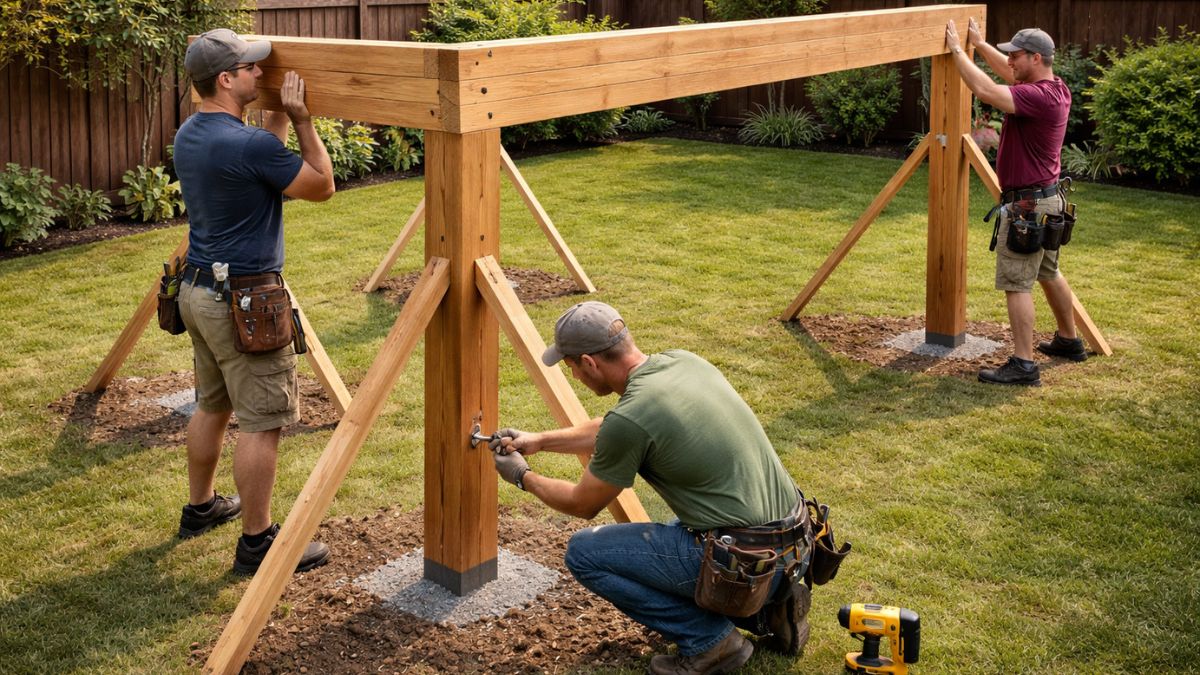
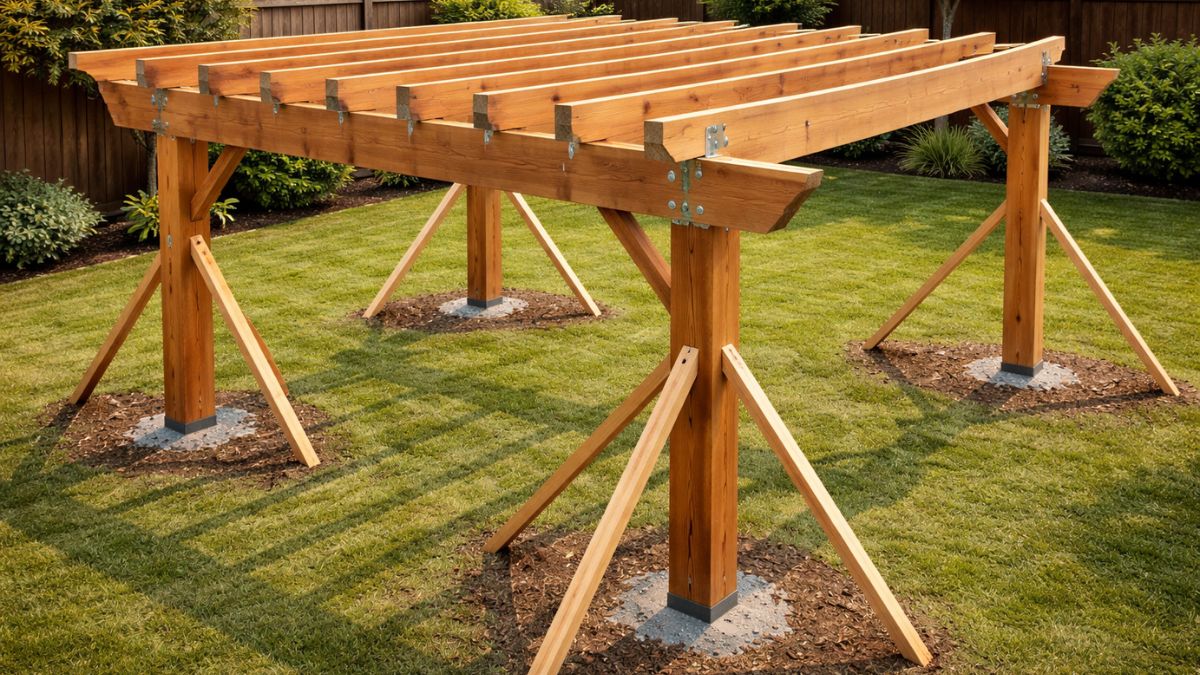
Beam installation is the most physically demanding and most structurally critical step. Beams are heavy — two 2×8×12 ft boards together weigh about 60–80 lbs — and must be lifted to 8 ft height and held in place while fastened. You need at least 3 people: two to lift and hold, one to fasten. Safety first.
Double Beam Method (Recommended)
Rather than using a single large beam (4×8, 4×10, or 6×10) that's heavy and difficult to handle, use two 2× boards sandwiching each post — a "double beam" or "sandwich beam." This is easier to handle, stronger in many configurations, and gives a cleaner visual look where the beam wraps the post on two faces.
- Cut beams to final length — for a 10×12 ft pergola, beams run along the 12 ft axis (the long sides). Cut beams to overhang each end post by 12–18 inches for a traditional pergola look. Example: post span is 10 ft, plus 12" overhang each end = 12 ft beam length. A symmetrical overhang looks most intentional.
- Mark the post notch location on each beam board — if using the sandwich method, mark where each post falls on both beam boards so you can drill bolt holes before lifting. Drilling at ground level is far easier than at 8 ft.
- Pre-drill bolt holes — clamp both beam boards together and drill ½-inch holes for the carriage bolts through both boards simultaneously. This ensures the holes are perfectly aligned. Drill bolt holes at each post location — two bolts per connection, staggered vertically 4 inches apart.
- Lift and position the first beam board — lift one beam board into position with two helpers, resting it on the post top. Clamp temporarily with a C-clamp or strap clamp. Verify it's level with a long level. Tack with a screw to hold temporarily.
- Install the second beam board — sandwich the second board on the other side of the post. Drive carriage bolts through the pre-drilled holes, add washers and nuts, and tighten firmly. The post is now captured between both beam boards — an extremely strong connection.
- Add blocking between beams at post locations — cut short blocking pieces from 2×8 scrap to fit between the two beam boards between posts. This keeps the beam from twisting and completes the sandwiched appearance. Install with 3-inch screws through the beam face into the blocking ends.
- Remove temporary post braces — once both beams are fully bolted to all four posts, the structure is self-bracing. Remove all temporary 2×4 diagonal braces.
A 12-ft pipe clamp or bar clamp is one of the best tools for beam installation. Attach one end to the post and use it to hold the beam board at the correct height while you drive the first bolts — freeing up your helpers to focus on keeping things plumb and level rather than just holding weight. It's a $20–$30 tool that makes a 3-person job manageable with 2 people.
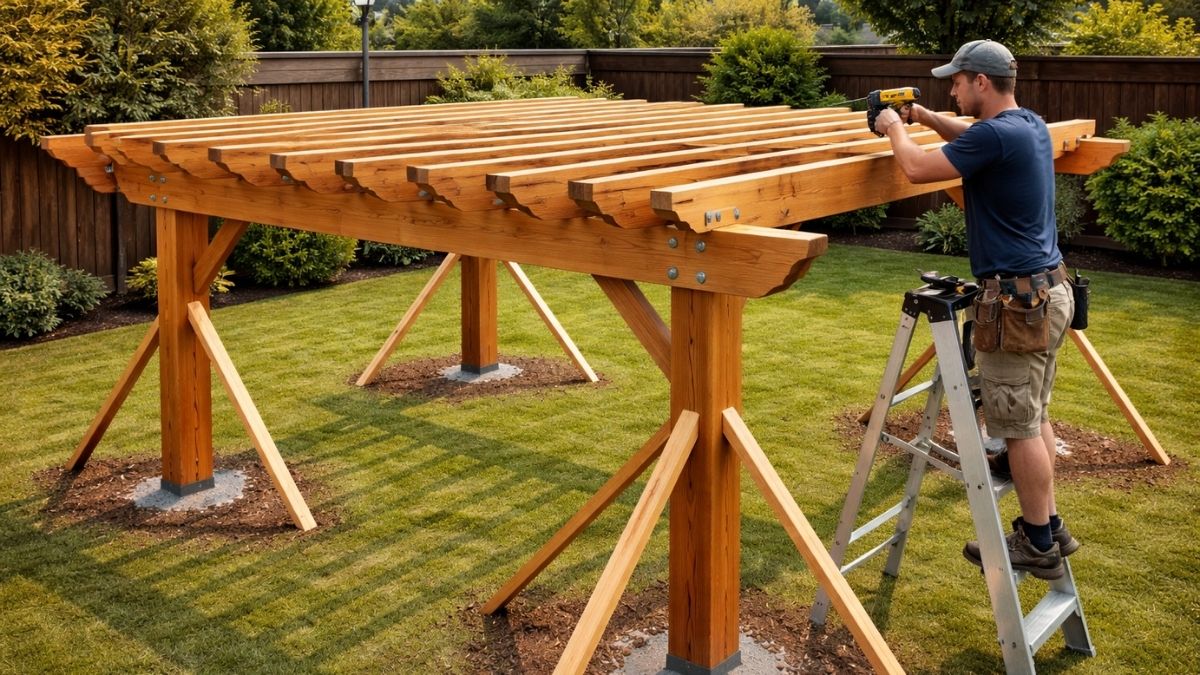
Rafters are the horizontal boards that span across the two beams, running perpendicular to them. They define the visual character of the pergola — their spacing, overhang, and tail cut style are what people notice first when they look at the finished structure.
- Cut all rafters to the same length — rafters span the 10 ft width of the pergola plus overhang on each end. Standard overhang is 12 inches per side for a 10 ft span. Cut length = 10 ft + 1 ft + 1 ft = 12 ft. Since you bought 12 ft boards for this guide, no cutting is needed for length — just cut the decorative tails (Step 6).
- Mark rafter spacing on the beams — measure and mark rafter locations on both beams simultaneously. For 16-inch OC spacing on a 12 ft beam with 12-inch overhangs on each end, mark at 0", 16", 32", 48", 64", 80", 96" from the end post centerline — 7 rafters total. Use a square to transfer marks to both beam boards simultaneously.
- Install the two end rafters first — the outermost rafters establish the visual boundaries of the pergola and serve as a reference for all interior rafters. Install them first, verify they're plumb (not twisted), and use them to confirm all subsequent rafter spacing.
- Attach rafters with rafter ties — use hurricane ties or rafter ties (H2.5 or similar) on at least one end of each rafter, fastened with the correct joist hanger nails (not screws — the shear capacity is different). These metal connectors dramatically increase wind uplift resistance and are required by many building codes.
- Toe-nail the opposite end — at the non-hardware end of each rafter, drive two 3-inch structural screws at opposing angles (toe-nailing) into the beam face. This holds the rafter in position while providing a secondary connection point.
- Check for plumb and consistent spacing — every 3 rafters, step back and sight down the line from the end. All rafter faces should be in a perfectly flat plane. Any twisted or bowed rafter should be corrected now before the purlins lock everything in place.
Every piece of dimensional lumber has a slight natural bow called a "crown." Before installing each rafter, sight down the edge to find the crown (the convex side of the bow). Always install rafters crown-side up — the weight of the structure will gradually push them flat over time. Installing crown-side down produces a permanently sagging appearance that gets worse over time.
Purlins are the top layer of the pergola — 2×4 boards laid flat on top of the rafters, running perpendicular to them. They add the finishing visual detail, provide additional shade when spaced closely, and are where climbing plants attach. Decorative tail cuts on the rafters and purlins are what transform a utilitarian structure into a beautiful one.
- Cut decorative rafter tails first — before installing purlins, cut the decorative profile on the exposed ends of all rafters. Common profiles: a simple 45° chamfer cut, a curved bullnose cut (use a jigsaw with a template), or a notched cut. Make a cardboard template for the chosen profile, trace it on all rafter ends, and cut with a jigsaw. Consistent cuts on all ends give a crafted, intentional appearance.
- Cut purlin length and tails — purlins span the 12 ft beam-to-beam distance plus 6–12 inch overhangs on each end. Cut all purlins to the same length and cut matching decorative tails on the purlin ends. Purlins are smaller (2×4) so tail cuts are faster and easier than on rafters.
- Space and mark purlins — mark purlin locations on the top edge of all rafters simultaneously. Standard purlin spacing is 24 inches OC. For a 12 ft rafter span with 12-inch overhangs: mark at 0", 24", 48", 72", 96" from the end rafter — 5 purlins for this guide's design.
- Attach purlins to rafters — lay each purlin flat on top of the rafters at the marked locations and drive two 3-inch structural screws down through the purlin into the top edge of each rafter. Pre-drilling prevents splitting — purlins are narrower and more prone to cracking than rafters.
- Sand all cut ends immediately — rough saw cuts on decorative ends absorb stain unevenly and look rough. Sand all cut ends with 80-grit followed by 120-grit sandpaper before applying any finish. Smooth ends take stain evenly and look far more finished.
Cut a cardboard or plywood template for your chosen rafter and purlin tail profile. Trace the same template on every single board end before cutting — this guarantees every tail looks identical. Even a millimeter of variation in freehand cuts looks sloppy on the finished pergola. One hour making a precise template saves hours of inconsistent cutting and produces a far more professional result.
Finishing is what separates a pergola that looks beautiful for 20 years from one that turns gray and rough in 3 seasons. Exterior wood needs protection from UV, moisture, and biological growth — and applying finish to a newly built structure is dramatically easier than refinishing an old weathered one.
- Sand the entire structure — sand all visible surfaces with 80-grit sandpaper to remove mill glaze (a slick surface layer from lumber mill processing that prevents stain penetration). Follow with 120-grit for a smooth finish. Pay special attention to all cut ends — end grain needs extra sanding to accept finish evenly.
- Wipe down with a tack cloth or damp rag — remove all sanding dust before applying any finish. Dust trapped under stain creates a grainy, rough surface. Vacuum the structure first, then wipe with a tack cloth or lightly damp cloth and allow to dry completely.
- Apply a wood preservative or pre-treatment (PT lumber) — if using pressure treated lumber, apply a water repellent preservative to all cut ends and any areas where the PT treatment was disturbed by cutting. This is a building code requirement in many jurisdictions and significantly extends post life.
- Apply exterior stain or paint — use a semi-transparent penetrating stain for cedar (shows natural grain), or a solid-color stain or exterior paint for PT lumber. Apply with a brush for thorough coverage — rollers and sprayers miss the undersides of horizontal members. Two coats provide far better protection than one.
- Seal with a UV-protective topcoat — for maximum protection, apply a UV-blocking clear sealer over the stain. UV radiation is the primary cause of wood graying and surface degradation. A quality UV sealer adds 2–3 years between refinishing cycles.
- Re-apply every 2–3 years — exterior wood finish breaks down from UV and weather. Clean the surface, lightly sand any peeling areas, and re-apply stain and sealer every 2–3 years to maintain protection and appearance.
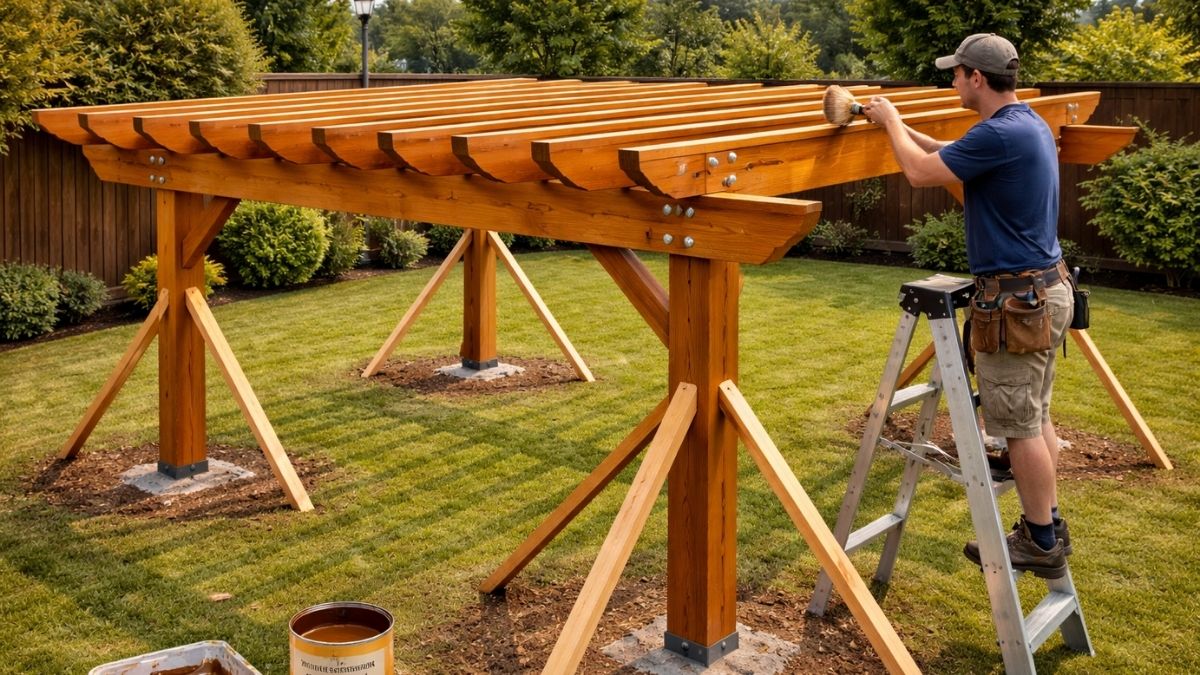
The professional approach is to apply the first coat of stain to all individual lumber pieces on sawhorses before assembling the structure. This gives complete access to all surfaces — including the faces that will be hidden by connections after assembly. Do a touch-up coat after assembly to cover any handling marks and joint areas. You'll use less stain, achieve better coverage, and finish faster.
The pergola structure itself is functional and beautiful — but the addition of climbing plants, shade sails, or string lights transforms it into a true outdoor living room. These finishing touches cost relatively little but have an outsized impact on how much you actually use and enjoy the space.
Popular Shade & Plant Options
| Option | Shade Level | Maintenance | Cost | Notes |
|---|---|---|---|---|
| Wisteria | Dense (full coverage) | High (aggressive grower) | $20–$50/plant | Spectacular blooms; needs heavy pruning 2× per year |
| Climbing roses | Moderate | Moderate | $15–$40/plant | Beautiful blooms; requires training and annual pruning |
| Clematis | Light to moderate | Low | $10–$25/plant | Fast-growing; dies back in winter; easy to manage |
| Shade sail | 70–90% | Very low | $50–$200 | Instant shade; removable for winter; attach to post tops |
| Retractable canopy | 90–100% | Very low | $200–$600 | Adjustable; waterproof options available |
| Polycarbonate roofing | 80–90% | Very low | $3–$8/sq ft | Full weather protection; permanent |
- Install climbing plant supports — staple galvanized wire or garden netting between the posts and along the purlins to give climbing plants something to grip. Space wire runs 6–8 inches apart vertically. Plant climbers in soil at the base of each post after the structure is fully finished.
- Hang string lights — zigzag outdoor string lights (weatherproof, Edison bulb style) back and forth across the purlins, using cup hooks screwed into the purlins. Attach one end to a weatherproof outdoor outlet. String lights are the single highest-impact finishing touch — they make the pergola usable at night and create an instantly inviting atmosphere.
- Install a shade sail (optional) — stretch a triangular or rectangular shade sail between post tops using eye bolts and stainless turnbuckles. Position the sail at a slight angle for water runoff. Most shade sails are UV-treated and rated for 5–10 years of outdoor use.
- Add a ceiling fan (optional) — a damp-rated outdoor ceiling fan mounted to a blocking board between two rafters provides airflow and mosquito deterrence. Run the electrical before purlins make ceiling access difficult. Use a licensed electrician for the electrical connection.
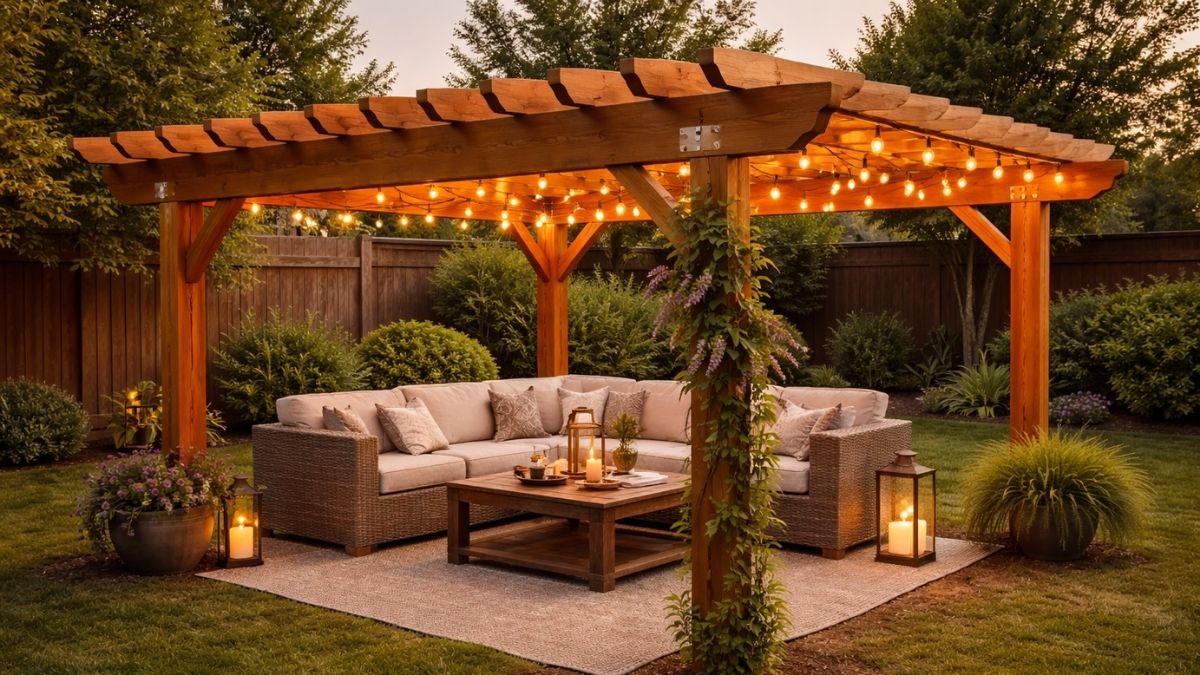
A well-built cedar pergola adds $5,000–$10,000+ in appraised value to most homes — far exceeding the $500–$1,500 DIY material cost. With proper finishing and maintenance every 2–3 years, your pergola will look great and stand strong for 20–30+ years. See how the full project cost compares professionally with our pergola cost calculator.
Pro Tips & Common Mistakes
Common Mistakes to Avoid
- Using 4×4 posts — 4×4 posts are structurally adequate for low pergolas but look spindly and undersized at 8+ ft heights. Always use 6×6 for a pergola with 8 ft or taller posts. The visual difference is dramatic.
- Shallow footings — post holes above the frost line will heave in winter, throwing the entire structure out of alignment. Know your local frost line depth and dig below it.
- Posts not plumb — a post that's slightly out of plumb multiplies its error through every level of the structure above it. Spend the extra time to get posts perfectly plumb before concrete sets.
- No decorative rafter tail cuts — square-cut rafter ends look unfinished on an otherwise beautiful pergola. Even a simple 45° chamfer takes 5 minutes per board with a jigsaw and transforms the finished look entirely.
- Skipping the finish — unfinished cedar turns gray within 1–2 seasons and begins checking (cracking) at cut ends. Unfinished PT lumber weathers acceptably but looks utilitarian. A proper stain and seal job takes one day and protects the investment for years.
- Building without a permit when one is required — unpermitted structures must be disclosed when selling and may need to be removed if discovered. A $100 permit is cheap insurance.
- Lifting beams without enough help — trying to lift and fasten 8-foot beams with only 2 people is a safety risk and usually results in misaligned connections. Always have 3 people for beam installation.
Pro Tips
- Buy the best-grade lumber you can afford — a pergola is a high-visibility structure and the quality of the lumber shows. Select boards carefully for straightness, minimal knots, and consistent color at the lumber yard.
- Apply the first coat of stain before assembly — coat all individual boards on sawhorses before building. Touch up after assembly. Full coverage, less waste, faster application.
- Use structural screws (GRK, FastenMaster, or similar) instead of deck screws — structural screws have rated shear and withdrawal values and are code-compliant for structural connections. Regular deck screws are not rated for structural use.
- Add a 1-degree slope to the post tops — cutting post tops at a slight angle (1°) sheds water and greatly reduces end-grain checking and rot at the most vulnerable location. Just tilt the circular saw blade 1° before the final post top cut.
- Install a post cap on each post top — a decorative metal or wood post cap sheds water away from the end grain of the post and the top of the beam connection. They're inexpensive ($5–$20 each) and dramatically extend the life of this critical joint.