Before You Start
A retaining wall holds back soil on a slope and prevents erosion — but only if it's built correctly. Before you pick up a shovel, there are a few critical things to check.
Check Local Permit Requirements
Most municipalities require a building permit for retaining walls taller than 3–4 feet. Some also require engineer-stamped drawings for walls over 4 feet. Call your local building department before starting — fines for unpermitted walls can be significant and you may be forced to tear it down.
Call 811 Before You Dig
Always call 811 (or your country's equivalent utility notification service) at least 3 business days before digging. Underground utility lines for gas, water, electric, and cable are buried in many yards. Hitting one can be fatal. This service is free.
Is This a DIY-Friendly Project?
Retaining walls under 3 feet tall are very achievable for a motivated DIYer, especially using segmental concrete block or timber. Walls taller than 3 feet, walls on steep slopes, walls near structures or property lines, or walls holding back saturated soil should be designed and built by a licensed contractor.
Before buying materials, use our Retaining Wall Cost Calculator to get an instant estimate based on your wall size and material choice.
Materials & Tools Needed
The materials list below is for a standard segmental concrete block retaining wall — the most popular DIY choice. Adjust quantities using our cost calculator above.
Materials
| Material | Purpose | Quantity Guide |
|---|---|---|
| Segmental retaining wall blocks | Wall structure | 1.5 blocks per sq ft of wall face |
| Crushed gravel / base material | Foundation base | 6 inches deep, full wall length |
| Drainage gravel (pea gravel) | Behind wall drainage | 12 inches wide behind wall |
| Perforated drain pipe (4") | Water drainage | Full wall length + 10% |
| Landscape fabric | Keeps soil out of gravel | Full wall length × wall height |
| Capstone blocks | Top finishing course | 1 per linear foot of wall |
| Construction adhesive | Secure cap blocks | 1 tube per 10 linear feet |
Tools
- Shovel & mattock — for excavation
- Plate compactor — rent for $60–$100/day, essential for base prep
- Level (4 ft) — to keep courses level
- Rubber mallet — for setting blocks
- Masonry chisel & hammer — for cutting blocks
- String line & stakes — for layout
- Tape measure
- Wheelbarrow — for moving gravel and blocks
- Safety glasses & work gloves
Start by marking the front face of your wall using stakes and a string line. This gives you a clear straight reference to work from throughout the build. Use spray paint or marking chalk on the ground along the string to mark where you'll dig.
Measure the total wall length and height and sketch a simple plan. Note where the wall starts and ends, any corners, and where water will drain. Also identify where you'll outlet the drainage pipe at the end of the wall — water must have somewhere to go.
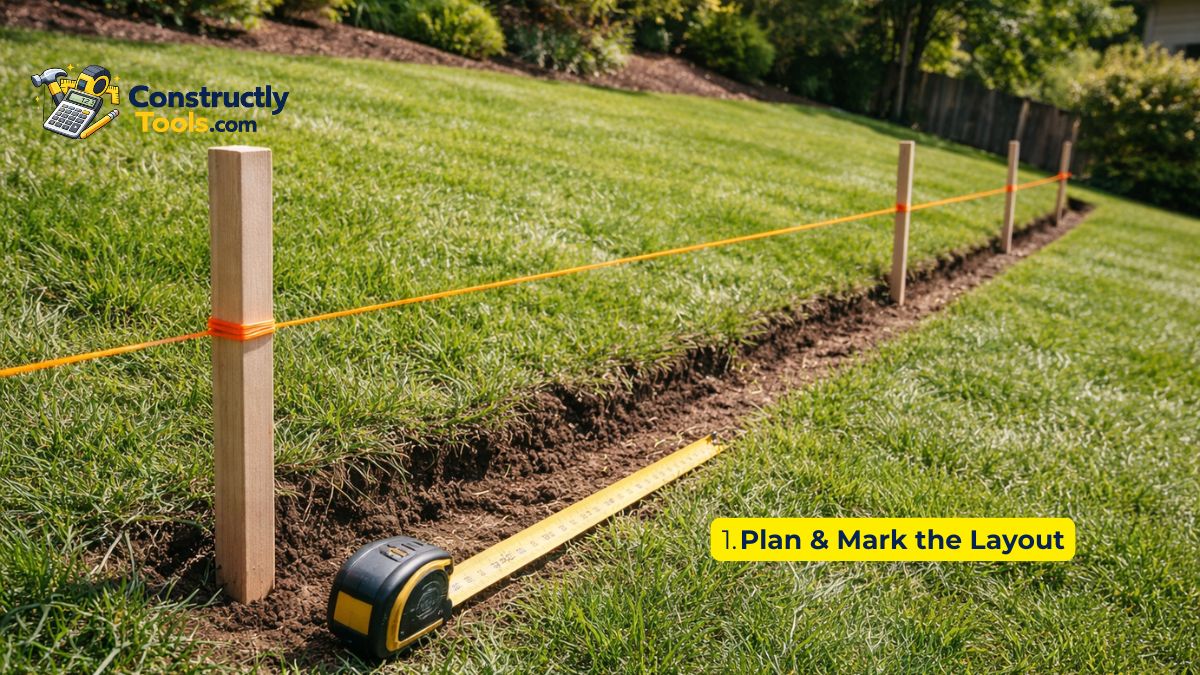
For a straight wall, a string line is all you need. For a curved wall, use a garden hose to lay out the curve naturally before marking it — this gives a much more natural-looking result than trying to measure curves.
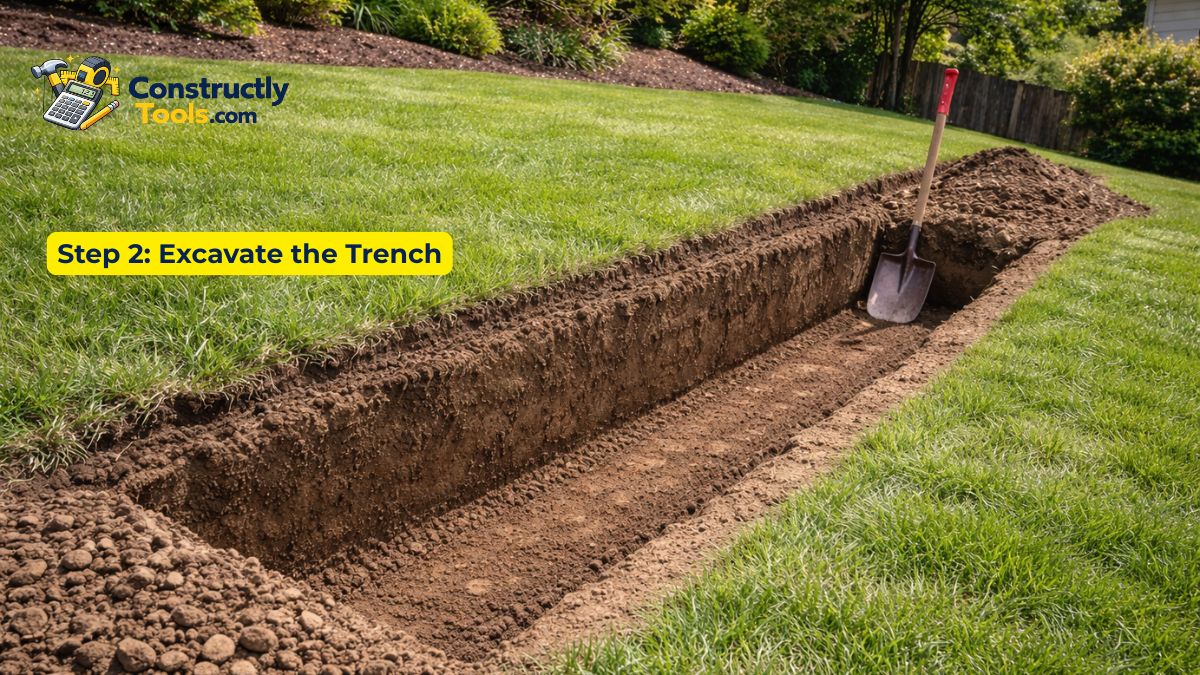
Dig a trench along your marked line for the base course of blocks. The trench needs to be:
- Deep enough to bury the first course of blocks completely — typically 6–8 inches below finished grade. The buried first course is what anchors the wall and prevents it from sliding forward.
- Wide enough for the blocks plus 6 inches of gravel base behind them — typically 24–30 inches total.
- Flat and level across the full length — use your level to check constantly.
Bury one block deep for every one foot of wall height. Building a 3-foot wall? Bury the first 3 inches of block below grade minimum. Many pros bury an entire first course (6–8 inches) regardless of height for maximum stability.
A proper base is the most important step in building a retaining wall that lasts. Skipping or rushing this step is the number one cause of wall failure.
- Add 6 inches of crushed gravel (¾ inch crushed stone) to the bottom of the trench.
- Spread it evenly with a rake.
- Compact it thoroughly with a plate compactor — make 2–3 passes. The gravel should not shift when you walk on it.
- Check for level across the full length of the trench. Adjust as needed by adding or removing gravel.

Hand tamping is not sufficient — rent a plate compactor. An uncompacted base will settle unevenly, causing blocks to shift and the wall to lean or collapse within a few years. Compactor rental is $60–$100/day and worth every penny.
The first course is the most critical — get this right and the rest of the wall will follow naturally. Take your time here.
- Place the first block at one end of the trench, lip facing down and toward the slope (into the hillside).
- Check it for level side-to-side and front-to-back. Tap with a rubber mallet to adjust.
- Place the next block tight against the first, check level, and continue down the trench.
- At corners, overlap the blocks for strength — alternate which side overlaps with each course.
- Cut blocks as needed using a masonry chisel and hammer, or rent a masonry saw for cleaner cuts.
- Once the full first course is laid, check that the entire course is level end-to-end before proceeding.

With the first course solid and level, the remaining courses go up much faster. Follow these rules for every course:
- Stagger vertical joints — never stack joints on top of each other (running bond pattern). Each block should sit over the joint between the two blocks below it, just like a brick wall.
- Set back each course — most retaining wall blocks have a built-in setback of ½–1 inch per course. This batter (slight lean back into the slope) is what gives the wall its structural strength against the soil pressure.
- Check level frequently — use your 4 ft level both along the course and across the wall face every 2–3 courses.
- Brush off debris — sweep the top of each course clean before placing the next one so blocks sit flat.

For walls over 3 feet tall, most block manufacturers require geogrid reinforcement fabric to be installed every 2–3 courses. It extends back into the compacted backfill and dramatically increases wall stability. Check the manufacturer specs for your specific block system.
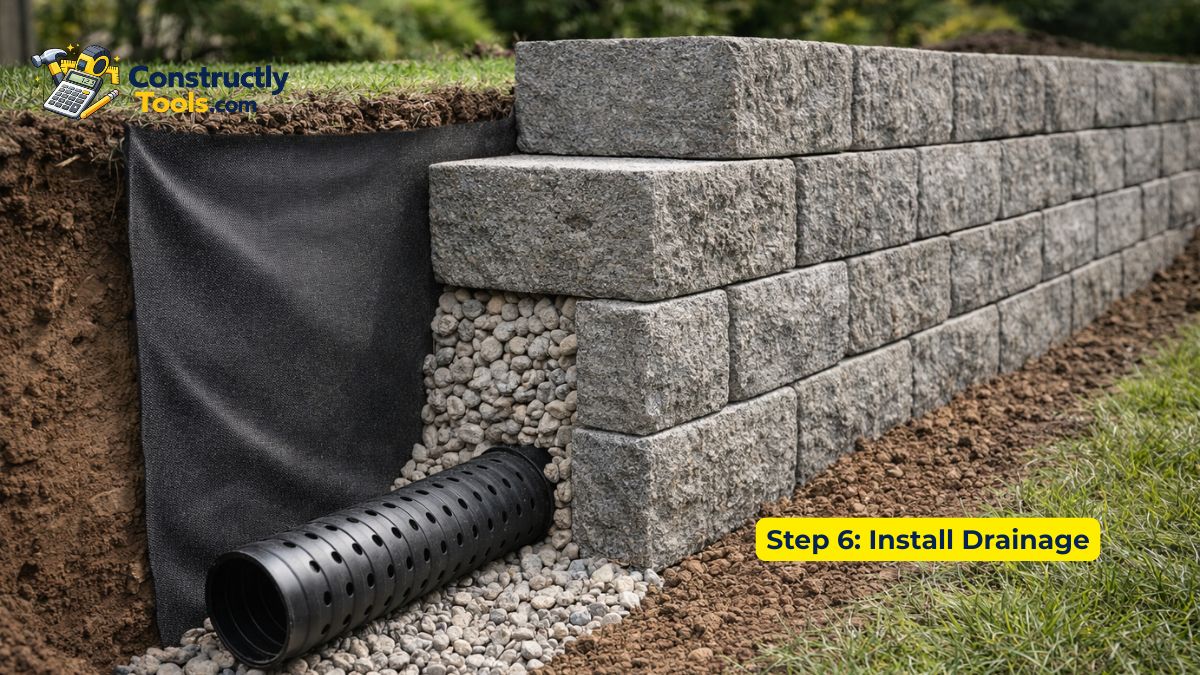
Poor drainage is the #1 cause of retaining wall failure. Water trapped behind the wall builds up hydrostatic pressure that can push the wall outward or cause it to collapse entirely. Do not skip this step.
- Lay landscape fabric against the slope behind the wall — this prevents soil from migrating into the drainage layer over time.
- Place a 4-inch perforated drain pipe along the base of the wall, holes facing down, on top of the first course of gravel.
- Make sure the pipe slopes slightly (1 inch per 10 feet minimum) toward a daylight outlet — a point where water can drain freely out the end of the wall or into a catch basin.
- Cover the pipe and the area behind the wall blocks with clean drainage gravel (pea gravel or ¾ inch clean stone) — at least 12 inches wide.
- Fold the landscape fabric over the top of the gravel before backfilling with native soil.
Not sure how much drainage gravel you need? Use our Pea Gravel Calculator to estimate the exact amount based on your wall length and gravel depth.
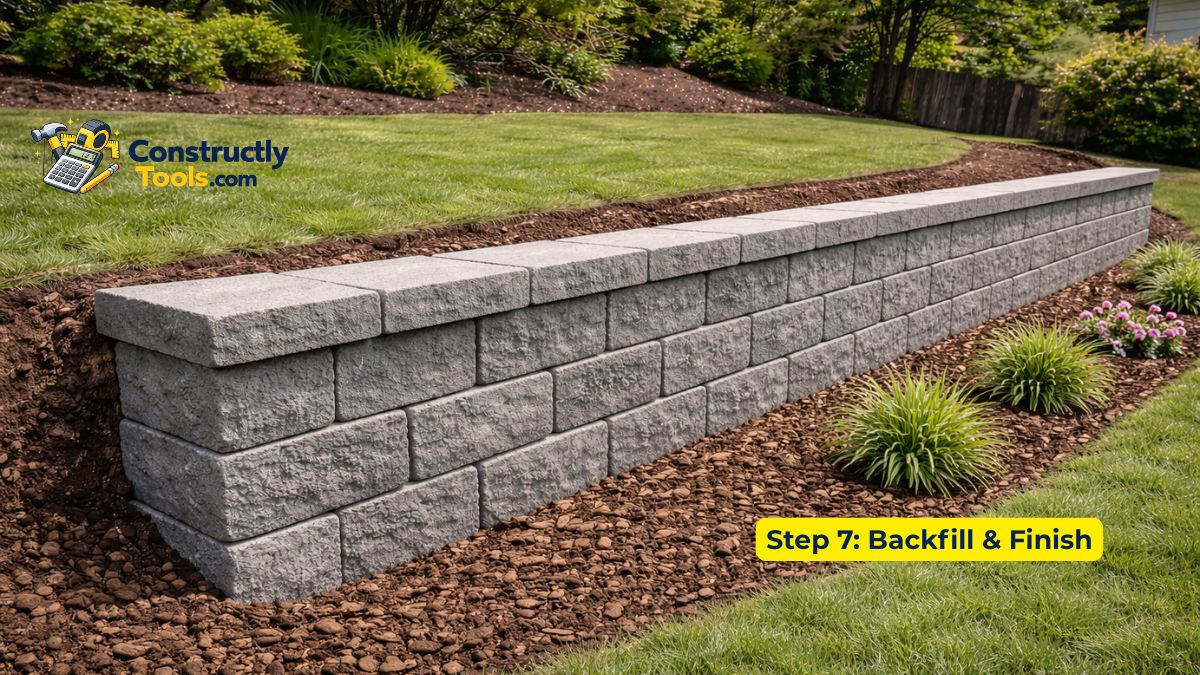
With the wall built and drainage installed, it's time to backfill and add the finishing touches.
- Backfill in layers — add 6–8 inches of native soil behind the drainage gravel, then compact it with the plate compactor before adding more. Never dump all the soil at once — compacting in lifts prevents future settling.
- Keep soil below the top course — finished soil grade should sit at least 1–2 inches below the top of the wall to prevent soil from washing over the face.
- Install capstone blocks — lay the decorative cap blocks along the top course using construction adhesive for a clean, finished look. Press firmly and allow 24 hours to cure before loading with soil.
- Grade the surface — slope the soil behind the wall slightly away from the wall face to direct surface water toward drains rather than letting it pool against the wall.
- Clean the wall face — wipe down the block faces with a damp cloth to remove any soil or gravel dust for a crisp, clean finish.
Allow the wall to settle for a few weeks before planting directly against it. Avoid heavy machinery on top of the backfill for at least 30 days. Inspect after the first heavy rain to confirm drainage is working as intended.
Pro Tips & Common Mistakes
Common Mistakes to Avoid
- Skipping the buried first course — the most common DIY mistake. Always bury at least the full depth of one block below grade.
- No drainage — walls without drainage fail faster than any other reason. Always install a drain pipe and gravel layer.
- Building too tall for the material — timber walls should not exceed 4 feet without engineering. Concrete block can go higher with proper geogrid.
- Using the wrong gravel — do not use pea gravel for the compacted base. Use crushed angular gravel (¾ inch crusher run) which locks together when compacted. Save pea gravel for the drainage layer only.
- Not staggering joints — stacked joints are a weak point that will crack and shift over time.
- Building on wet or frozen ground — always build on stable, unfrozen soil.
Pro Tips
- Lay out all your blocks alongside the trench before starting to make sure you have enough material.
- Take photos of the drainage pipe location before covering it — you'll thank yourself later if repairs are ever needed.
- For long walls, set up a string line at the height of each course and work to that line instead of checking each block individually.
- Rent a block splitter instead of hand-chiseling — it's faster, safer, and gives cleaner cuts. Many tool rental shops carry them.
- If building on a hillside with a significant slope, step the base of your trench rather than trying to make it all one level — this is called a "stepped footing" and is much stronger than a sloped base.