- Before You Start
- Materials & Tools Needed
- Step 1 — Plan & Mark the Area
- Step 2 — Excavate & Prepare the Base
- Step 3 — Build the Forms
- Step 4 — Install Rebar or Wire Mesh
- Step 5 — Order & Pour the Concrete
- Step 6 — Screed & Float the Surface
- Step 7 — Finish & Texture the Surface
- Step 8 — Cure the Concrete
- Pro Tips & Common Mistakes
- FAQs
Before You Start
Pouring a concrete slab is one of the most satisfying — and most unforgiving — DIY projects a homeowner can tackle. Once the concrete is mixed and poured, you have 30–60 minutes to get everything right before it begins to set. That urgency means that thorough preparation is non-negotiable. Every minute saved in planning is worth ten minutes of frantic scrambling at the pour.
Professional concrete flatwork costs $4–$8 per square foot installed in 2026 — a 12×16 ft patio slab runs $800–$1,500 in labor alone. DIY materials for the same slab cost $300–$600. The savings are significant, but success requires respecting concrete's demands: proper base preparation, correct mix strength, well-built forms, adequate reinforcement, and proper curing.
What This Guide Covers
This guide covers residential flatwork: patios, sidewalks, shed pads, and garage floors — rectangular slabs 4–6 inches thick. Structural slabs, foundation walls, steps, and decorative concrete are beyond its scope. Use our concrete volume calculator to find your exact cubic yards and bag count before purchasing materials.
Do You Need a Permit?
Most municipalities require a permit for concrete slabs attached to or immediately adjacent to a house (like patios and garage floors). Detached garden slabs under a certain size (often 200 sq ft) are sometimes exempt. Always check with your local building department before starting — pouring without a required permit can complicate home sales and insurance claims.
Use our Concrete Volume Calculator to get exact cubic yards for ready-mix delivery or bag count for hand-mixing — with a built-in 10% overage factor. Ordering short and running out mid-pour creates a cold joint that weakens the slab permanently.
Materials & Tools Needed
The list below covers a standard 10×12 ft patio slab, 4 inches thick — approximately 1.5 cubic yards of concrete. Use our concrete volume calculator to adjust quantities for your specific dimensions.
Materials
| Material | Purpose | Quantity (10×12 ft, 4") |
|---|---|---|
| Concrete (ready-mix or bags) | The slab itself | ~1.5 cu yd ready-mix or ~55 80-lb bags |
| 2×4 or 2×6 dimensional lumber | Form boards | Perimeter length + 10% = ~50 linear ft |
| Form stakes (wood or metal) | Hold forms in place | 1 stake every 2–3 ft = ~20 stakes |
| Duplex nails (1.5") | Fasten forms to stakes | 1 box |
| #4 rebar (½" diameter) or 6×6 WWM | Reinforcement | Rebar on 18" grid or single layer of mesh |
| Rebar chairs (2" plastic) | Hold rebar at mid-depth | 1 per 4 sq ft = ~30 |
| Compactable gravel (¾" base) | Stable, draining sub-base | ~2 tons for 4" base on 10×12 ft area |
| Plastic sheeting (6-mil poly) | Vapor barrier (garage floors) | Area + 12" overlap each side |
| Release oil or form release spray | Prevent forms sticking to concrete | 1 can |
| Expansion joint foam | Isolate slab from adjacent structures | Perimeter where slab meets house or existing concrete |
Tools
- Excavation tools — spade, flat shovel, wheelbarrow, tamper or plate compactor (rent)
- Layout tools — mason's line, stakes, tape measure, speed square, line level
- Form tools — circular saw, hammer, drill, torpedo level
- Screeding tools — 2×4 screed board (cut to span the forms), darby float (bull float on extension handle)
- Finishing tools — magnesium hand float, steel trowel, edger tool, groover tool, broom (for texture)
- Safety — rubber boots (wear inside the pour), nitrile gloves, eye protection, knee boards (for finishing)
- Concrete chute/pump — if using ready-mix, coordinate truck access to the site
- Mixer — electric or gas concrete mixer (rent) if mixing bags
A plate compactor ($80–$120/day rental) is essential for a proper base — hand tamping is inadequate for anything larger than a small pad. A bull float ($25–$40/day) dramatically improves surface quality on slabs wider than 4 feet. Both are worth renting. A concrete mixer rental ($50–$80/day) is worthwhile if doing more than 10 bags — mixing by hand in a wheelbarrow is exhausting and inconsistent.
Accurate layout is what separates a slab that looks professional from one that looks like it was poured by feel. Taking the time to establish true square corners and accurate grade marks before a single shovel goes in the ground saves enormous frustration during forming and pouring.
- Call 811 before you dig — in the US, call 811 (or visit call811.com) at least 3 business days before any excavation. This is free and legally required. Utility companies will mark underground lines. Hitting a buried gas, water, or electrical line is extremely dangerous and costly.
- Determine the finished slab elevation — the top of your slab must slope away from any adjacent structure at minimum 1–2% (¼ inch per foot) for drainage. Calculate your finished height at the high point (nearest the house) and the low point (outermost edge).
- Square the layout using the 3-4-5 method — drive stakes at each corner. To establish a true 90° corner: measure 3 ft along one side, 4 ft along the adjacent side — the diagonal between those two points must be exactly 5 ft. Adjust until it is. This ensures your slab is a true rectangle.
- Set batter boards and string lines — for large slabs, set batter boards (stakes with crosspieces) several feet outside each corner and stretch mason's line along the perimeter. This lets you verify square and level throughout forming without the corner stakes getting in the way.
- Mark the excavation area — spray paint the excavation outline on the ground 6 inches outside the slab perimeter on all sides (to allow room for forms).
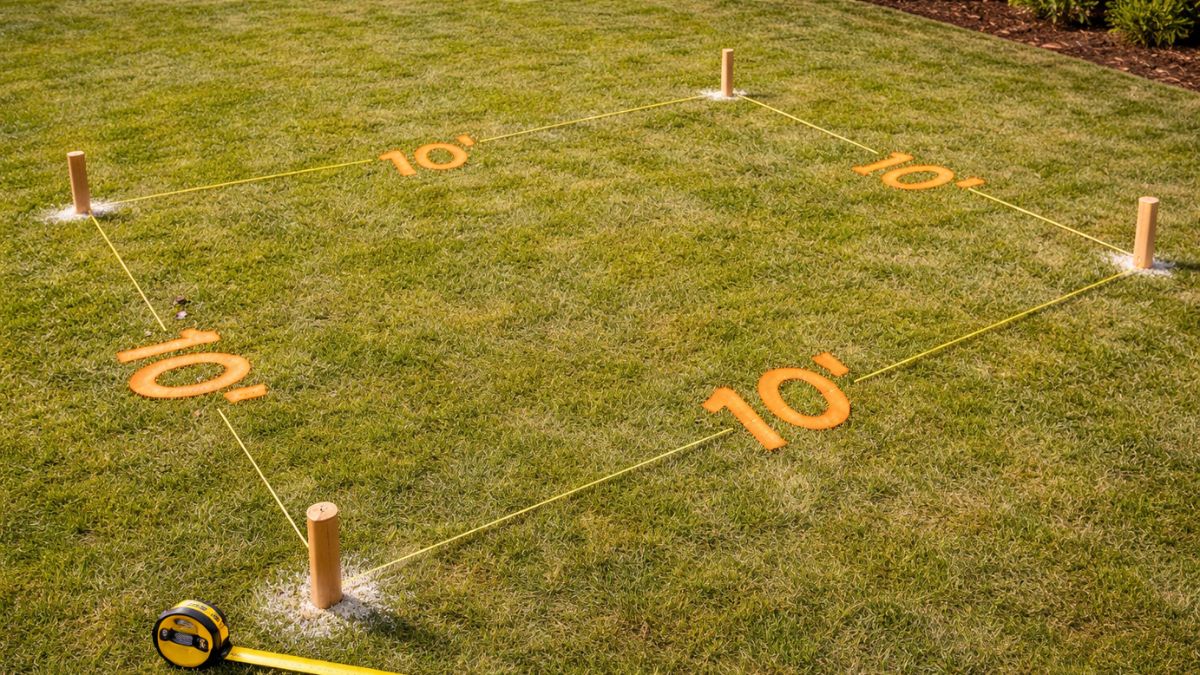
Once your string lines are set, measure diagonally from corner to corner in both directions. The two diagonal measurements must be identical for the layout to be perfectly square. A difference of even ¼ inch will be visible in the finished slab. Adjust string lines until both diagonals match exactly before beginning excavation.
The base under a concrete slab is as important as the concrete itself. A poorly prepared base — insufficient depth, inadequate compaction, or unstable soil — causes slabs to crack, settle, and heave regardless of concrete quality. This step is where most DIY concrete failures originate.
- Excavate to the correct depth — for a 4-inch slab, excavate 8–10 inches below finished grade (4" slab + 4" compacted gravel base). For a 6-inch garage floor slab, excavate 10–12 inches. Remove all organic material (topsoil, roots, grass) — organic material compresses and decomposes under concrete, causing settling and cracking.
- Remove and dispose of excavated material — topsoil from the excavation can be used to grade other areas of the yard. Haul away anything else. Use our fill dirt calculator to estimate removal or backfill volumes.
- Compact the native soil — use a plate compactor to compact the exposed subgrade. Make multiple passes in different directions. If the soil is sandy or loose, dampen it slightly before compacting. If you hit soft spots, dig them out and fill with compactable gravel.
- Install the gravel base — spread 4 inches of clean compactable gravel (¾" crushed stone or road base) in 2-inch layers, compacting each layer thoroughly with the plate compactor before adding the next. The finished gravel surface should be firm and not give when walked on. Use our gravel calculator to calculate tons needed.
- Check grade — stretch a level string line across the compacted base and measure down to verify consistent depth. The base should slope to match your planned slab slope. A consistent base depth ensures consistent slab thickness — uneven thickness creates weak points.
- Install vapor barrier (garage floors) — for enclosed garage slabs, lay 6-mil polyethylene sheeting over the compacted gravel before forming. Overlap seams by 12 inches. This prevents ground moisture from wicking up through the slab, protecting vehicles, stored items, and finishes.
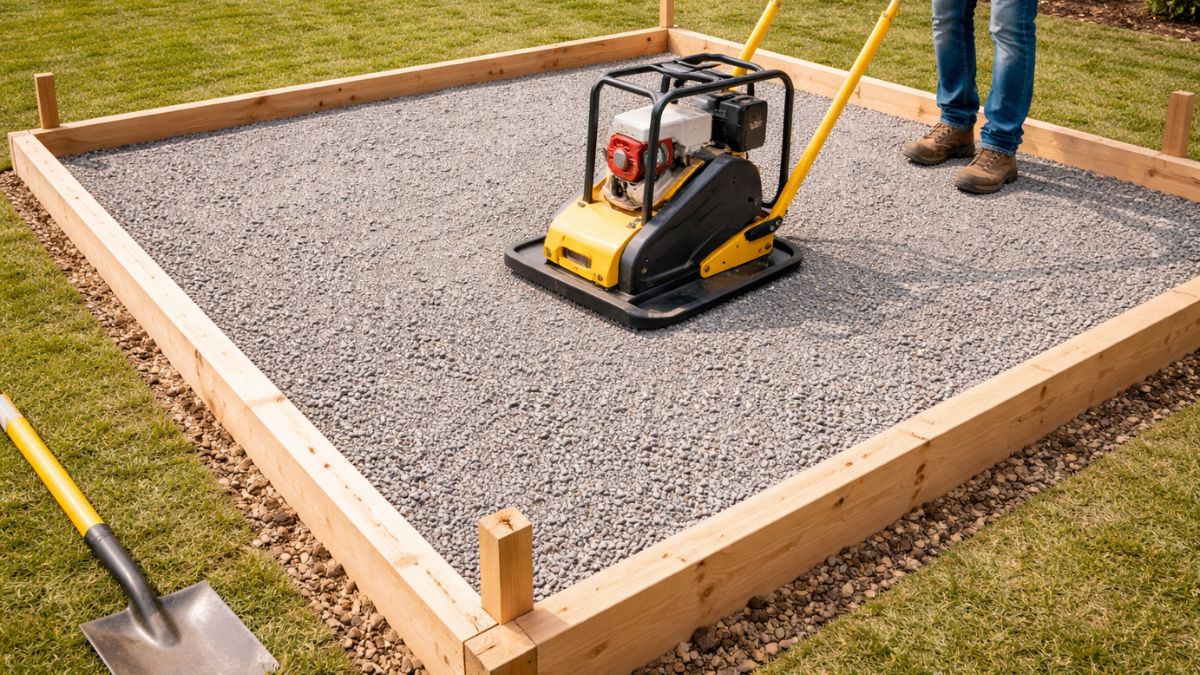
The most common cause of slab cracking and settling is an inadequate base. Even high-quality concrete will crack if it's poured on soft, uncompacted, or organic soil. Take an extra hour on this step — the plate compactor is the single most important tool for a long-lasting slab. If the soil under your excavation is particularly clay-heavy or wet, consider adding a geotextile fabric layer before the gravel base.
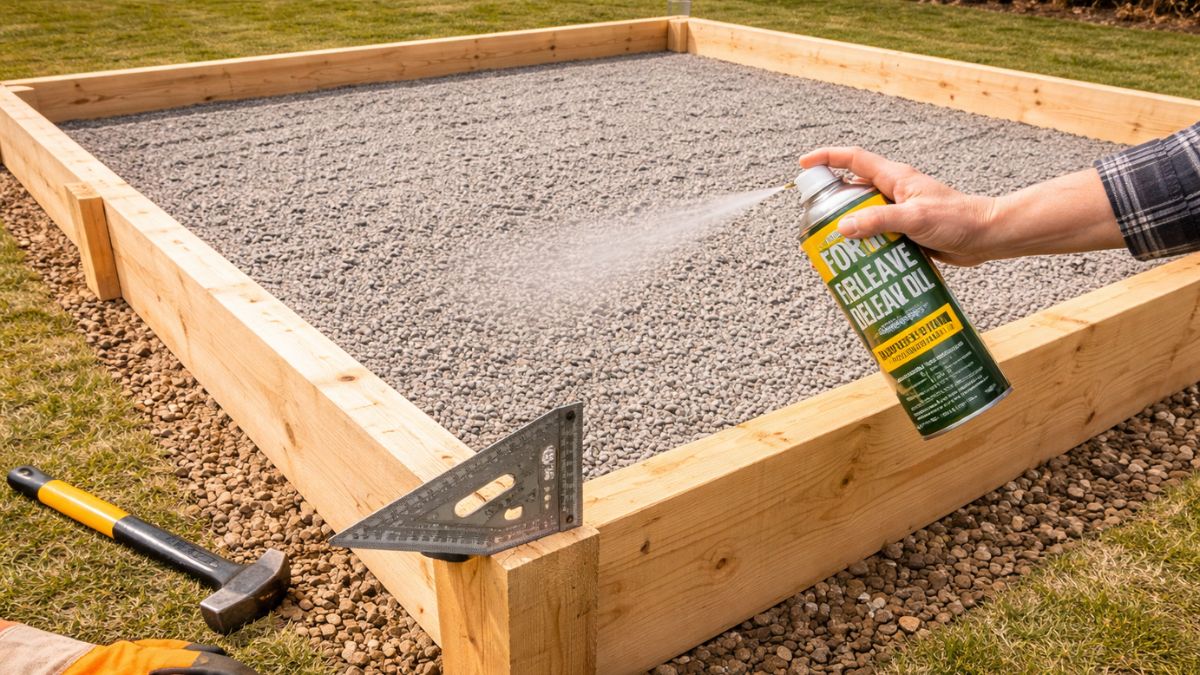
Forms are the molds that give your concrete its shape and finished edges. They must be strong enough to hold the lateral pressure of wet concrete without bowing, perfectly level at the top (since you'll screed across them), and treated so they release cleanly from the hardened slab.
- Choose the right lumber — use 2×4 lumber for 4-inch slabs, 2×6 for 6-inch slabs. The lumber nominal thickness matches the slab depth, making the top of the form exactly level with the planned slab surface. Standard construction lumber (Douglas fir or Southern yellow pine) works fine for forms — you don't need premium wood since it gets removed after the pour.
- Cut boards to length — measure and cut form boards to fit the perimeter. For a 10×12 ft slab: two 12-ft boards for the long sides, two 10-ft boards for the short ends (or two 9 ft boards if the side boards overlap the ends — your choice, either works).
- Set forms to correct grade — position each form board along the string line at the correct height. Drive stakes every 2–3 feet on the outside of each form board and nail or screw the form to the stakes. Use a long level to verify the top of each form is at the correct height and slope.
- Check for level and square — use a level across the top of opposite form boards to verify consistent height. Re-check the diagonal measurements — the corners must still be exactly square. Any error in the forms will be locked permanently into the concrete.
- Brace against bowing — concrete exerts significant lateral pressure on forms. Add extra stakes at 2-foot intervals on long runs and kicker stakes (driven at an angle) at corners where needed. A bowed form creates a wavy edge that looks unprofessional and can't be fixed after the pour.
- Apply release agent — spray or brush form release oil on all interior form surfaces before the pour. This prevents the concrete from bonding to the wood, making form removal easy and preventing wood from pulling out chunks of the concrete edge. Cooking spray or used motor oil works as a budget alternative.
- Install expansion joint foam — wherever the slab meets an existing structure (house foundation, existing concrete, etc.), install ½-inch expansion joint foam against the existing surface before pouring. This allows independent movement of the slab and prevents cracking from thermal expansion.
Before the pour, mark a line on any vertical surfaces (house walls, posts) at the planned top-of-slab height. These marks are lifesavers during the pour when you can't see the form tops through fresh concrete. They also help you verify the screed is hitting the right level as you work.
Concrete is strong in compression but weak in tension. Reinforcement — rebar or welded wire mesh — carries the tensile forces that occur when a slab is loaded or when ground movement creates bending stress. For residential patios and sidewalks in stable soil, wire mesh is adequate. For driveways, garage floors, and areas subject to vehicle traffic or soil movement, #4 rebar on an 18-inch grid is strongly recommended.
- Choose your reinforcement — Welded Wire Mesh (WWM) 6×6-W1.4×W1.4 is the standard for patios and walkways. #4 rebar on 18" centers each way is standard for driveways, garage floors, and vehicle-bearing slabs. Rebar provides significantly more tensile strength but requires more labor and cost.
- Position reinforcement at mid-depth — reinforcement works only when positioned at the correct depth. For a 4-inch slab, reinforcement should be at 2 inches from the bottom. Use 2-inch plastic rebar chairs or wire bolsters to hold it off the base. Reinforcement sitting on the base (at the bottom of the slab) provides almost no structural benefit.
- For rebar: lay the grid — cut rebar to length with a bolt cutter or angle grinder. Lay horizontal bars first, then vertical bars on top. Tie intersections with rebar tie wire using a rebar tying tool or pliers. The grid should stop 2 inches from all form edges to prevent the rebar from being exposed at the slab edge.
- For wire mesh: unroll and cut — wire mesh comes in rolls and is notoriously springy. Unroll it inside the forms, cut to fit 2 inches from all edges, and weigh down with pieces of rebar or rocks to keep it flat. Lap mesh seams by one full grid square minimum.
- Place rebar chairs — set plastic rebar chairs every 3–4 feet under the reinforcement grid to hold it at the correct depth. Check that the chairs are stable and the reinforcement doesn't sag between support points.
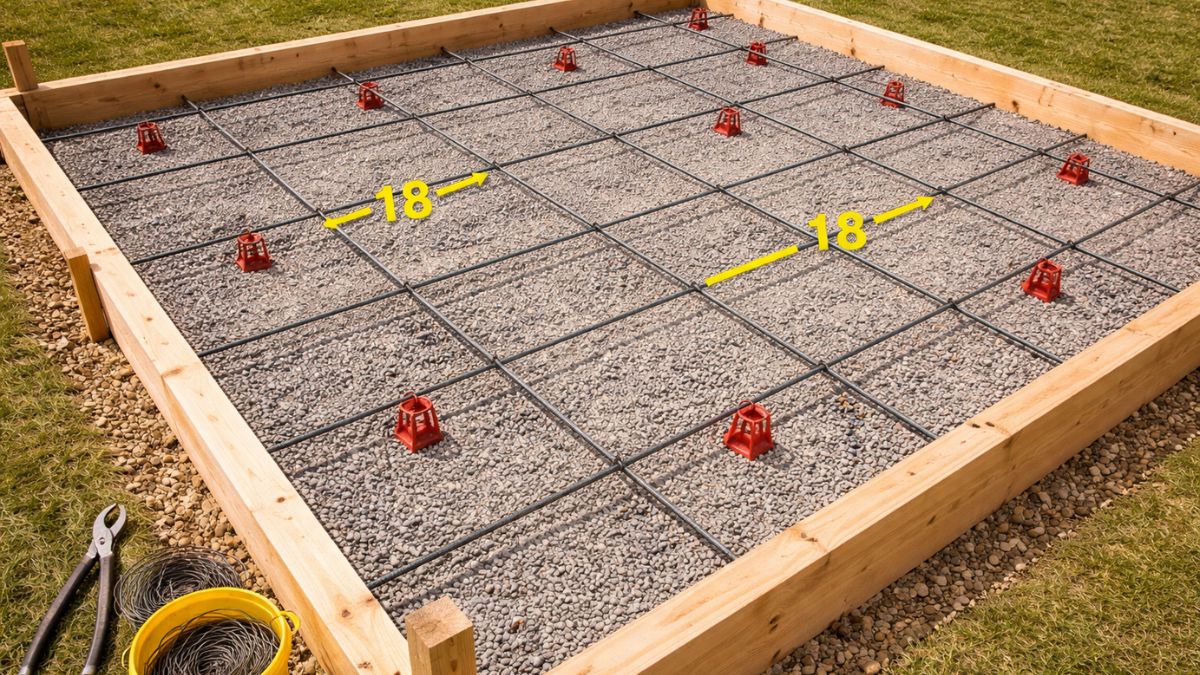
Use our Rebar Calculator to find the exact bar count, total linear footage, and weight for your slab dimensions and spacing. This prevents over- or under-ordering at the lumber yard.
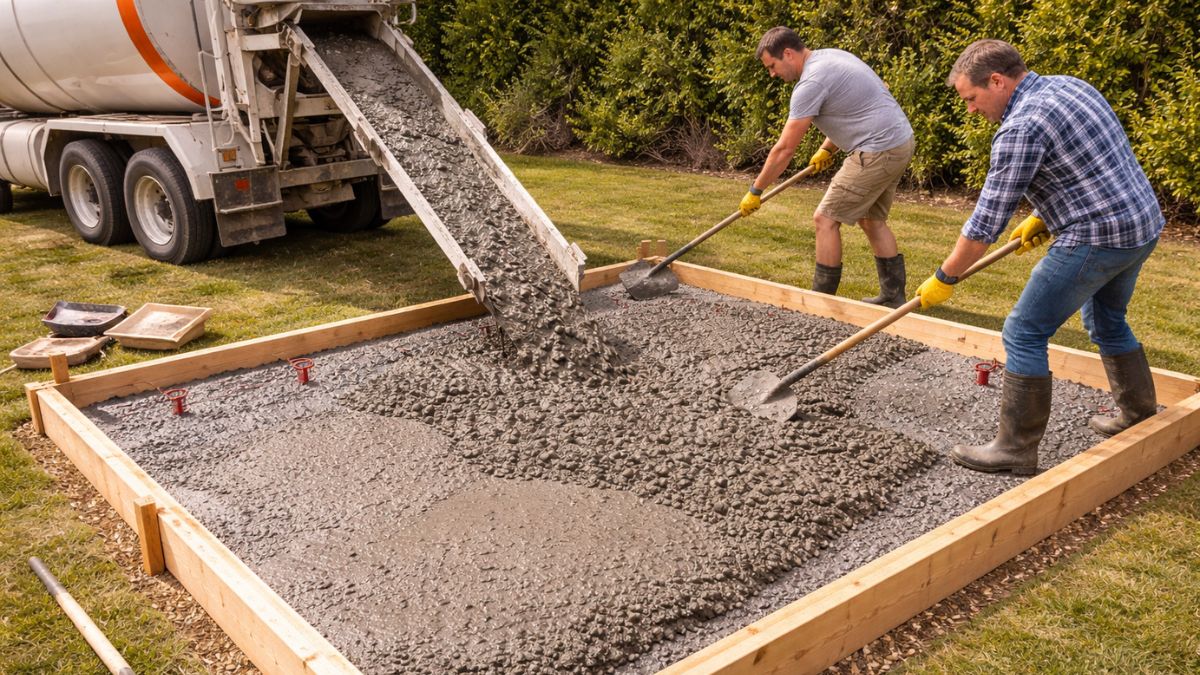
The pour is the most exciting and most time-sensitive step. Once concrete starts flowing, the clock is running. Every person who's going to help must be briefed and in position before the truck arrives. Concrete waits for no one.
Choosing Ready-Mix vs Bags
| Volume | Best Option | Why |
|---|---|---|
| Under 0.5 cu yd | Bagged concrete | Ready-mix minimums and delivery fees make it uneconomical |
| 0.5 – 1 cu yd | Either | Bags give you pace flexibility; ready-mix is faster |
| Over 1 cu yd | Ready-mix strongly recommended | Consistent mix, faster pour, less labor, better for large slabs |
Ready-Mix Concrete Tips
- Order 3,000–4,000 PSI mix for residential slabs — specify fiber-reinforced concrete for driveways (adds crack resistance). For garage floors subject to deicing salts, request air-entrained concrete (4–7% air content) to prevent freeze-thaw spalling.
- Order 10% more than calculated — never run short mid-pour. Use our concrete volume calculator and add 10% to the result.
- Coordinate truck access — the truck must get close enough for the chute to reach the pour area. Clear the access path before the truck arrives. If the truck can't reach the forms, you'll need to wheelbarrow concrete from the chute — plan this and have enough wheelbarrows and helpers.
- Start at the far end, work backward — pour concrete starting at the point farthest from the truck and work toward the truck. Never dump concrete in one spot and drag it — this separates the aggregate and weakens the mix. Move the chute to distribute concrete close to its final position.
- Consolidate against forms — use a shovel or concrete vibrator to work concrete into corners and against form edges, eliminating voids. A rented pencil vibrator dramatically improves quality by releasing trapped air bubbles — essential for any slab thicker than 4 inches.
It's tempting to add water to stiffen or loosen the mix if it seems wrong — don't. Every additional gallon of water per cubic yard reduces concrete strength by approximately 200 PSI and dramatically increases cracking risk. If the mix seems too stiff, have the plant add a plasticizer (water reducer admixture) before delivery. If it's too wet, refuse the load and have a new batch mixed correctly.
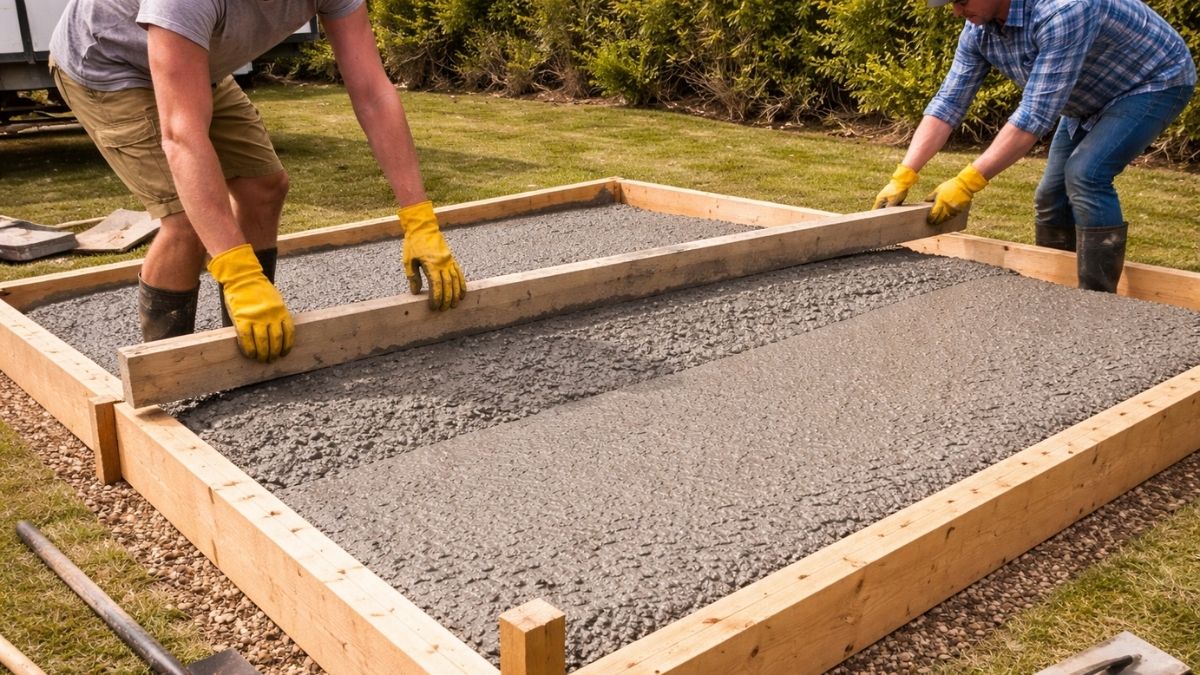
Screeding is the process of striking off excess concrete and leveling the surface to the height of the form tops. Floating follows immediately, embedding aggregate below the surface and creating a smoother finish that's ready for final texturing. Work quickly and efficiently — concrete is setting the entire time.
- Screed immediately after pouring each section — don't let concrete sit unscreeded. Place a straight 2×4 screed board across the top of opposite form boards and move it in a sawing motion from side to side while pulling it toward you. The screed removes excess concrete and fills low spots simultaneously.
- Fill low spots — after the first screed pass, shovel concrete into any obvious low areas and screed again. It typically takes 2–3 screed passes to get a truly flat surface.
- Bull float immediately after screeding — push a bull float (a large flat float on an extension handle) across the wet concrete in overlapping passes. The bull float embeds coarse aggregate below the surface and closes the surface voids left by screeding. Always keep the leading edge slightly raised to avoid digging in.
- Wait for the bleed water to disappear — after floating, a sheen of water (bleed water) appears on the surface. This is normal. Wait until this sheen disappears and the surface loses its glossy look before doing any final finishing. Finishing while bleed water is present traps water in the surface and dramatically weakens it — causing scaling, dusting, and peeling later.
For finishing the center of slabs wider than 4 feet, you need to work from inside the slab — not from the edges. Use knee boards (2×2 ft sheets of plywood) to kneel on without leaving marks in the fresh concrete. Move them as you work across the slab. Never step directly on fresh concrete without knee boards — footprints are nearly impossible to eliminate once made.
Finishing defines the final look and function of the slab surface. The timing of finishing is critical and varies with weather conditions — hot, dry, windy days mean faster setting and less working time. Cool, humid days give you more time. Watch the concrete, not the clock.
- Edge the perimeter — run an edging tool along all form edges to create a smooth rounded corner. A rounded edge is stronger than a sharp edge (which chips easily) and looks more finished. Edge after the bleed water disappears and when the concrete holds the tool without slumping.
- Cut control joints — use a groover tool to cut control joints into the slab at regular intervals. Control joints are planned weak points that direct where the slab will crack as it shrinks during curing — keeping cracks straight and hidden in the joint rather than random across the surface. Space joints at 8–10 feet for 4-inch slabs, or every 2–3 times the slab thickness in feet. Cut joints ¼ of the slab depth (1 inch deep for a 4-inch slab).
- Float the surface — work a magnesium hand float over the entire surface in a smooth circular motion. The float closes surface voids, embeds aggregate, and creates the final base texture. Apply moderate pressure and keep the float flat against the surface.
- Trowel for smooth finish (optional) — for a smoother surface (garages, indoor slabs), follow floating with a steel trowel, applying pressure in sweeping arcs. Multiple trowel passes — each at a slightly higher angle — compress the surface and create a hard, dense finish. This requires practice and proper timing — too early and the trowel sinks; too late and it won't move.
- Broom for textured finish (patios, driveways) — for outdoor slabs that need traction, drag a stiff-bristled broom lightly across the floated surface in parallel strokes. Broom finish provides excellent slip resistance in wet conditions. Apply broom texture after floating but before the surface becomes too stiff — typically 30–60 minutes after floating, depending on conditions.
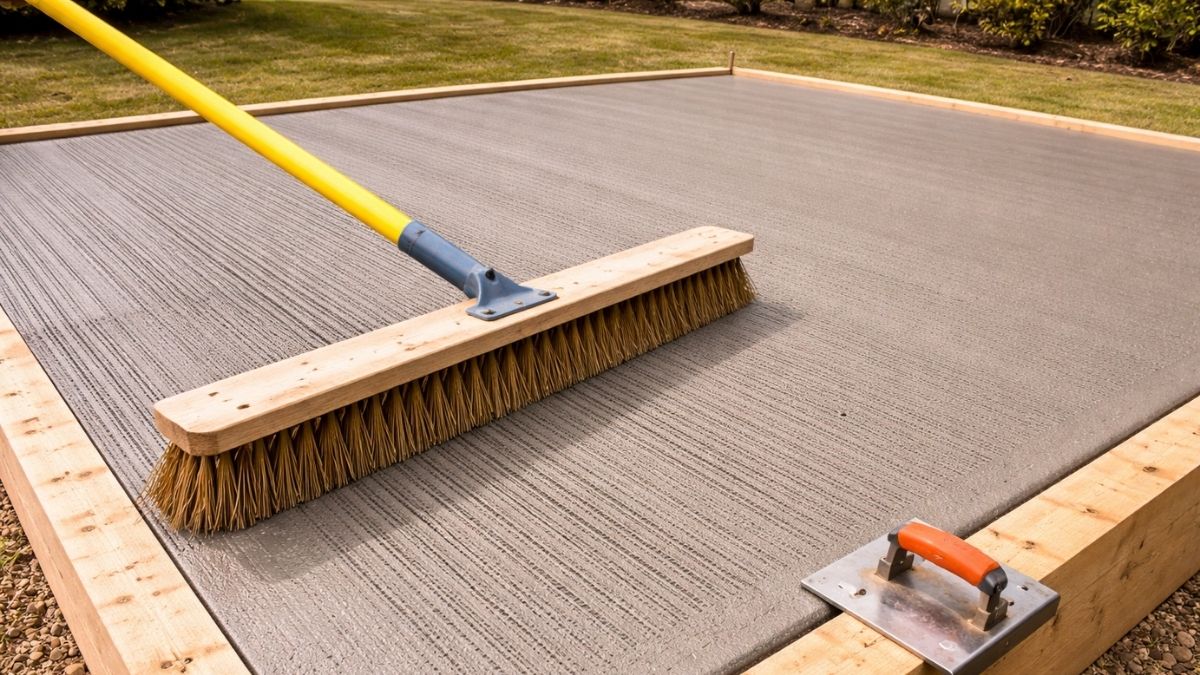
A broom finish is the best choice for patios, driveways, and sidewalks — it provides excellent traction in wet conditions with minimal additional effort. Draw the broom in straight parallel lines from one side to the other, overlapping each pass by half a bristle width. Consistent broom pressure and speed gives a uniform texture. Always broom perpendicular to foot traffic direction for maximum slip resistance.
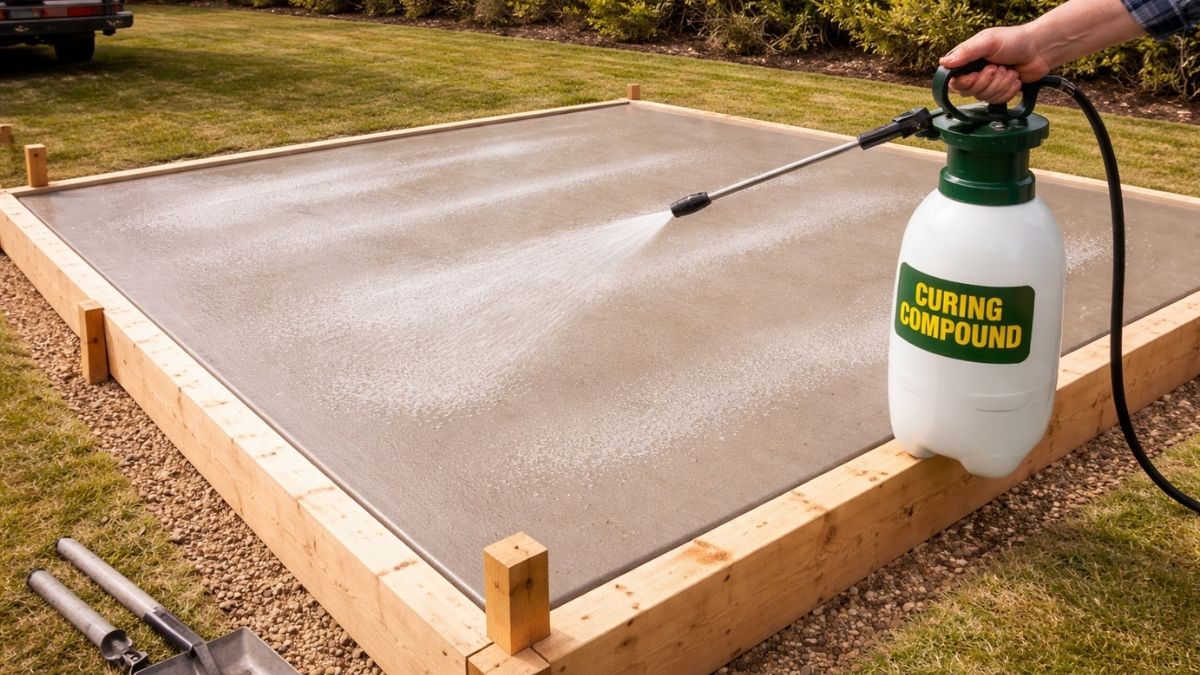
Curing is the most overlooked step in DIY concrete work — and one of the most critical. Concrete doesn't harden by drying; it hardens through a chemical reaction (hydration) between cement and water. If the concrete dries too fast, the reaction stops prematurely and the slab can lose up to 50% of its design strength. Proper curing keeps moisture in the concrete for a minimum of 7 days.
- Apply curing compound immediately after finishing — spray a liquid curing compound on the slab surface as soon as finishing is complete. Curing compound seals the surface to retain moisture. Apply in overlapping passes for complete coverage. This is the easiest and most effective curing method for most residential projects.
- Alternative: cover with plastic sheeting — lay 6-mil polyethylene sheeting over the slab and tape or weight the edges so it doesn't blow off. Check daily and re-wet the surface if it appears to be drying through the edges. Plastic sheeting can cause color variations (blotchy appearance) on decorative or exposed aggregate slabs.
- Alternative: wet burlap method — for high-quality architectural slabs, cover with burlap and keep it continuously wet for 7 days. This is more labor-intensive but provides superior curing.
- Protect from temperature extremes — in cold weather (below 50°F), cover the slab with insulating blankets to prevent freezing, which can destroy uncured concrete entirely. In hot weather (above 90°F) or direct sun, shade the slab and apply extra water to prevent the surface from drying faster than the interior.
- Remove forms after 24–48 hours — once the concrete is hard enough to hold its shape (typically 24–48 hours), remove form boards by pulling stakes and prying the boards away from the slab. Remove stakes and any nails carefully to avoid chipping the slab edge.
- Respect curing timelines before use — light foot traffic: 24–48 hours. Furniture and full pedestrian load: 7 days. Vehicle traffic (passenger car): 28 days. Heavy vehicles: 28 days minimum, ideally longer. Allowing vehicle traffic before 28 days can cause permanent surface damage on residential slabs.
A properly poured and cured slab will last 25–50+ years with minimal maintenance. Seal the surface with a concrete sealer every 2–3 years to protect against staining, freeze-thaw damage, and deicing salt deterioration. For a patio, consider adding pavers on top in a future project to enhance the appearance — the concrete slab makes an excellent stable base.
Pro Tips & Common Mistakes
Common Mistakes to Avoid
- Inadequate base preparation — the single biggest cause of slab failure. No amount of good concrete overcomes a bad base. Compact thoroughly, use gravel, remove all organic material.
- Reinforcement on the ground — rebar or mesh sitting on the base (not on chairs) is nearly useless. Mid-depth placement is what provides tensile strength. Always use rebar chairs.
- Finishing while bleed water is present — working the surface before bleed water disappears traps water in the top layer, causing scaling, dusting, and surface weakness. Patience here pays for itself over the life of the slab.
- Adding water to the mix on site — reduces strength dramatically. Specify the correct slump at the plant rather than adjusting on site.
- Skipping control joints — concrete will crack. Control joints tell it where to crack. Without them, cracks appear randomly across the surface — with them, cracks hide inside the joints.
- Pouring in freezing temperatures without protection — concrete poured below 40°F and allowed to freeze before curing is destroyed. In cold weather, heat the subgrade and aggregates, use hot mix water, and insulate the slab after pouring.
- Removing forms too early — forms are structural support during the first 24 hours. Removing them at 12 hours on a warm day is tempting but risks edge damage. Wait 24–48 hours minimum.
Pro Tips
- Do a dry run — gather all tools, walk through every step with your crew, and identify problems before the concrete arrives. A 20-minute dry run prevents costly panics during the pour.
- Have more helpers than you think you need — for a 10×12 ft slab, 3 people is minimum for a ready-mix pour: one at the chute, one screeding, one floating. Four is better.
- Pour in the morning — concrete sets slower in cooler morning temperatures, giving you more working time. Avoid pouring in direct afternoon sun in summer.
- Never pour on frozen ground — frozen subgrade thaws and settles after the pour, cracking the slab. If ground is frozen, apply heat or wait for a thaw.
- Use a concrete vibrator for slabs thicker than 4 inches — a pencil vibrator consolidates the mix, eliminates voids, and dramatically improves final strength. Well worth the $25–$40 rental cost.
- Wet the forms and subgrade lightly before the pour on hot days — this prevents the wood and base from absorbing water from the concrete mix, which can accelerate setting and reduce strength at the base of the slab.